 When I moved into my home 2 years ago, I started each day by facing a large blank wall. The wall was in my bathroom and faced my glass enclosed shower. Fortunately, thrift store "art" came to my rescue!
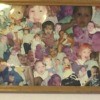
I made a plan and began purchasing framed pictures at local thrift stores. I only purchased pictures that contained flowers, had a gold frame, and cost $5 or less. There were no exceptions to this budget and many pictures were purchased for $0.50 to $2. For less than $100, I soon had what I needed to create my flower wall.
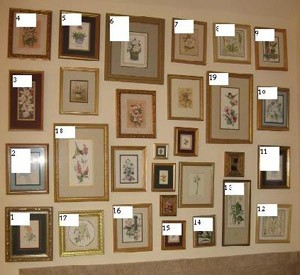
To determine how the pictures would be hung, I started by placing 4 pictures on the floor to form the corners of the grouping and limit the size to the wall space available. These eventually became pictures 1, 4, 9, and 12. I then placed the 2 large pictures that I wanted inside the grouping. Pictures 18 and 19 were placed at a diagonal to pictures 1 and 9. With the exception of pictures 18 and 19, any two pictures that formed a set were spaced at random points in the grouping. Examples are pictures 5 and 11, 8 and 12, 9 and 16. I had one set of three and found that 3 coordinating pictures did not do well in what was intended to be a random grouping. Various groupings were tried on the floor until I was satisfied with the plan. The common color of gold frames and common theme of flowers unified the grouping. A theme and/or color scheme for your grouping is recommended.
Even with a "floor plan", hanging the pictures on the wall can be a challenge. Some people, tape together newspaper, draw around each frame in the floor plan, then tape the newspaper to the wall as a guide. I didn't find that method to be satisfactory. Below is the measurement method I finally developed to determine where to place the nails and avoid multiple nail holes in the wall. It may seem complicated, but it actually worked well for me.
I learned thrift stores are a treasure trove for new or gently used wall art. Many still have the price tags and protective corners in place. I have pictures of fruits, vegetables, and herbs hanging in my kitchen; all are thrift store finds. I am now buying mirrors of various sizes and shapes to create another wall grouping. The $5 budget still applies to each item.
I have other pictures hanging in my home that were purchased years ago and cost more. I tend to spend more time admiring my thrift store art, because I begin each day facing a wall of flowers that reminds me to be creative and thrifty.
Measurements To Hang Pictures: I started by hanging corner pictures 1, 4, 9, and 12. Again these 4 pictures determined the overall size of the grouping. To hang picture #1, measure the distance from the bottom edge of the sawtooth hanging bracket to the bottom edge of the frame and add the distance the frame should be from the bottom of the wall or in my case the tile border. Then measure from the center of the sawtooth bracket to the edge of the frame and add the distance the frame should be from the corner of the wall. The intersection of these two measurements determines the location of the first nail. Use this method to measure from the hanging bracket to the top side or bottom of the picture as needed to determine the nail positions of pictures 4, 9, and 12.
Pictures 2 and 3 were hung next by taking the following measurements.
To hang picture 2, measure the distance from the bottom edge of the sawtooth bracket to the bottom edge of the frame and added the distance between pictures (2). This is the distance the nail should be ABOVE THE TOP EDGE of picture #1. Then measure from the center of the sawtooth bracket to the edge of the frame and add the distance from the corner of the wall. Now you have the nail position. After hanging picture #2, double check your remaining wall space needed above and below picture #3 by repeating steps 1 through 4 above measuring only the distance between pictures 2 and 4. Measure from the top, bottom, or side as needed to determine the placement of remaining border pictures.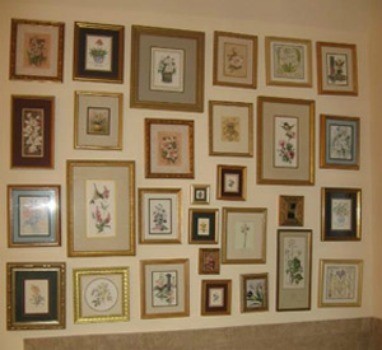
By The Aunt from Dacula, GA
I liked your idea of the unifying theme and all the frames the same. Artists prefer to have all the pictures in a show framed the same. One thing that I would suggest, that I think would make a wall like this easier to design, and also more unified, would be to start with the middle and work out, rather than from the corners and work in. Maintaining even spacing between the pictures whenever possible is the best way. A cluster of pictures with even spacing between them "holds" together better. I have had a lot of experience throughout my teaching career at putting up photos and such on bulletin boards, and this is how I would do it.
Thanks for sharing your idea. A lot of people are afraid to create a picture wall, and instead use only one or two small pics that are lost in the space.
I am very particular about spacing, things being straight etc...this would drive me insane! Sorry...LOL! I love your idea, just measuring would be a must for me if I did it. If I might add a tip, I use sticky tack at the corners of my frames when hanging pictures, this ensures they wont slip or move.
This too would drive me crazy. All that dusting. It is pretty but too much upkeep for me.
Aside from a cluttered appearance (and messy too if every frame is not straight), the moisture from the shower will over time do damage and it's too much upkeep, dusting and cleaning glass.