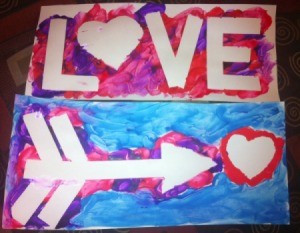
 Painting is a popular activity with many children. They can create something unique and enjoy getting a little messy in the process. These love and arrow paintings would be a fun project for kids and adults. They could be used to decorate the house or classroom for Valentine's Day or given as gifts. I love the final product so much that I plan on making more! I might try one on a canvas board next time!
Total Time: 30 minutes to make and several hours to dry
Yield: 2 paintings
Source: Pinterest for the Love painting
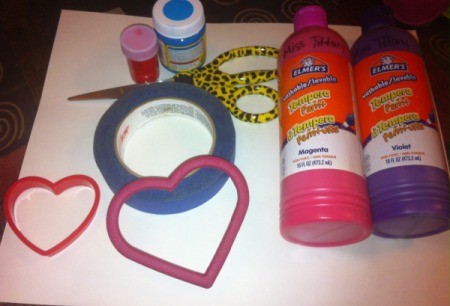
Supplies:
- 2 sheets white card stock or poster board
- finger paint (red, blue, purple, and pink)
- scissors
- painter's tape
- 1 permanent marker
- 1-2 heart stencils (I used cookie cutters.)
Steps:
- I created the heart first so I'd know how big the letters needed to be. Cut and lay down strips of painter's tape on a hard surface; I used a clip board. Make sure to overlap each strip slightly over the previous one. This will help later. Take a heart shaped stencil or cookie cutter and trace around it on the tape. Pull the tape up and cut out the heart. If you overlapped the tape and are careful, it will not separate while you cut it.
- For the love painting, cut strips of tape to form the letters, L, V, and E. Place the letters and heart on your paper.

- For the arrow painting, make the triangle and this heart the same way you made the previous heart. Then, cut out strips from the tape to form the arrow's body. Lay everything out on another piece of paper like the arrow is shooting the heart.
- Finger paint around each painting, making sure to cover every edge of tape.
- Slowly peel off the painter's tape. Be careful if you have longer nails like I do. Mine smeared paint where I didn't want it to go a of couple times! Then again, it also made it easy to lift the tape corners!
- Allow to dry and cut to be the size you wish!
Add your voice! Click below to comment. ThriftyFun is powered by your wisdom!