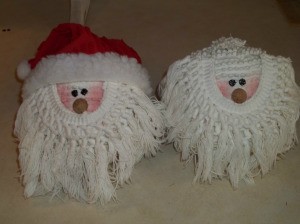
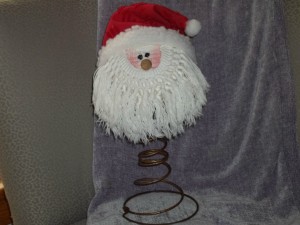
Make inexpensive Santa heads using an old chenille bedspread and a recycled bed spring. The Santa head sits on top of the bed spring, giving you a jolly decoration that stands 11 inches tall.
Advertisement
Approximate Time: 2 hours (not including drying time)
Supplies:
white chenille bedspread
scissors
red Rit dye
paper and pen
ruler
straight pins
sewing machine
faux sheep's fur
hot glue gun
1/2-inch white pompom
large-eyed needle
white crochet thread
stuffing
1/2-inch wood furniture plug
2 black snaps, size 3/0
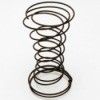
bed spring
Instructions:
Cut the fringe off a white chenille bedspread. Cut a 6-inch length and a 7 1/2-inch length. This is Santa's beard. Set the fringe aside.
Cut off a section of the bedspread. Dye this section using red Rit dye and following the manufacturer's instructions on the dye. I cut about a quarter off the bedspread because I didn't want to waste my dye and I knew I would be making more Santas.
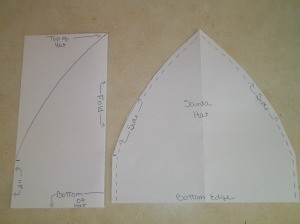
Draw an 8-inch square on paper. Cut out the square. Fold the square in half and lay it on your work surface with the fold running vertically and on the right-hand side. Measure 2 inches up from the bottom, along the left-hand edge. Mark the edge. Draw a line that curves outward slightly from the mark to the top right-hand corner. Cut along the line through both layers of the folded square. Unfold the shape. This is your Santa's hat pattern.
Advertisement
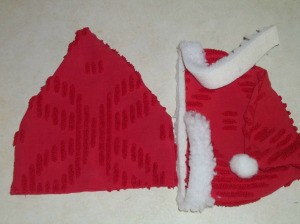
Fold the red chenille into two layers with the right sides together. Pin the hat pattern to the chenille and cut out. Remove the pattern. Pin the side edges of the hat together. Sew the pinned edges using a 1/4-inch seam allowance. Turn the hat right side out.
Cut a 1-inch wide by 16-inch long strip of faux sheep's fur. Hot glue the strip around the bottom edge of the hat and cut off the excess. Apply a dot of hot glue to the tip of the hat. Place a 1/2-inch white pom pom in the glue.
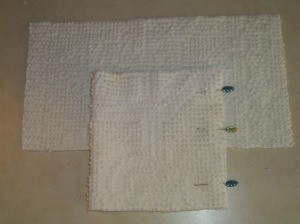
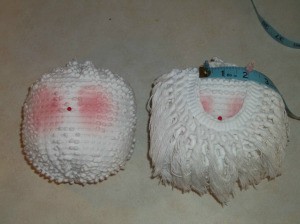
Cut a 7-inch wide by 14-inch long rectangle from the white chenille. This is Santa's head. Fold the rectangle in half with the right sides together and the short ends matching. Pin the short ends together. Sew the pinned edge using a 1/4-inch seam allowance. You now have a tube.
Advertisement
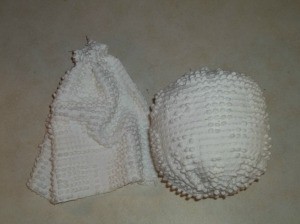
Thread a large-eyed needle with white crochet thread. Sew a running stitch around one end of the tube. Pull the thread to gather the opening closed. Knot and cut the thread.
Turn the head right side out. Fill the head with stuffing. Sew a running stitch around the open edge. Pull the thread to gather the opening closed. Knot and cut the thread. This end is the top of the head.
Turn the head so that the seam is in the back. Using blush and a paintbrush, apply two 1 1/2-inch diameter cheeks approximately 1/2 inch apart to the front of the head. Place a straight pin in the center of the face, between the cheeks. This is marking the spot for the nose.
Advertisement
Place the long edge of the shortest beard fringe below the nose-pin. Adjust the fringe so that the center of the length is right below the pin. Curve the ends upward and space 2 inches apart. Pin the fringe to the head. Place the longer fringe underneath the pinned fringe. Curve the ends upward and pin. Hot glue the pinned edges of the fringe to the face.
Apply craft glue to the back of a wood furniture plug. Remove the nose-pin and replace it with the wood plug. Allow the glue to dry before continuing.
Take two size 3/0 black snaps apart. Choose either the two backs or the two fronts for Santa's eyes. Save the two you don't use for another Santa. Sew the eyes 1/4 inch above the nose and 1/4 inch apart.
Advertisement
Place the hat on Santa's head. Adjust the hat so that the front edge is above the eyes, and the back is tilted slightly lower. Insert the tip of your craft glue bottle under the edge of the hat. Apply glue all the way around the head and underneath the hat's edge. Allow the glue to dry.
Stand your bed spring on your work surface. Place the head on top of the spring. Using a large-eyed needle and white crochet thread, stitch the bottom of the head to the top of the spring.
Note: Not all bed springs are created equal. Some have narrow tops, while others have a wide top that matches the base. Either one will work for this project, although a narrow topped bed spring will create more of a bobble head effect.
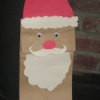
Out of the park on this one! And how inventive to use something that will end up in the land fill anyway. Too cute. would give you two thumbs up if I could. PBP
 Make inexpensive Santa heads using an old chenille bedspread and a recycled bed spring. The Santa head sits on top of the bed spring, giving you a jolly decoration that stands 11 inches tall.