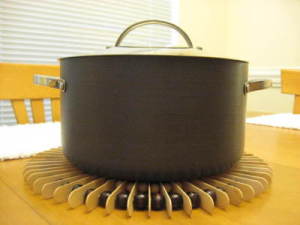
Approximate Time: 3 hours
Supplies:
- 53 - 10 mm brown wooden beads
- 53 - 14 mm white wooden beads
- 53 - tongue depressors (6 inches long)
- 2-1/2 yards of cord type elastic (there will be some left over)
- drill
- bead reamer (ice pick will do)
- clear nail polish
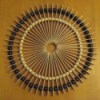
Instructions:
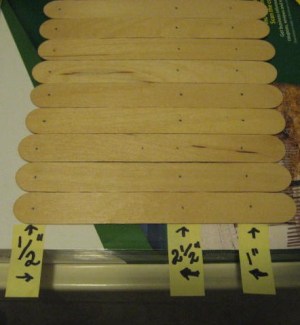
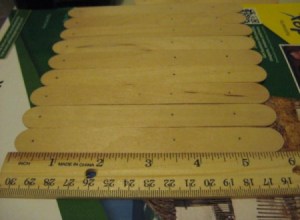
First of all you will need to mark and drill the holes in your tongue depressors. I used a 3/32 drill bit and made sure all the holes were nice and neat, without any jagged edges. This is a time consuming process, but I found it just works best to line up all the sticks in a row and drill one stick at a time. I used an old phone book to drill on, and it worked great.
- Mark 1 inch from the ends of each stick, then make another mark 2-1/2 inches from the end, then at the opposite end of the stick, mark 1/2 inch from that end. (See pics for marked sticks.)
- When you finish drilling all 53 sticks, the fun begins.

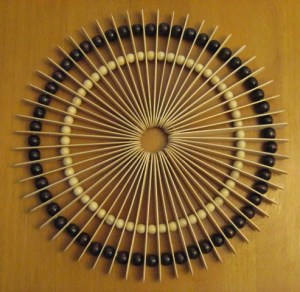
- Cut a length of elastic 36 inches and tie a slip knot at one end and make the other end 'pointed' by adding a small dab of clear nail polish to it and twist it to a point.
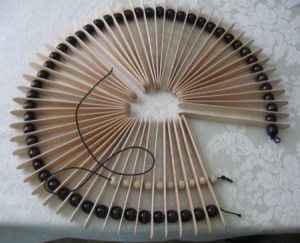
- Thread through the hole in the stick that is 1 inch from the end, then add a 10 mm bead, then go through another stick, add a bead, and keep going until you complete the outer row of your trivet, then tie a slip knot at the end of your elastic.
- Do the same process with the second row, using the smaller 14mm beads, then tie a slip knot at the end of the elastic.
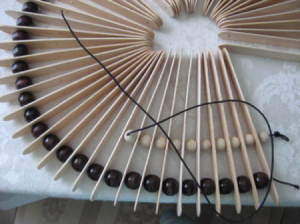
- For the center of the trivet, run a length of elastic through all 53 holes, then tie off the ends with 3 knots, then put a small dab of clear nail polish on the knot to secure it well.
- Now for the other 2 rows, tie the ends of the elastic together with 3 knots, then add a small dab of nail polish, and last of all trim off the ends to make your trivet look nice and neat. (If you turn the trivet to the opposite side, you will not even be able to see the knots at all.)
By CDC from FL