Does anyone remember how to make yarn pom pom pillows? What I remember is that you use a homemade wooden frame with nails and you wrap the yarn around the nails. To make the pom poms you tie the yarn, but I can not recall exactly how to do it. This craft was popular in the 70s.
By Nita Schobert from PA
Things you need:
Yarn, sharp scissors, 3 pieces of cardboard (or other sturdy material) - 1 (3" x 6") and 2 (2" round circles).
Notes: My cardboard rectangle is cut to about 1" larger than the width of my desired pom, but the length is cut to my desired tassel size so I can use it for tassels as well. I just used a piece of a box.
1) Make the pom pom tool: Cut a slice out of the center of the larger cardboard piece that is about 1/2"-3/4" wide by 2" long.
2) Loosely wrap the yarn around the center width of the cardboard 75-100 times for single strand of worsted weight. You'll need to wrap more for thinner yarns and less for thicker or doubled yarns. The density of the pom depends on how many times you wrap the yarn.
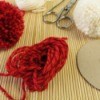
3) Cut the yarn from the ball. Cut a separate piece of yarn about 3" long. Take the short piece of yarn and thread it through the center hole on one side of the bundle, around the back of the wrapped yarn, and back through the center hole on the other side of the bundle. Make 2-3 tight knots to secure the center of the pom.
4) Cut the bundle of yarn at each edge of the board, taking care not to cut through the knot or center hole.
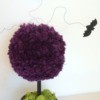
5) Carefully pull the pom out through the center hole.
6) Flatten the pom between the two circles of cardboard so that the knotted piece of yarn is sandwiched in the center. Begin to trim the pom to the size of the circles (crust-less pom sandwich). After the first trim, take the pom out, fluff it and rotate so you smoosh it flat in a different spot and trim between the circles. Continue to rotate the pom, smoosh it between the circles and trim until it is fluffy and evenly trimmed. If you want to make the pom smaller and denser either make smaller cardboard circles or continue trimming free hand.
You can adjust the size of your pom poms by increasing or decreasing the size of the pom pom maker and templates. (11/08/2009)
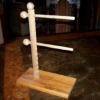
I think I know the one that you are talking about as I have the board here. I make them myself as well to give away as gifts for Christmas and birthdays, and I also sell them. If this is the one you are talking about, you have a board (don't know the size right now as it is in the shed) that has nails in it all the way around it with two nails that are extra in one corner and they are for the start and finishing tying off of the yarn.
I always start with a different color of yarn on the bottom 2 or 3 rolls so that it is easier to know which ones to cut when you are done and you will not be able to see these colors when the pillow top is done anyway.
Once you have the "base" color on and tied, then go to your next color or colors that you want. Once you have all the rolls on and tied off you can start making your pom poms now.
To make your pom poms, take the same color as the last color that you used and in any of the cross sections that you have (I always start in the center), you tie each cross section from both sides ( one side and then the other. Do this until all cross sections are tied very tight. Once you have all of them tied and in both directions you are ready to start cutting. I always leave my pillow in the frame while doing all of this as it is so much easier to make still in the frame. Now back to the pom poms.
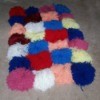
After all cross sections have been tied, very careful as not to cut the wrong strand of yarn, half way in between the tied cross sections, cut in the middle of the straight pieces, being very careful as to not cut the bottom 2 or 3 rolls that you started with. You are now making the pom poms. Once you have all of them cut you can now fluff them if you want to still on the frame. After all that is done, now you can cut half between all the nails holding the yarn for you. Once that is done, you now have a pom pom pillow top.
If you need more help please ask me and I will see if I can help you out more. SapphireB (11/10/2009)
By SapphireB
We're wondering how many times you wrap the yarn around the nails. We had one of these looms but don't remember how many times you need to wrap it before you tie it to make the pom poms. (07/11/2010)
By Sue Peters
Add your voice! Click below to comment. ThriftyFun is powered by your wisdom!