February 7, 20104 found this helpful
Best Answer
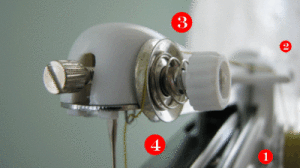
Hopefully this image that I made will make up for the inadequate one in the manual
The numbers in the images match the reference numbers below:
1. Load the Bobbin:
- Pull out the peg that holds the spool on.
- Be sure the spring is on first.
- Load the spool so the thread comes off the top...counter clock-wise.
2. the Bobbin guide
- Put the thread UP through the guide hole in the little plastic guide.
3. The Tensioner
If disassembled, assemble the tensioner:
Assembly
- Onto the shaft, put on the two dished tensioner disks so that they meet near the shaft to form a pulley.
- Load the spring on the metal sleeve and load the spring/sleeve combination onto the shaft with the wide end of the spring pressing into the the outside disk.
- Turn the knob onto the threaded end of the shaft and tighten.
Threading
- Pass the thread OVER the tensioner and BETWEEN the two tensioner disks.
- DO NOT WRAP the thread around the tensioner.
- If the stitch is not tight enough, turn the knob clock-wise to put more tension on the thread.
- If the stitch is too tight or breaks, turn the tensioner knob counter clock-wise for less tension.
4 The Needle Guide
- Pass the thread sideways from the tensioner through the metal guide.
5 The Needle
- From the needle guide, pass the thread through the needle, back to front.
- There is a needle threading tool that can be bought for this, to make this task easier.
- Pull out a tail of 3-5 inches (7-12cm) of thread through the needle
- After stitching be careful not to pull on the unsecured thread or you will pull the stitching out.
- Use the manual wheel to turn the needle out of the work
- carefully pull extra thread off of the spool and snip the work free from the rest of the spool.
- Secure the ends of the stitch by pulling the end of the thread back through the last loop so that it will tighten on its self.
- Trim off any excess thread.


Marjorie
Silver Feedback Medal for All Time! 290 Feedbacks August 21, 20090 found this helpful
Search on Google and find a website that sells them. They usually have a toll free number you can call. You need an instruction sheet.

August 23, 20090 found this helpful
I suggest to take it back. I had one, it did not work, good luck.
August 31, 20090 found this helpful
Toss it in the nearest garbage can and you'll be a lot happier! I've had several given to me as gifts. They do not work!
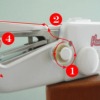
February 7, 20100 found this helpful
Here's another image that should help, in case you took the tensioner apart and don't recall how it looked to begin with ;)
The numbers in the images match the reference numbers below:
1. Load the Bobbin:
- Pull out the peg that holds the spool on.
- Be sure the spring is on first.
- Load the spool so the thread comes off the top...counter clock-wise.
2. the Bobbin guide
- Put the thread UP through the guide hole in the little plastic guide.
3. The Tensioner
If disassembled, assemble the tensioner:
Assembly
- Onto the shaft, put on the two dished tensioner disks so that they meet near the shaft to form a pulley.
- Load the spring on the metal sleeve and load the spring/sleeve combination onto the shaft with the wide end of the spring pressing into the the outside disk.
- Turn the knob onto the threaded end of the shaft and tighten.
Threading- Pass the thread OVER the tensioner and BETWEEN the two tensioner disks.
- DO NOT WRAP the thread around the tensioner.
- If the stitch is not tight enough, turn the knob clock-wise to put more tension on the thread.
- If the stitch is too tight or breaks, turn the tensioner knob counter clock-wise for less tension.
4 The Needle Guide
- Pass the thread sideways from the tensioner through the metal guide.
5 The Needle
- From the needle guide, pass the thread through the needle, back to front.
- There is a needle threading tool that can be bought for this, to make this task easier.
- Pull out a tail of 3-5 inches (7-12cm) of thread through the needle
- After stitching be careful not to pull on the unsecured thread or you will pull the stitching out.
- Use the manual wheel to turn the needle out of the work
- carefully pull extra thread off of the spool and snip the work free from the rest of the spool.
- Secure the ends of the stitch by pulling the end of the thread back through the last loop so that it will tighten on its self.
- Trim off any excess thread.
April 16, 20120 found this helpful
Hi - can you upload the PDF here or somewhere?
The website is not available anymore.
Thank you.
(my email is achbarosch at hotmail punto com)