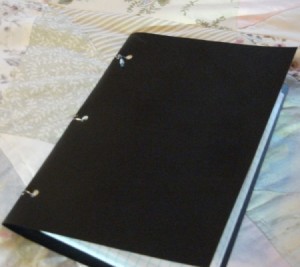
 This project is perfect for the student or designer looking for a fun, inexpensive, and eco-friendly way to jot down their ideas, notes, or craft designs. This booklet is made from materials that would otherwise be thrown away, creating a stylish and functional alternative to a store-bought pocket notebook.
Total Time: One to two hours
Yield: One notebook
Supplies:
- Tools and Supplies:
- 12 sheets standard size graph paper (feel free to experiment with lined or blank paper as well)
- 1 used spiral notebook with plastic cover
- 1 package small reinforcement labels
- 1 paper clip
- 3 1 to
- scissors
- ruler
- handheld hole puncher
- clear tape
- pen
- needle nose pliers
- round nose pliers
- stack of three or four heavy books
- Charm (Optional)
- 1 headpin
- 6-8 seed beads
Steps:
- Cut the plastic cover directly beneath the spiral binding, starting at one end and working your way vertically to the other.
Cut a piece of clear tape that is 1 to 1 1/2 inches wide to fit the vertical length of the cover and place over the three holes punched into the cover. The bottom edge of the tape should match up to the bottom edges of these three hole-punches. This will allow you to make an even cut just below the three holes.
Next, fold the plastic cover at the center (hamburger style). Try to make each of the four edges line up. Your cover should look like a Christmas or birthday card.
After you have made a crease, put the folded cover beneath a stack of heavy books to keep it in place. The pressure from the books will do the rest of the folding for you! - Stack each piece of graph paper so that each piece lines up evenly with the next. If there are hole punches in the graph paper you will also want to get rid of these.
Mark the paper three squares to the right; this should be where any hole punches meet the edge of the third line running vertically. Cut the paper off at this line. If the graph paper lacks hole punches, you will still need to cut at the this line in order for it to fit neatly in your booklet. - From the upper left corner, move two squares (slightly under 1/2 inch) across the crease of the folded graph paper and three squares (3/4 inch) down. Mark the point where the lines intersect with a pen.
Repeat the following at the bottom left corner. Next, go up ten squares (2 1/2 inches) from the bottom intersection point and make a dot. Go down ten squares from the top intersection point and make another dot. You should have three spaces in between these two inner points.
Taking your hole-puncher, punch out exactly where the two outer intersection points are marked. Next, punch the second space directly between the inner two intersection points (aka the three spaces, which are 3/4 inches in length). Make sure to line this up with the other two hole-punches. All three should be placed evenly on the middle of the second vertical line. - Take the plastic cover out from underneath the books. Using a paper clip, attach the non-sticky side of a reinforcement label to one of the hole-punches on the folded graph paper, making sure that the holes line up. Line up the reinforcement label and paper with the folded edge of the plastic cover.
Flip the paper over so that the sticky side of the label is placed toward the folded edge of the plastic cover. The three-hole-punched graph paper should fit at about half an inch within each edge of the cover.
Gently pull the paper clip away from the sticker. You should now have an accurate marker for the first hole-punch. Repeat until all three hole-punches in the graph paper are lined up with where the cover is marked. Punching through the areas marked by the reinforcement labels will take a little elbow grease! - Next, take a headpin. With a pair of round-nose or needle-nose pliers, bend the headpin into a narrow U. Repeat this step with the other two headpins. It is also possible to use the wire spiral of the old notebook to make new fasteners. Cut off three one to two inch sections of the wire and straighten them out enough to form into a U shape.
- Match up the folded graph paper to the plastic cover, making sure that the three-hole-punches align. Starting from the middle of the 12th page (or 6th original sheet), insert the wire U through the paper hold-punches to the middle two hole-punches of the cover on each side of the crease. If done properly, the hole punches in the paper will unfold into three sets of two symmetrically spaced holes along the crease.
Take the pliers and fold the U shaped wire over each side of the cover. Flatten the wire to secure and be sure to tightly loop at least one edge of the wire over the opposite side of the cover. If you are using headpins, the rounded tip, or head, should be pressed into the plastic. Repeat this step, using the two other wire sections, headpins, or eye-pins. - *Optional Using the tip of your pliers, take the top left section of wire and curve to create a small, semi-closed loop using the front side of the wire. Add beads to a separate headpin and make a similar loop to secure them. These loops will resemble the shaped wire at the bottom of a drop earring.
Next, pull the loop of the charm through the small wire loop on the booklet. Press the ends of each loop together to fasten. Now decorate your new notebook with stickers!
Add your voice! Click below to comment. ThriftyFun is powered by your wisdom!