social

Juice Pouch Lunch Bag


Silver Post Medal for All Time! 254 Posts

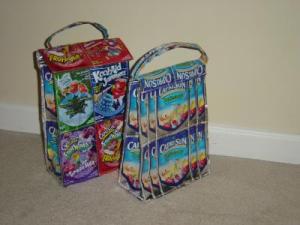
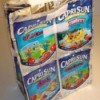
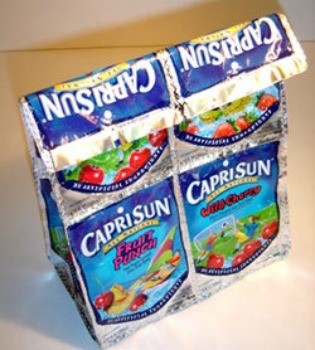
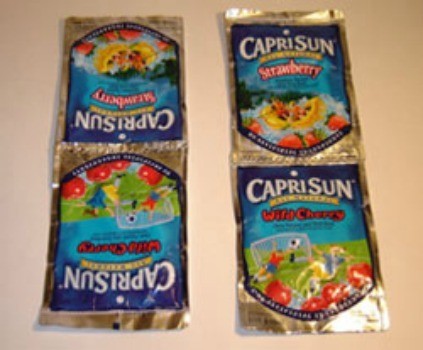
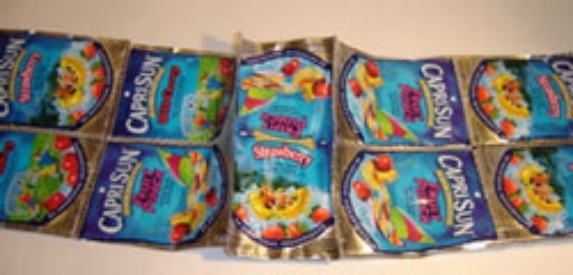
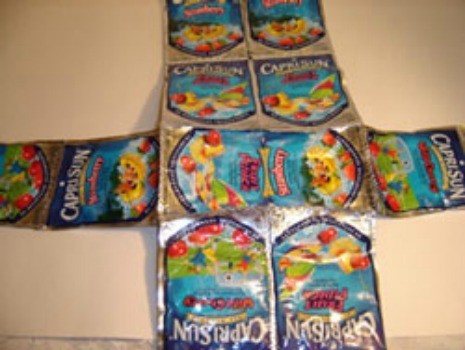
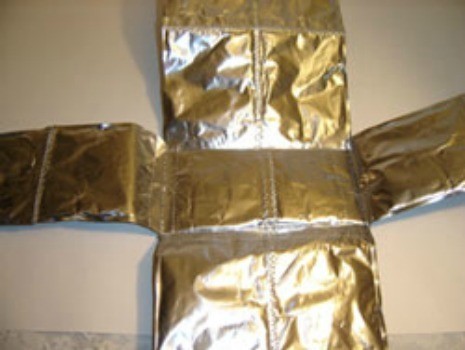
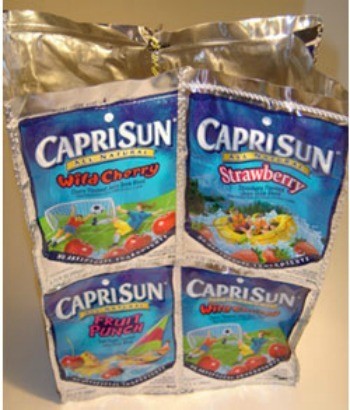
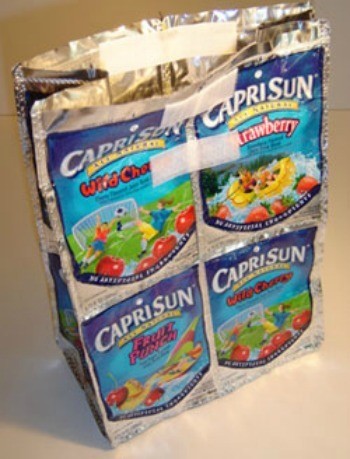
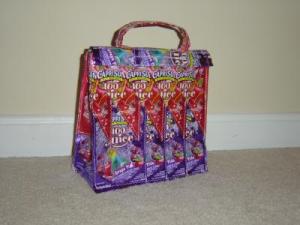
This lunch bag is easy to make and durable. It makes great use of Kool-Jammer or Capri Sun pouches. Finished CapriSun lunch bag


Supplies:

Advertisement

  • 14 Capri Sun or Kool-aid Jammer juice pouches
  • X-Acto knife
  • sticky end Velcro
  • sewing machine and thread
  • scissors

Preparation:

  1. After the juice has been drunk use an X-Acto knife to slit the bottom of the juice pouch.
  2. Clean the inside of each pouch with hot soapy water and let dry.

The Front and Back:

  1. Take four juice pouches and sew them together 2 by 2.
  2. Juice Pouch Lunch Bag
     

  3. Do the same with four more juice pouches, having two sets of four. These are the front and back of the bag.

The Sides:

  1. Sew two juice pouches together, one above the other, two tall and one wide.
  2. Do the same to two more juice pouches, you now have two sets of two. These are the sides of the bag.

The Bottom:

  1. For the bottom of the bag you will need to determine how long it will need to be by taking two juice pouches and laying them next to shorter side of the set of four juice pouches. Instead of having one juice pouch full size and having a small part of another showing for the bottom I laid them on top of each other and sewed down the middle of them both to make it the appropriate length. Then I cut off the extra bit, leaving approximately a 1/2", then sewed that end down flat.
Advertisement

Putting It All Together:

  1. The next step is to sew the bottom to one of the sets of four.
  2. Once you have done that sew the other set of four to the other side.
  3. Juice Pouch Lunch Bag
     

  4. Next sew one of the sets of two to the bottom, then the other.
  5. Now sew all the ends together, the front to the sides and the back to the sides.
  6. Juice Pouch Lunch Bag
     
    Juice Pouch Lunch Bag
     
    Juice Pouch Lunch Bag
     

Advertisement

Finishing:

  1. Add a piece of Velcro to the top inside of the bag.
  2. Fold over the top of the bag approximately an inch and a half, then place another piece of Velcro under the fold.
  3. Juice Pouch Lunch Bag
     

  4. Now your lunch bag is complete, everyone will be impressed by your creative recycling.

Add your voice! Click below to comment. ThriftyFun is powered by your wisdom!

 
September 12, 20050 found this helpful

Stella this is so cool, even better than a purse. You are so creative and the instructions and pictures are really good. suzen


Bronze Feedback Medal for All Time! 174 Feedbacks
December 20, 20050 found this helpful

Excellent project. Maybe you should submit it to Carol Duvall for her craft show on HGTV cable.

 
January 22, 20060 found this helpful

This is the neatest idea!
Thank you!
and Thank you for such good illustrations.
I need pictures to be able to do projects like this
and this is perfect!

 
By tracey (Guest Post)
May 4, 20070 found this helpful

I can't wait to make one of these, too cute. What are you doing to cover the little punched straw holes, after drinking the juice? Are people cutting the bottoms out of the juice and not drinking from them? I want to recycle the used ones my kids love drinking from. Any suggestions that will stay when bag gets wet?

Advertisement

I thought about cutting the bag down past the straw hole but it would not look as nice. Thanks

Editor's note: Once the pouches are empty (yes use the ones that the kids have emptied) use an x-acto knife to slit the bottom of the juice pouch. Clean the inside of each pouch with hot soapy water and let dry.

 
By Tracey (Guest Post)
May 7, 20070 found this helpful

I guess I did not make myself clear. What I need to know is - the hole where the straw goes - do you leave the hole punched out or can you seal in some way so that liquids do not enter into the bag from the outside. Thanks.

Editor's Note: Before you start sewing them together you could stitch or glue near the holes so water cannot get in there. In any case, I doubt that much water could get in there unless you submerged the finish bag in water.

 
July 6, 20070 found this helpful

I've mixed art with thriftiness to create some new designs for lunch bags. See photos.


July 6, 20070 found this helpful

Another one...


By Hannah (Guest Post)
July 27, 20070 found this helpful

In hindsight, I think it would have been easier to put the velcro on earlier on in the process when things were still more flat. Would have saved a lot of trouble. Has anyone else done that?

 
By Amanda (Guest Post)
March 2, 20080 found this helpful

What type of thread to you use? Just regular or synthetic?

 
By Fenice (Guest Post)
March 17, 20080 found this helpful

Have you tried with coffee bags? It's wonderful.

 
By Irais (Guest Post)
March 27, 20080 found this helpful

Thank You for your great idea, very original, your pictures and instructions are great, you are very creative and a recycle queen.

Thank You for the inspiration.

 
By Nicole (Guest Post)
April 15, 20080 found this helpful

Some of your pictures show the lunchbag with a handle. How do you put on the handle?

Editor's Note: No handle in this project, it just folds over like a paper sack.

 
April 23, 20090 found this helpful

What kind of sewing machine needle do you use and what kind of thread? Did you use a zig zag stitch?


Add your voice! Click below to comment. ThriftyFun is powered by your wisdom!

 
In This Page
< Previous
Categories
Crafts Recycled Crafts ContainersSeptember 12, 2005
Pages
More
🍀
St. Patrick's Ideas!
🎂
Birthday Ideas!
💘
Valentine's Ideas!
Facebook
Pinterest
YouTube
Instagram
Categories
Better LivingBudget & FinanceBusiness and LegalComputersConsumer AdviceCoronavirusCraftsEducationEntertainmentFood and RecipesHealth & BeautyHolidays and PartiesHome and GardenMake Your OwnOrganizingParentingPetsPhotosTravel and RecreationWeddings
Published by ThriftyFun.
Desktop Page | View Mobile
Disclaimer | Privacy Policy | Contact Us
Generated 2024-01-30 13:17:54 in 4 secs. ⛅️️
© 1997-2024 by Cumuli, Inc. All Rights Reserved.
https://www.thriftyfun.com/tf48400145.tip.html