I want to make a puff quilt for a baby's pram. Does has anyone have pictures of how it's done. Also, I've seen one that has a plain square in the middle with the puffs around the edge and at the bottom How is this done?
Add your voice! Click below to answer. ThriftyFun is powered by your wisdom!
I saw one made years ago by taking small squares of material and sewing two together on three sides. Then these squares are to be stuffed with polyester fibrefill
and joined together, Hope this is what you had in mind. sewingmamma
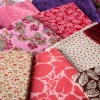
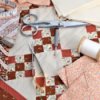
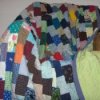
I've made a bunch of these, first I cut squares 4 inches of the material I want to show, than cut 3 inch squares out of muslin or any left over material you want to use up because it will NOT show. Next you sew the 4 inch squares to the 3 inch squares making a pleat in the center (so the 4 inches match the 3 inches) stuffing the 4th side before you close it I make a lot of these, Also after sewing around the 4 side I pick up the next square and sew that one without cutting the thread on the machine, I let them stay connected (by thread) and snip them apart when I finish for the day, makes things go much faster. I use a few differant colors then match them up in a pleasing way after cutting them apart. now I make rows. If you want a baby quilt decide how many squares you will need across and gather then up in the pattern, I use one color than another. What I stuff them with are cotton balls,(100% cotton) I find they are the perfect size and will be very uniform, but you can use leftover quilt backing or fiberfill just try to keep it the same amount, you only need a bit, When I join them I put the right sides together and sew across the seam allowence then pick the next block and add it when I have a few rows of say 16 squares I put the whole rows together the same way (right sides together, turn over and stich along the seam allowence) it works up pretty fast.
Thanks so much for the info .I love to sew and make things. I have wanted to make this quilt for some time thanks again!!

I would like a pattern for making a "Puff Quilt". If anyone has the pattern or knows a link to the pattern.
Thanks,
Seamstress
There is a pattern for a full size puff quilt by either Simplicity or McCalls. They do still have it, or did last year. If I remember right, it's in multiple sizes. I'm sorry...I tried to find my pattern and it is NOT where it belongs!!! The quilt is very easy to make. My template that I traced is 71/2" X 9". I cut all the squares first.
Note...the batting should be poofy and thick, not flat. You will spend a little more, but if the batting isn't full enough the quilt won't have any "puff".
Watch a good movie or listen to music or the radio...something interesting while you sew. Trust me...sewing around all the squares gets tedious!!!
At the time, my mother was elderly and unable to do handwork like knitting any more. She needed something to do, so as I finiished the squares, she turned them for me. She didn't get the corners turned too well, but I didn't care...I finished pulling the corners out later. It gave her something to do...something we could do together. Everyone wants to be "needed" and to feel useful, especially the elderly. She was around 91 at the time.
When someone, regardless of age, asks if they can do something to help...don't be in a big hurry to say no!!! Perhaps that person NEEDS something to do.
Have fun making your puff quilt. That is a very special gift for a very special person!
Would like to make a Puff Quilt. May I please have a pattern? Thank you vaseux AT persona.ca
www.quilterscache.com/
Decide the size you want the quilt to be. Buy a grid interfacing. Cut out your blocks from the fabric you like. Sew them to the grid and make sure you put tucks int them so that there is room for the stuffing. (Don't worry about the stuffing just yet) I usually cut the blocks 4 inches bigger than I want the little pillows to be. Now you have to decide if you want raggy edges or finished edges. If you want raggy edges leave a 1" seam allowance sticking up.(Don't cut the edges into strips until the whole quilt is done) After you get it all sewn together go in the back of the interfacing and cut a little slit and stuff each pillow.
Add your voice! Click below to answer. ThriftyFun is powered by your wisdom!