These fun and colorful pinatas make a great gift and holiday activity for kids of all ages!
Approximate Time: 1 hour and 30 minutes.
This project requires three different sessions, each lasting approximately 30 minutes.
Cut 4 or 5 pages of a newspaper into approximately 3 inches wide by 12 inches long strips (these measurements do not need to be exact).
To make paste, mix 2 cups of flour with 4 cups of water in a large bowl or pan. For best results, use a whisk to make sure all lumps are gone.
Spread a few sheets of newspaper on a flat worksurface (Note: this process gets pretty messy, so give yourself plenty of room).
Blow up the balloon to the size you would like your pinata and tie off.
Place the balloon in one of the bowls on top of the news paper. The bowl helps stabilize the balloon as you add your paper strips.
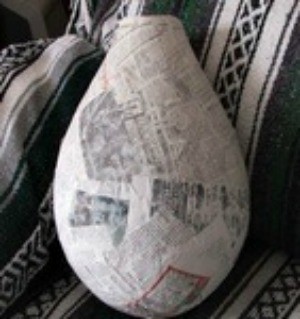
Dip a paper strip completely into the bowl of paste, then run the strip through your fingers to remove the excess. Place this first strip on your balloon. I like to start about 3 inches from the top of the balloon and go all the way around. This will create the opening for the pinata.
Continue with this process to cover all but the top of your balloon. Make sure to flatten out all bumps in the paper to make it as smooth as possible.
Tie string or yarn to the top of the balloon and allow to hang and dry for at least 12 hours.
Follow the same steps as in Session 1, to create a second and final layer for your pinata.
Again, allow the pinata to dry for at least 12 hours.
Take your pinata down, pop the balloon and remove all balloon pieces.
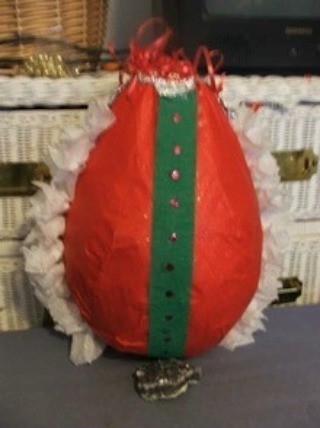
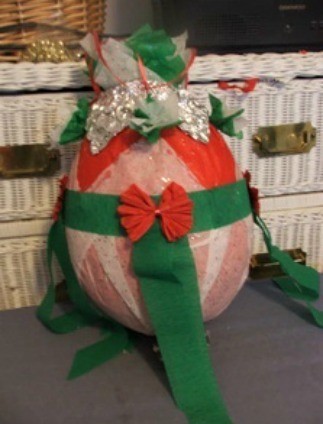
Cover your pinata with the desired color of tissue or crepe paper using hot or Elmer's glue (I prefer using hot glue to get the job done a little quicker).
Determine how you will decorate your pinata, then use tissue, crepe paper, paper ribbons or other light decorations to make it look pretty. I like to make flowers by cutting squares of crepe or tissue paper and crunching them together in the middle. I also like to make bows out of small pieces of paper ribbon, tied in the middle. Use your own creativity.
When the pinata has been decorated, fill it with the desired goodies, along with newspaper strips or bunched up tissue paper (to keep the items from bunching up at the bottom). The pinata can be used for any age group and I even mix the contents for families with kids of different ages. Make sure that items are light-weight, non-breakable, do not have any sharp edges and are age-appropriate.
Here are some suggestions:
After the pinata is stuffed, create the hangers at the top. Punch holes on four sides, about 3/4 inches from the top. Use string, yarn, curling ribbon or any other item strong enough to hold your pinata up while kids are hitting it. String 12" - 18" pieces through the holes and tie off. I also like to staple each piece to the side of the pinata, just above the hold, for added strength. Tie the pieces together at the top to create your hanger.
To close your pinata, glue several layers of tissue or crepe paper or aluminum foil over the hole, then decorate the top as desired.
And there you have it - a beautiful and fun gift and activity for the youngsters in your life. By the way - it could also be used for the young at heart with just a change of contents. Have fun!
By MtnWmn from Antonito, CO
Add your voice! Click below to comment. ThriftyFun is powered by your wisdom!
Add your voice! Click below to comment. ThriftyFun is powered by your wisdom!