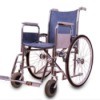
This is not exactly a pattern but instead a way of adjusting a different pattern in order to make a wheelchair bag. I have 2 versions here.
First off, find a pattern for a scarf that you like. Make sure it's either the width that you want the bag to be, or is easily adjusted width-wise.
Then, just make the scarf. But don't make it the length that the pattern will call for. Measure how long you want the bag to be and double it. If it was me, I'd add 5-6 inches so that I could make a fold-over flap closure for it.
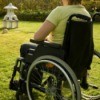
Once you get it made, then make 2 hangers for it:
Row 1: Ch 4. Sc in 2nd ch from hook and in each ch across. Turn. (3 sc)
Row 2-22: Ch 1, sc in each sc across. Turn.
Row 23: Ch 1, sc in 1st st, ch 1 (buttonhole), sk next st, sc in last st, turn.
Row 24: Ch 1, sc in each st and in each ch across, turn.
Row 25: Ch 1, sc in each st across. Do not turn.
Rnd 26: Working around outer edge, in ends of rows, ch 1, evenly space sl st around. Join with sl st in beg sl st. Fasten off.
Sew end of hangers (end without buttonhole), evenly spaced across one side of top edge of bag.
This one is made from granny squares. You can make the squares any size you want and/or make as many squares as you want. Just be sure to make double for the front and back of the bag.
The following is one of the patterns from a book I have. I'm not including the sizes because you can make them as big as you want. I'm sorry I can't include a picture but my scanner is not working.
Granny Square Bag:
Step 1: Make 8 granny squares.
Step 2: Sew the granny squares together making 2 strips of 4 squares each.
Edging: (I'm going to call the color for this B. You can of course use contrasting or matching color)
Row 1: Working down one long edge of one 4-square strip, join B with sc in corner ch sp, sc in each st across with hdc in each seam, ending with 3 sc in corner ch sp, turn.
Row 1: Ch 4. Sc in 2nd ch from hook and in each ch across. Turn. (3 sc)
Row 2-22: Ch 1, sc in each sc across. Turn.
Row 23: Ch 1, sc in 1st st, ch 1 (buttonhole), sk next st, sc in last st, turn.
Row 24: Ch 1, sc in each st and in each ch across, turn.
Row 25: Ch 1, sc in each st across. Do not turn.
Rnd 26: Working around outer edge, in ends of rows, ch 1, evenly space sl st around. Join with sl st in beg sl st. Fasten off.
Sew end of hangers (end without buttonhole), evenly spaced across one side of top edge of bag.
Sew buttons to remaining side opposite buttonholes.
Sew Second Side Edgings on 4-square strips together.
Fold piece in half with WS together, working through both thicknesses, join B with sc in first st, sc in each st across to fold. Fasten off.
Beg at fold, join B with sc in first st, sc in each st across to top edge, ch 1, working around top opening, evenly sp sc around working hdc in each seam, join with sc in beg sc on top opening. Fasten off.
Source: Annie's Attic Wheelchair Afghans and Bags
By Cricket from Parkton, NC
Add your voice! Click below to comment. ThriftyFun is powered by your wisdom!
I am totally confused on this andwould really like to make one for my daughter who is in a wheelchair and could use something like this. I do not understand what the SC ,ch,sk, pictures would probably help because the 1st.thing I thought of was knitting. Need some help on this one.
Editor's Note: These are crochet instructions, I'll update the title to reflect that. Here is a post on ThriftyFun that might be helpful in deciphering the instructions.
www.thriftyfun.com/
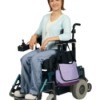
A little piece to think about changing. Putting 'hangers' and attaching something on a chair is great for the added storage; but it pulls on the back of the chair and doesn't feel good to the person in the chair. It also wears out the back faster too. I know because I use a chair, people do that or have wanted to do that with my chair. Now I have industrial strength hook and loop attached to the metal parts of back of my chair. This works great and no strain on me or my chair while riding.
Post a picture of it .
Add your voice! Click below to comment. ThriftyFun is powered by your wisdom!