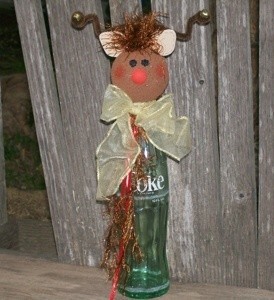
Create this fun Reindeer decoration using an old vintage Coke bottle. Collectors of Coke memorabilia will love this red nosed icon, as well as those who enjoy decorating with antiques.
Approximate Time: A few hours
Place the Styrofoam ball over the top of the bottle and press down. You want the neck of the bottle to penetrate about one inch. Remove the ball and paint around the hole and the bottom half using brown acrylic paint. Apply craft glue to the rim of the bottle and replace the ball on the neck. Note: Do not apply too much glue, you do not want it to drip inside the bottle where it can be seen. Finish painting the remainder of the ball brown.
Paint a 1/2 inch wood plug using red acrylic paint and allow it to dry. Press the plug into the center front of the ball for the nose. Remove the nose. Apply craft glue to the indentation and reinsert the nose. Use a stencil brush to lightly pounce the cheeks with the red paint. Dip the eraser end of a new pencil into black acrylic paint. Dot two eyes a 1/4 inch above the nose and a 1/4 inch apart. Allow the paint to dry.
Draw a 1 inch leaf or tear drop pattern on lightweight cardboard for the ear shape and cut out. Lay the pattern on tan craft foam and trace around it. Do this twice for two ears. Cut the ears out. Use a fine line black permanent marker to make stitch marks around the edges of the ears. Fold the brown chenille stem in half. Pull the sides apart, forming a "V" shape. Form the antlers, one side at a time. Measure 1 1/2 inches up from the bottom of the "V" and bend the stem down. Measure another 1 1/2 inches and bend up. Measure another 1 1/2 inches and wind the remaining end of the antler around a pencil. Repeat for the other antler side.
Insert the blade of the table knife in the top of the head and cut it from right to left, creating a 2 inch slit. Rock the knife slightly to widen the slit. Apply craft glue to the bottom center of the antler "V" and the bottom of each ear and insert into the slit, using the picture as a placement guide.
Cut the eyelash yarn in half. Cut 4 inches from one 18 inch length and set aside. Wrap the remainder of the piece around three fingers. Carefully slide the yarn off your fingers and tie the 4 inch piece around the center to create a tassel. Apply hot glue to the top of the head, between the ears and antlers. Set the tassel in the glue. Hot glue a jingle bell to the end of each antler.
Hold the remaining eyelash piece and the 18 inch red satin ribbon together. Wrap around the neck of the reindeer and knot. Tie the gold wired ribbon around the neck and tie into a two inch bow.
By Cyndee from Winfield, Kansas
Add your voice! Click below to comment. ThriftyFun is powered by your wisdom!