Decoupage is the art of pasting paper. Wildly popular during Victorian times, it can be a wonderful way to create many different styles of art. It's also a great way to recycle almost any kind of paper. Here are the basics about the art and a simple project to get you started.
Supplies:
- Styrofoam ball - 1, about 3 inches big
- gift wrapping paper - striped
- gift wrapping ribbon - blue, 1/2 inch thick and 6 feet long
- scissors
- white glue
- paintbrush
- Popsicle stick
- varnish/sealer
Instructions:
Learning the basics of decoupage is a breeze. The paper can be glued to almost any surface and any shape. The exact look is entirely up to you, and there are no ugly results, everything comes out with at least a little charm.
To decoupage you need scissors, white glue, paper, a paintbrush, a Popsicle stick, some water, and an object to decorate. You can decoupage another piece of paper, a wooden block, a plastic picture frame, a Styrofoam ball, or just about anything.
- Use the scissors to cut small shapes from your paper. You can make the shapes angular, with square and rectangle shaped pieces from a magazine, or you can cut out the exact shape, like a daisy shaped piece of wrapping paper.
- Mix your basic white glue with a tiny drop of water and mix well.
- Dip your paintbrush into the glue and spread it on the back of a piece of paper.
- Apply the paper to the object being decorated. It's very important that you always lay the paper flat, without any rips or wrinkles.
- Use the Popsicle stick to gently smooth out the paper, applying it perfectly to the object. If a piece of paper is acting stubborn, brush a little of the glue-water over the piece of paper and smooth with the stick.
- Keep repeating this process until the entire item is covered with paper.
- Let dry.
- Once everything is dry, you may want to add some "focal-point" paper pieces to the object. "Focal-point" pieces help tie together the picture or give it a specific look. Let's say you cut squares out of striped wrapping paper as your main decoration. Then you cut some beautiful dolls out of a catalogue, following their exact shape, and paste them in the middle. A beautiful finish to a wonderful piece of art.
- Once everything is glued and dried, you want to give the object a thin, even coat of the glue. This will help any stray ends stick down and protect the paper.
- Let dry.
- If you want heavy protection, use a clear, waterproof sealer on the object.
- Let dry.
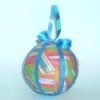
Decoupage Ornamental Ball - 2
Supplies:
- Styrofoam Ball - 1, about 3 inches big
- striped gift wrapping paper
- blue gift wrapping ribbon - 1/4 inch thick, 6 feet long
- scissors
- white glue
- paintbrush
- varnish
- Popsicle stick
Instructions:
- Cut paper into small squares.
- Glue papers smoothly over Styrofoam ball using decoupage techniques.
- Let dry.
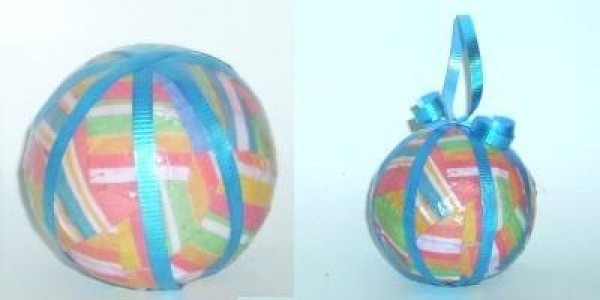
- Cut four pieces from the ribbon, each 1 foot long. You are going to wrap these around the ball, as shown on the left side of the finished project picture.
- Carefully glue the ribbon on, sweep some glue over the ribbon, smooth, and let dry. Some ribbons may be stubborn and take a few rounds to truly stick.
- Cover ball in a coat of glue-water mixture and let dry.
- Next, cover the ball in an even coat of shiny varnish and let dry.
- You could just stop the craft now and put the ball in a basket as a decoration. But it's easy to make the ball into an ornament, perfect for something like a Christmas tree. Use the remaining 2 feet of ribbon to tie a loop and some curly strands to the top of the ball, as shown on the right side of the finished project picture. Glue ribbon and let dry.
Note: Once you have the basics of cutting and pasting down, you can take decoupage to the next level. By using paints, varnishes, beads, or foil, you can make much more intricate and unique looking pieces of art. Don't be afraid to play around. Remember, anything that looks terrible could just have a piece of cut paper pasted over it.
By Aysha