social

How to Make a Garlic Braid


Gold Post Medal for All Time! 858 Posts

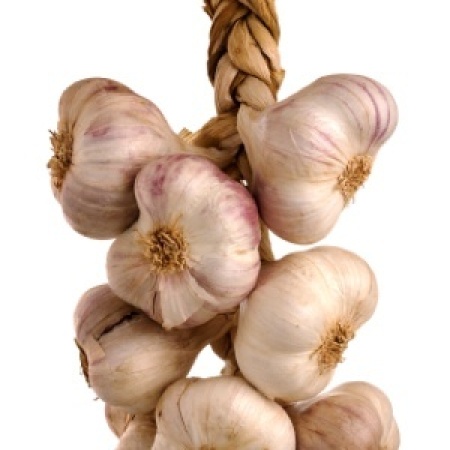
If you use a lot of garlic for cooking, making garlic braids to hang in your kitchen is a fun and functional way to store your harvest. Braiding not only makes the bulbs look attractive, it also provides each bulb with good air circulation, which prolongs storage.

Advertisement

All you need to make a braid is 10 to12 soft-neck garlic bulbs (like those you commonly see in grocery stores), a pair of scissors, and a few small pieces of string or twine. This technique can also be applied to onions and shallots.

When to Harvest

When garlic's green leaves ("stems") start to turn brown and go limp, the heads are nearly ready for harvesting. The outer-most (lower) leaves will die first, and the inner (upper) leaves last. Harvest the heads after the lower leaves have all died down and only the top 4 to 6 leaves remain green. These remaining green leaves are important, because each corresponds to a bulb wrapper protecting the cloves. To remove the heads from the ground, carefully pull them up by the neck with the aid of a spade of garden fork. Any cloves cut or damaged during harvest should be used immediately.

Advertisement

The Curing Process

Newly harvested garlic (and onion) bulbs must be cured before being braided and stored to toughen up their skins. When it's sunny and warm, this can be done by laying them out to dry for the day on newspapers. If you expect rain, take them indoors and spread them out on newspaper in a warm room.

Directions for Braiding

  1. Braiding garlic is a lot like plaiting or French braiding a child's hair. To begin, choose 10 to 12 garlic bulbs that are fairly uniform in size. If none of your heads are uniform, plan to braid them from largest to smallest. Heads that are cracked open should be set aside for immediate use. For easy braiding, the leaves ("stems") on the heads should still be pliable and somewhat green. If they have become stiff and dry during the curing process, lay them between them wet paper towels to restore pliability.
    Advertisement

  2. Trim the roots to 1/2 inch and clean away any loose dirt from the bulbs using your fingers or a soft brush. Be careful not to rub off all of the wrappers protecting the cloves.

  3. Lay three bulbs together on a table with the stems facing you. Braid the stems two or three times (crossing the stems over each other) until you have a braid about 1 inch in length. Place a fourth bulb on top of the forming braid. Hold the fourth stem together with the last stem you crossed over. Treat these two stems as though they were one. Continue to braid, making one or two more braids, ending again with a single stem on top.

  4. Now add a fifth stem and bulb to the single stem you left on top. Treat these two stems as one. Make one or two braids, ending once again with the single stem on top. Continue this pattern of adding and braiding until you have braided the desired number of bulbs together.
    Advertisement

    Note: As you continue to add stems and bulbs, try to space them evenly apart along the length of the braid. You're braiding "overhand", so the braid will form under the bulbs as you go. Each stem is lengthened by adding another on top of it, so no stem will extend the entire length of the braid.

  5. Once you have added all of your garlic bulbs, continue to braid the stems 6 inches beyond the last bulb. Secure the end with string and make a loop for hanging. Use your scissors to neatly trim up the ends of the stems.

  6. Remove individual bulbs as needed by carefully cutting or twisting them off from their stems without disturbing the rest of the braid.

How to Make a Garlic Braid
 
Advertisement

About The Author: Ellen Brown is an environmental writer and photographer and the owner of Sustainable Media, an environmental media company that specializes in helping businesses and organizations promote eco-friendly products and services.

Add your voice! Click below to comment. ThriftyFun is powered by your wisdom!


Silver Post Medal for All Time! 254 Posts
October 7, 20100 found this helpful

This reminds me that it is time to plant garlic here in the Pacific Northwest! I love garlic in everyway: Fresh, roasted, sauteed, etc...


Bronze Feedback Medal for All Time! 116 Feedbacks
October 10, 20100 found this helpful

I've found that if I start the first three garlic braided together 1, 2, 3, and then add the 4th to the first, it is easier to get the braid started.


Add your voice! Click below to comment. ThriftyFun is powered by your wisdom!

 
In This Page
< Previous
Categories
Home and Garden Gardening Growing Growing FoodOctober 7, 2010
Pages
More
🍀
St. Patrick's Ideas!
🎂
Birthday Ideas!
💘
Valentine's Ideas!
Facebook
Pinterest
YouTube
Instagram
Categories
Better LivingBudget & FinanceBusiness and LegalComputersConsumer AdviceCoronavirusCraftsEducationEntertainmentFood and RecipesHealth & BeautyHolidays and PartiesHome and GardenMake Your OwnOrganizingParentingPetsPhotosTravel and RecreationWeddings
Published by ThriftyFun.
Desktop Page | View Mobile
Disclaimer | Privacy Policy | Contact Us
Generated 2024-02-06 13:27:00 in 3 secs. ⛅️️
© 1997-2024 by Cumuli, Inc. All Rights Reserved.
https://www.thriftyfun.com/tf92896203.tip.html