ThriftyFun Logo
Home   Find   Ask   Share   Answer   Join   Index   Login  
 
 User Login:  Username:    Password:      Forgot It?  | Join ThriftyFun!

 - Beauty
 - Budget and Finance
 - Cleaning
 - Consumer Advice
 - Craft Projects
 - Craft Tips
 - Food Tips
 - Garage Sales
 - Gardening
 - Gifts
 - Green Living
 - Home Improvement
 - Organizing
 - Parenting
 - Parties
 - Pest Control
 - Pets
 - Product Reviews
 - Recipes
 - Repair
 - Weddings for Less

RSS Feed
About Us
Media
Advertising
Contact Us
Privacy Statement
Disclaimer

Watercolor Art Cards

By Christine Weber
1x1
Date: 12/21/2005 Topics: Christmas > Cards | Craft Projects > Christmas | Photos > Crafts  
1x1
Post Feedback | Get Responses | Bookmark | Link | Print | Print (With Feedback) | Rate: Thumbs Up Thumbs Down | Bookmark and Share
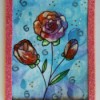
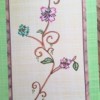
These striking cards are surprisingly easy to make when you choose simple, bold images such as flowers to paint. Pasted onto card stock, they make an enchanting gift for a mother or beloved friend.
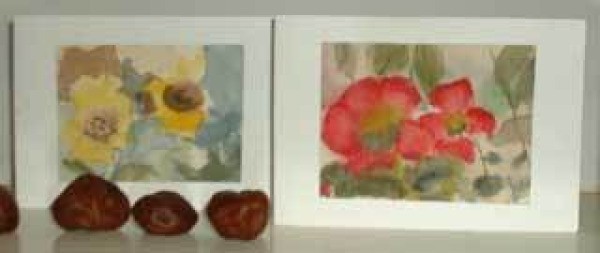
Watercolor Art Cards

Materials and Equipment:

  • a large plastic bag or several sheets of newspaper
  • a plain card and envelope
  • watercolor paints
  • an artist's tray to mix watercolors in
  • good quality watercolor paper
  • a paintbrush
  • an empty jar filled with water
  • paper towel
  • craft glue
  • a glue spreader or Q-tip
  • a pencil
  • an eraser
  • a lid from a used plastic container (such as a yogurt container)
  • an exactoknife
  • a rule with a hard edge
  • a thick piece of cardboard as a cutting surface
  • masking fluid (optional), (available at art stores)
  • photo or picture of a design you'd like to draw (optional)

Instructions:

1. Before starting, clear the table and cover it with newspaper or a large garbage bag to avoid getting paint and glue on the table.

2. Take out your paints, watercolor paper, artist's tray, paintbrush, pencil and eraser. Fill a jar with cool water and set aside. There are several ways to do this craft; you do not need to be an artist to create attractive watercolor cards. The trick is choosing a simple, bold design such as a close-up of a flower (see photo). There are several ways in which to create your original design.

  • Option 1: You can opt to work freeform', painting the design directly as you go.

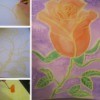
  • Option 2: You can pencil in your design on the watercolor paper before you start. If you aren't sure of your design or have never painted with watercolors before, you may want to opt for this route. You can draw a design from your imagination, or you can use a photograph or another picture as a guide. With the pencil, lightly trace the design you have chosen onto the watercolor paper. Keep in mind the size of the card you have chosen. You will be gluing the watercolor painting onto the card, so it needs to be slightly smaller in size.

  • Option 3: If you like a contained look (watercolors do run a bit), you can use masking fluid to outline your design. Masking fluid dries to a rubbery substance that keeps watercolors from running outside of an area. The area covered with masking fluid will remain white after the dried fluid is removed. Although you should read the instructions on the bottle, the basic idea is to dip your brush in masking fluid and trace over the pencil lines you've drawn. Wait until the fluid hardens (see bottle for directions), then paint your design and allow it to dry. Once your painting is dry, remove the masking fluid (it will now be gummy and can be peeled off). You will have white lines along the outline you drew with pencil. If any pencil marks are visible, erase them.

3. Wet the entire surface of your watercolor paper lightly with the paintbrush. Do not add too much water, as your painting will warp when it dries.

4. Paint your picture, mixing your paints in the artist's tray as you go. You can do test patches on another piece of watercolor paper to make sure the color you have mixed is what you want. Remember that colors dry slightly darker than they appear when wet. If you are choosing option 1 or 2, you will need to begin by 'layering' washes of color. This is a main technique in watercolor. Start by adding a light layer of color. Then add more color to accent or darken specific areas or to create shadows and borders. If you are choosing option 3, you don't need to layer your colors as much, because the masking fluid is creating borders for you.

5. When you've finished your picture, set it aside to dry.

6. Once the painting is completely dry, measure the card that you are going to place your painting on. On the back of your painting, lightly outline measurements that are slightly smaller than those of the card. Cut along the outline with an exactoknife and ruler. Be sure to place a hard surface such as thick cardboard under the painting to protect the table from cuts.

7. Pour a puddle of craft glue onto the plastic container lid. Spread a thin layer of glue along the back of you painting and glue it to the front of your card. Allow to dry.

8. Make several cards and tie them in a pretty ribbon to give as a gift to your favorite correspondent.

(1x1 graphic )
Previous: Daily Thrifty Tips - December 21, 2005 ThriftyFun Next: Miniature Snowmen Ornaments
(1x1 graphic )
1x1
1x1
 Feedback
1x1
1x1
1x1

No Feedback Yet

Be the first to post feedback! Click here to post feedback.

1x1
1x1
 Post Feedback:
1x1
1x1
1x1

Login using the form on the top of the page to post feedback (if you are a registered user). If you have not yet registered, click here to do so. It's FREE!.

1x1
(1x1 graphic )

© 1997-2009 ThriftyFun.com - Design by Cumuli Design
Disclaimer: ThriftyFun.com cannot accept any responsibility for any injury or damage that you may cause to yourself, others, or property when following any advice given on this site. Read the full disclaimer. If you find any information on ThriftyFun.com or in our newsletters that is either erroneous and/or potentially harmful to others, please Contact Us, immediately.