social

Grow Your Own Vegetable Sprouts

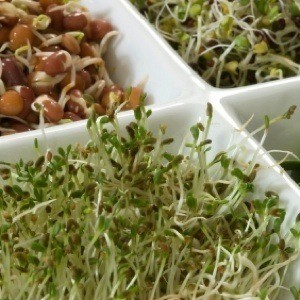
Growing vegetable sprouts is fun, economical, and easy to do yourself. Not only are sprouts delicious, but they are also packed full of nutrients like protein, fiber, and vitamin C. Here are two quick and easy ways to sprout vegetable seeds at home, one using the traditional jar method, and the other using a cookie sheet.

Advertisement

Choosing Seeds for Sprouting

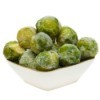
Most everyone is familiar with bean and alfalfa sprouts, but sprouts can be grown from a variety of seeds including lentils, soybean, peas and chickpeas, celery, radish, broccoli, cabbage, and sunflowers. Grass seed like rye, barley, wheat and buckwheat are also popular for sprouting, and like your lawn, will continue to grow and produce a second crop after being cut.

When choosing seeds for sprouting, look for organic seeds that have not been treated with chemical preservatives. These can be found in health food stores, in catalogs, or online. Different seeds produce sprouts with very distinctive flavors. If you're unsure about what to try, many companies offer sampler packs that include several different types of their most popular seeds.

Advertisement

Jar Sprouting

Materials Needed:

  • 1 1/2 to 2 Tbsp. of sprouting seeds
  • Ball Mason jar or other glass jar
  • Cheese cloth or a sprouting lid*
  • Purified/filtered water

Sprouting lids are available that are designed to fit Ball Mason jars for a cost of around $4.00. Look for them at grocery stores, health food stores or you can order them online. The advantage to using them is that they allow for convenient drainage while also providing good air circulation so the seeds can breathe. I recommend getting the plastic mesh lids instead of steel mesh, which have a tendency to rust around the edges.

Directions:

  • Pour 1 1/2 to 2 tablespoons of sprouting seeds into your jar, and fill it with 2-3 inches of lukewarm purified water-enough to cover the seeds thoroughly. Cover the top of the jar with cloth mesh secured with a rubber band, or use a sprouting lid. Let the seeds soak overnight (at least 12 hours).
    Advertisement

  • After 12 hours, drain the water from the jar (without removing the lid). Fill the jar again with purified water and shake gently to rinse the seeds. Drain thoroughly. (If using cloth mesh, you'll need to remove it to refill your jar with water, covering it again before draining.)

  • Set your jar of seeds in a place where it will get plenty of light and good air circulation. Tip the jar at a slight angle, lid side down, so that any excess water remaining in the jar continues to drain. A dish rack works well for this.

  • Continue to rinse the seeds and drain the jar 2 to 3 times daily.

  • After 3-5 days your seeds should be sprouting.

  • When the sprouts have matured (about 2 inches long), give them a final rinse and let them drain thoroughly for a few hours before refrigerating. Store them refrigerated in a plastic bag punched with air holes. They should stay fresh for about 7 days.
Advertisement

Tips:

  • Use cloth mesh or sprouting lid with large enough mesh to allow for air circulation, while still small enough to strain the seeds.

  • Sprouting seeds need just enough air circulation to stay moist and breathe. Not enough and they will dry out. Too much and you invite mold growth.

  • As soon as your sprouts shed their hulls, their leaves are ready to take in light.

  • To "de-hull" your sprouts (separate sprouts from seeds), remove them from your sprouting jar and place them in a bowl of purified water. Hold the sprouts under water and gently swish them around with your fingers. The empty hulls will float to the surface where they can be removed with small, hand-held strainer.

The Cookie Sheet Method

Without proper air circulation and drainage, the moist, humid environment of a sprouting jar can encourage mold and bacteria to growth. For this reason, some people may prefer the cookie sheet method, which allows the sprouts to grow vertically in the open air rather than in a tangled clump. This is also a good method for tiny seeds that are difficult to strain.

Advertisement

Materials Needed:

  • 1 1/2 to 2 tablespoons of sprouting seeds
  • Jar and straining cloth for soaking and draining seeds
  • Cookie sheet or shallow tray (Styrofoam take-out containers cut in half work well)
  • Paper towels

Directions:

  • Soak the seeds overnight in lukewarm water. Drain.

  • Line a tray, cookie sheet, or disposable foil baking pan with several sheets of moist paper towels, and spread a thin, even layer of seeds over the towels.

  • Gently pour off any excess water and place the tray in a warm, well-ventilated area (about 70 F) with dim light.

  • As soon as the seeds germinate, move the tray into filtered light.

  • Use a hand-held spray bottle to moisten the paper towels as necessary, while not disturbing the sprouts.

  • When the sprouts reach 2 inches tall, cover the tray with plastic and move it to the refrigerator. Punch a few holes in the plastic to allow for air circulation. Harvest sprouts with a scissors as needed.

A variety of sprouts.
 
Advertisement

About The Author: Ellen Brown is an environmental writer and photographer and the owner of Sustainable Media, an environmental media company that specializes in helping businesses and organizations promote eco-friendly products and services. Contact her on the web at http://www.sustainable-media.com

Add your voice! Click below to comment. ThriftyFun is powered by your wisdom!

 
August 28, 20100 found this helpful

Ellen,
This is so timely! I haven't been able to find the multi-sprouts at my grocery lately. They're limited to alfalfa sprouts only. I'm going to take your tips and hope to enjoy fresh sprouts on our salads.
Thank you.
Laura

 
September 13, 20101 found this helpful

This article should have included photos of all methods. A picture is worth a thousand words. And the author is actually a photographer!


Add your voice! Click below to comment. ThriftyFun is powered by your wisdom!

 
In This Page
Categories
Home and Garden Gardening Growing Growing FoodAugust 27, 2010
Pages
More
🍀
St. Patrick's Ideas!
💘
Valentine's Ideas!
🎂
Birthday Ideas!
Facebook
Pinterest
YouTube
Instagram
Categories
Better LivingBudget & FinanceBusiness and LegalComputersConsumer AdviceCoronavirusCraftsEducationEntertainmentFood and RecipesHealth & BeautyHolidays and PartiesHome and GardenMake Your OwnOrganizingParentingPetsPhotosTravel and RecreationWeddings
Published by ThriftyFun.
Desktop Page | View Mobile
Disclaimer | Privacy Policy | Contact Us
Generated 2024-01-23 11:16:22 in 6 secs. ⛅️️
© 1997-2024 by Cumuli, Inc. All Rights Reserved.
https://www.thriftyfun.com/tf16264354.tip.html