ThriftyFun Logo
Home   Find   Ask   Share   Answer   Join   Index   Login  
 
 User Login:  Username:    Password:      Forgot It?  | Join ThriftyFun!

 - Beauty
 - Budget and Finance
 - Cleaning
 - Consumer Advice
 - Craft Projects
 - Craft Tips
 - Food Tips
 - Garage Sales
 - Gardening
 - Gifts
 - Green Living
 - Home Improvement
 - Organizing
 - Parenting
 - Parties
 - Pest Control
 - Pets
 - Product Reviews
 - Recipes
 - Repair
 - Weddings for Less

RSS Feed
About Us
Media
Advertising
Contact Us
Privacy Statement
Disclaimer

Craft Project: Mr. Whiskers

1x1
Date: 07/08/2008 Topic: Craft Projects > Recycled > Other  
1x1
Post Feedback | Get Responses | Bookmark | Link | Print | Print (With Feedback) | Rate: Thumbs Up Thumbs Down | Bookmark and Share
Mr. Whiskers
Mr. Whiskers
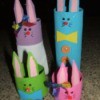
This is a cute, very inexpensive craft for kids of all ages.

Approximate Time 30 - 45 minutes

Supplies:

  • bath tissue tube
  • pink and white construction paper
  • scissors
  • cellophane tape
  • markers
  • wiggle eyes (optional)
  • broom straw, string or yarn
  • glue
  • three white pom poms or cotton balls
  • small pink pom pom or small piece of pink tissue paper

Instructions:

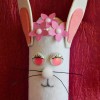
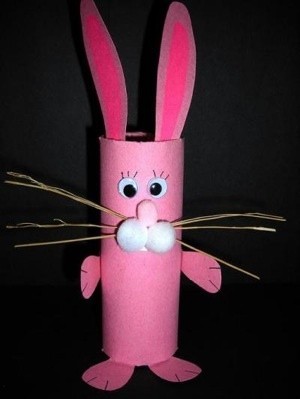
1. Cover a bath tissue tube with pink construction paper. Use marker to draw eyes at one end, or glue on wiggle eyes, if you have them.

2. Draw, color, and cut rabbit ears from pink construction paper. Tape these to the inside of the tube above the eyes.

3. Draw and cut four paw shapes, with attached legs, from pink paper. Glue one pair of paws to the sides of the tube. Tape the legs of the second pair to the inside of the bottom of the tube. Bend the paws at the bottom of the tube to the outside so the rabbit will stand.

4. Cut three strands of straw from a broom or whisk broom for whiskers. Glue the centers of the whiskers to the tube below the eyes. String or yarn may also be used for whiskers.

5. Cut two small rectangular shaped teeth from white paper. Glue these just below the whiskers.

6. Glue two white pom poms or small balls of cotton over the whiskers at the top of the teeth. Glue the remaining white pom pom to the back of the tube for the tail.

7. Glue the small pink pom pom over the white ones on the face for a nose. You can also use a small piece of pink crumpled tissue for the nose.

By Marie from West Dundee, IL

Editor's Note: This could be adapted into a dog or cat using different ears and facial features.

(1x1 graphic )
Previous: Online Game: Sudoku ThriftyFun Next: Summer Crafts For Bored Kids
(1x1 graphic )
1x1
1x1
 Feedback
1x1
1x1
1x1

No Feedback Yet

Be the first to post feedback! Click here to post feedback.

1x1
1x1
 Post Feedback:
1x1
1x1
1x1

Login using the form on the top of the page to post feedback (if you are a registered user). If you have not yet registered, click here to do so. It's FREE!.

1x1
(1x1 graphic )

© 1997-2009 ThriftyFun.com - Design by Cumuli Design
Disclaimer: ThriftyFun.com cannot accept any responsibility for any injury or damage that you may cause to yourself, others, or property when following any advice given on this site. Read the full disclaimer. If you find any information on ThriftyFun.com or in our newsletters that is either erroneous and/or potentially harmful to others, please Contact Us, immediately.