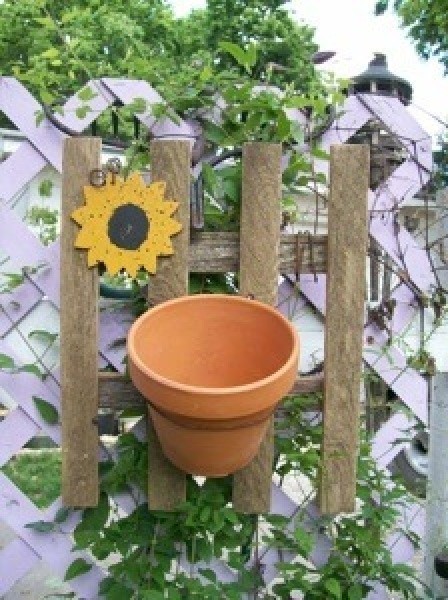
This garden hanger was made from old leftover barn wood and fence boards from previous projects, a recycled clay pot and baling wire. It is simple and quick and can easily be hanging on your garden gate by noon.
Approximate Time: Couple of hours
Supplies:
- barn wood or fence board scraps
- pencil
- jigsaw
- nails
- baling wire
- 4-6 inch clay flower pot
- painted wood shape
- measuring tape
- table saw
- hot glue gun
- hammer
- wire cutters
- needle nose pliers
Instructions:
- Cut four pieces of old barn wood or fence boards 1 1/2 inches wide by 14 inches long for the pickets and two pieces a 1 1/2 inches wide by 12 inches long for the fence braces.
- Lay the fence pickets vertically on your work table with the back side up and laying side by side. Measure up from the bottom 4 inches on each one and mark with a pencil. Measure down from the top 3 1/2 inches on each one and mark with a pencil.
- Separate the pickets, so they are laying as wide as the fence braces are long. Apply a dab of hot glue above each 4 inch mark. Lay a fence brace, horizontally, across the pickets with the 4 inch marks below the brace as a guide. Apply a dab of hot glue below the 3 1/2 inch marks on each picket. Lay the remaining brace horizontally across the pickets with the 3 1/2 inch marks above the brace as a guide. Let the glue harden and turn the picket fence over.
- Nail the pickets to the braces in the center of each intersecting board to secure.
- Cut two pieces of baling wire 36 inches long. If you do not have baling wire, you could use heavy galvanized wire or copper wire.
- Form one length of wire into an arched shape. From the back, insert an end of the wire between the first two pickets on the left, under the fence brace. Insert the other end of the wire between the two pickets on the right. Pull the wire through until the arch measures approximately 4 1/2 inches above the fence. Wrap the wire ends around the top fence brace to secure. This is the hanger.
- Lay the clay pot over the center of the remaining wire. Wrap the wire around the pot under the rim and twist to connect and form a ring. Remove the pot.
- Insert the ends of the wire through the front of the fence, to the back in the opposite way as the hanger wire. Adjust and bend the pot ring, horizontally, and position slightly above the center front of the fence. Wrap the ends of the wire around the top brace to secure.
- Nail a painted wood shape on the upper left or right of the picket fence. Plant flowers in your pot and insert the pot into the wire ring. Hang on your garden gate or a fence post and enjoy.
By Cyndee from Winfield, KS
Add your voice! Click below to comment. ThriftyFun is powered by your wisdom!

likekinds
Gold Post Medal for All Time! 523 Posts January 24, 20190 found this helpful
Pretty
Add your voice! Click below to comment. ThriftyFun is powered by your wisdom!