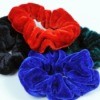
For all of you who have already crocheted everything you can think of as gifts for your friends and relatives, here's something new and fun to make for them! It's a beautiful pattern I've designed myself for beaded hair scrunchies which I'd like to share with you. This scrunchie will glimmer and shimmer in the light and both kids and adults love to wear them.
*Beads: You''ll need 22 each of type "A" (the larger bead) and 33 each of type "B" (the smaller bead). Plastic beads work best because they are lighter in weight, but glass beads are also okay. I sometimes use both. Faceted beads sparkle nicely and large seed beads will also work if they are mixed with a much larger second type of bead. I've even used 1 small button in place of a set of beads.
** Yarn: The yarn should be thin enough to go through the beads but not fray and it works best if it's not fuzzy. Knit-cro-sheen (for lace and doilies) works wonderfully, but if you can find a shiny rayon blend in lace weight you've got it made! This yarn or fiber needs to be strong enough to take the beads rubbing back and forth across it without catching on the beads and snagging, so a dense weave yarn or thread works best.<
This pattern uses only 2 stitches (single crochet and slip stitch). You'd do 3 single crochets around the band then put on a set of beads one at a time with a slip stitch after (and over) each bead then repeat (3 single crochets around the band, put on the beads one at a time with a slip stitch after (and over each one) then repeat.
Note: If your beads are tiny, you can do 2 single crochets between each set of beads instead of 3, with buttons you need 3 sc
Start with step 1 again and continue this same pattern around the elastic hair band until you have used up all 22 sets of beads.
To Finish: Pull the beginning piece of yarn (from where you first started) through the ending loop of yarn then tie 3 square knots to finish, then thread the yarn-thread back into your work and tie these ends again for extra security. Finish by dabbing the knots with clear nail polish for even more security. Lastly, gently pull on the elastic to stretch it and the beads will arrange themselves into an even pattern.
A Warning: Don't pull to tightly on the knots when tying or you may break your thread as I have done on several occasions.
Any questions? Send a note to "Cyinda" here on ThriftyFun and I'd be happy to answer. I've designed many patterns myself but this is the first time I've taken the time to actually write one down. Let me know how your beaded scrunchie turned out and please let me know if I've made myself perfectly clear and if I could make any changes. If you like this easy beaded scrunchie and I'll take the time to write up more of my original crochet patterns (from beginner to advanced).
By Cyinda from near Seattle
Add your voice! Click below to comment. ThriftyFun is powered by your wisdom!
< What does the finished project look like? >
I wish I had a camera that worked, but it's SUPER-pretty & sparkly. It looks like a crocheted scrunchie with beads all around it... There's a cluster of 2 large beads, then a few single crochet stitches then a cluster of 3 beads... The directions are basically how to crochet the beaded clusters. I saw one similar to this that sold for around $10, so I worked for quite a few hours to make up my own pattern for it.
Add your voice! Click below to comment. ThriftyFun is powered by your wisdom!