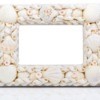
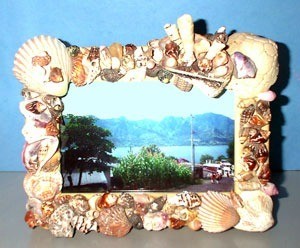
Ever collected shells at the beach or just admired their natural beauty? Frames decorated in shells are always distinct (no two shells are the same), stimulate personal or collective creativity, and evoke a peaceful and harmonious atmosphere for years to come.
Materials:
- shells: enough to cover entire frame from personal collection OR purchase assortment from local craft store (i.e. Michaels) or online
- frame: any wooden frame (4 x 6 inches is sufficient) NOT distressed or old
You can find wood frames priced under $4 available at local Walgreens
- glue: white or all-purpose
- damp cloth/towel: clean and large enough to wipe frame, glue spills, and/or hands
Instructions:
- Determine whether finished frame will stand or be wall-mounted so shell design isn't upside down. Make sure frame is clean. If necessary, use a damp cloth or towel to remove dust or other particles. Place frame on its back (photo side up) throughout entire project.
- Start the design process by outlining the frame with various shells. DO NOT use glue at this time.
Tip: Use the larger shells first as a foundation from which you can add layers and patterns with smaller shells, as well as fill in gaps.
- When the outlined layer of shells is placed on the frame, pick up one shell at a time to glue. Hold the shell upside down while squeezing the bottle of glue. Make sure the shell is completely coated as it is pressed onto the frame.
White and all-purpose glue will dry clear as long as you don't use dirty items (i.e. cloth, fabric, hands) to wipe up excess splurges.
- When all of the shells are glued on the frame, allow for sufficient dry time to begin gluing further layers.
Dry Tip: Lightly wiggle a couple of shells approximately an hour later. If any shells shift (remember, just a gentle touch), wait at least another hour and test again. Note: Using excess glue will take shells longer to dry.
- Once the last shell has been glued, give your frame ample time to dry. Dry time will vary based on the number of layers, amount of glue used, and other factors. Use the Dry Tip (above) or for a more secure bet, wait at least 6 hours (or overnight).
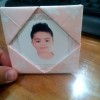
- Finally, your frame is dry! Carefully turn it over and remove the backing and sample photo. Clean the inside of the glass, if necessary. Place an image that best signifies the meaning of your new frame. Your image doesn't have to be limited to a photo; it can be anything from a drawing, postcard, magazine cutout, etc.
- Carefully put your frame back together and place it in a location that you can admire it from.
By Nancy
Add your voice! Click below to comment. ThriftyFun is powered by your wisdom!
By wonderlady4crafts (Guest Post)
July 27, 20070 found this helpful
This is lovely and will be a great idea for one of the groups I volunteer for. Awesome thanks for sharing.
By Lynda (Guest Post)
July 28, 20070 found this helpful
SWEET! God bless you. : )

suzanne
Silver Post Medal for All Time! 277 Posts July 29, 20070 found this helpful
how beautiful
Add your voice! Click below to comment. ThriftyFun is powered by your wisdom!