Home |  Index |  Submit Request |  Share Photos |  Share Tips |  Active Topics |  New Feedback  |  Contact Us  |  Search
 User Login:  Username:    Password:      Forgot It?  | Register

 Popular Topics
 - Beauty
 - Budget and Finance
 - Christmas *
 - Cleaning
 - Consumer Advice
 - Craft Projects
 - Craft Tips
 - Food Tips
 - Garage Sales
 - Gardening
 - Gifts
 - Green Living
 - Home Improvement
 - Organizing
 - Parenting
 - Parties
 - Pest Control
 - Pets
 - Product Reviews
 - Recipes
 - Repair
 - Thanksgiving
 - Weddings for Less

More Topics

Google Search:

Web thriftyfun.com

About:
RSS Feed
About Us
Media
Advertising
Contact Us
Privacy Statement
Disclaimer

Craft Project: Recycled Flower Pot with Coffee Filter Flowers

1x1
Date: 05/07/2008 Topic: Craft Projects > Crafts for Kids  
1x1
1x1
Post Feedback! | Email Friend | Print | Get Responses | Bookmark | del.icio.us | Link | Rate: Thumbs Up Thumbs Down
Recycled Flower Pot with Coffee Filter Flowers
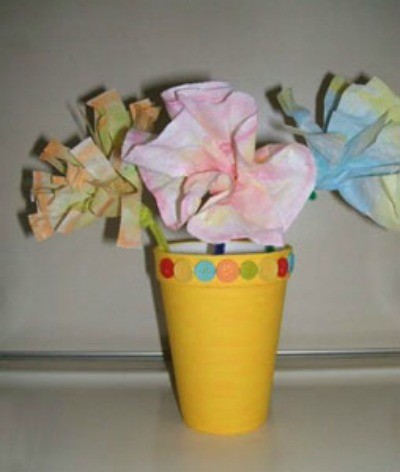
This bright, pretty flower pot is easy enough for kids to make and perfect for holding coffee filter flowers. Or, you could plant a real flower in the pot by adding some potting soil and some seeds.

Approximate Time 30 minutes

Supplies:

  • 16 oz. styrofoam cup
  • small piece of floral foam
  • colorful buttons
  • craft glue
  • yellow acrylic paint
  • paintbrush
  • scissors
  • coffee filters
  • water color paints
  • water
  • chenille stems, one for each flower

Instructions:

To make the flower pot, paint cup yellow using acrylic paint, and allow to dry completely. Glue buttons around the rim of the cup and let dry. Place small piece of floral foam inside the cup to insert the flowers. To make flowers, place newspaper on your work surface to protect it. Flatter each coffee filter, and paint with watercolors. Use whatever combination of colors you like. I used two colors for each flower. Allow filters to dry completely or use a hair dryer to speed up the drying time.

Cut about 2 inches off the end of each chenille and set both pieces aside. There are several different ways to make your flowers. You can fringe the ends by cutting thin strips around the filter edge. You can cut thicker strips to make larger petals, or don't cut the filter at all to make it resemble a rose. Insert the large piece of chenille stem into the center of the coffee filter about 1 1/2 inches.

Hold onto the small end and turn the flower upside down so that the long end of the chenille is sticking up. Grasp the center of the coffee filter and gather it around the small end of the chenille stem. Twist the smaller piece of chenille around the gathered filter to secure the flower in place. Turn the flower back over and fluff the petals out, as desired. Insert the stems into the floral foam. You could cover the foam with moss or shredded green paper to resemble grass.

By Mom of 1 from Wilkesboro, NC

Jump to Feedback | Post feedback
Related Links:
Previous: Toffee Ice Cream Pie ThriftyFun Next: Craft Project: Butterfly Note Cards
1x1
 Feedback
1x1
1x1
1x1
1x1
 Sponsors
1x1
1x1

Post by NoviceKnitter (1) | (05/07/2008)
Contact
I'll bet trimming the edges of the filters with those zigzag, etc shaped craft sisscors would make some interesting flowers, too. Can't wait to try this!

Report Spam or Abuse


1x1

Post Feedback:
Login using the form on the top of the page to post feedback if you have registered with ThriftyFun. If you have not yet registered, click here. It's FREE!. If you are not registered you can post feedback as a guest below. Please don't use your email address for your name because spam robots can dredge it from our site. Please do not post your feedback more than ONCE. We need to approve all guest feedback and it may take from minutes to hours for that to happen.
(1x1 graphic )
Your Name

Subject

Feedback

text tool text tool text tool text tool

Image Upload: Add an image to your post! Click the "Browse" button below and select an image from your hard drive. Please only select gifs or jpegs. If you have any problems, just email the image to images@thriftyfun.com


If you want to post your email address for responses from readers, obscure it in some way like put spaces between the name and @ sign and service address with (remove spaces) behind it or name (at) server (dot) com . This is for your protection from those creepy Robots.

(1x1 graphic )

© 1997-2008 ThriftyFun.com - Design by Cumuli Design
Disclaimer: ThriftyFun.com cannot accept any responsibility for any injury or damage that you may cause to yourself, others, or property when following any advice given on this site. Read the full disclaimer. If you find any information on ThriftyFun.com or in our newsletters that is either erroneous and/or potentially harmful to others, please Contact Us, immediately.