Home |  Index |  Submit Request |  Share Photos |  Share Tips |  Active Topics |  New Feedback  |  Contact Us  |  Search
 User Login:  Username:    Password:      Forgot It?  | Register

 Popular Topics
 - Beauty
 - Budget and Finance
 - Christmas *
 - Cleaning
 - Consumer Advice
 - Craft Projects
 - Craft Tips
 - Food Tips
 - Garage Sales
 - Gardening
 - Gifts
 - Green Living
 - Home Improvement
 - Organizing
 - Parenting
 - Parties
 - Pest Control
 - Pets
 - Product Reviews
 - Recipes
 - Repair
 - Thanksgiving
 - Weddings for Less

More Topics

Google Search:

Web thriftyfun.com

About:
RSS Feed
About Us
Media
Advertising
Contact Us
Privacy Statement
Disclaimer

Tall Floral Arrangement

By Shauna Smith Duty
1x1
Date: 11/28/2005 Topics: Craft Projects > Floral | Photos > Crafts  
1x1
1x1
Post Feedback! | Email Friend | Print | Get Responses | Bookmark | del.icio.us | Link | Rate: Thumbs Up Thumbs Down
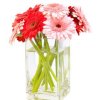
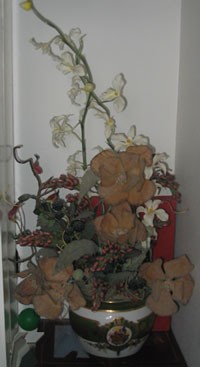
Floral arrangements are best classified by shape. This project describes how to build a tall triangular floral arrangement. When complete, it will look best on a podium, shelf, or end table as the tallest of three objects. Customize this arrangement by choosing floral stems that compliment your décor or represent a specific season.

What you'll need:

  • 1 or 3 tall stems (this can be orchids, curly willow, glittered birch twigs, feathers, etc.)
  • 2 different textural elements (berries, wheat, Christmas balls, pinecones, fruit, etc.)
  • 1 bush or 3 stems of flowers or greenery
  • stout container that is about as tall as it is wide
  • floral foam
  • glue gun
  • floral snips
  • sphagnum moss or Spanish moss
  • floral pins (U-shape)

pyramid floralSecure floral foam to the inside of the container with your glue gun. The foam should be even with the lip of the container. Cover the foam with a thin layer of moss and secure it with floral pins. This arrangement will have a front and a back.

First, insert the tall stems about 2" from the back of the container. Next, insert the textural elements so that more weight is on one side of the arrangement. Do not disperse them evenly. Work with odd numbers. Place three textural elements on the right side and two on the left, for example. This puts more visual weight on the right side of the arrangement, and it keeps the total number of textural elements odd, 5.

Snip apart your bush to create separate stems, or if you have stems, snip the ends off so that the stem (not including the flower or greenery) is about 4"6" long. Again, working in odd numbers, use these stems add some height at the base of the tall stems. They should be about half as tall as the tall stems. Also insert the stems into either side of the arrangement, but not in even numbers.

Pull some of the textural elements up to vary the visual depth of the arrangement. Make sure some of the stems fall below the lip of the container. While you do want the impression of a pyramid shape overall, you do not want to be able to draw any imaginary lines that are straight. Have you ever seen a tree that naturally grows in perfect lines? Nature, and that is what we are imitating with silk floral arrangements, has no straight or perfect lines.

Turn the container around and view all four sides, making adjustments to the placement of elements as needed. The back of the arrangement, though it may never again be seen, should not be left bare or disheveled. Use leftover stems of greenery or flowers to fill in bare spots and give a look of fullness. This fullness will create a background for the arrangement when viewed from the front. Step back and look at the arrangement. Make sure there are no straight imaginary lines. Vary the height of the three tall stems and intertwine them if they can be manipulated. Now go find the perfect home for your new work of art.

About The Author:
Shauna Smith Duty is a freelance writer with a penache for writing family and parenting articles. She composes articles for both print and web publications, reviews children's books and movies, writes short plays, and provides editing services. Visit her online at http://www.shaunasmithduty.com
Jump to Feedback | Post feedback
Related Links:
Previous: Crocheted Tulip Placemats ThriftyFun Next: Making Fleece Scarves for Gifts
1x1
 Feedback
1x1
1x1
1x1
1x1
 Sponsors
1x1
1x1

No Feedback Yet

Be the first to post feedback! Click here to post feedback.

1x1

Post Feedback:
Login using the form on the top of the page to post feedback if you have registered with ThriftyFun. If you have not yet registered, click here. It's FREE!. If you are not registered you can post feedback as a guest below. Please don't use your email address for your name because spam robots can dredge it from our site. Please do not post your feedback more than ONCE. We need to approve all guest feedback and it may take from minutes to hours for that to happen.
(1x1 graphic )
Your Name

Subject

Feedback

text tool text tool text tool text tool

Image Upload: Add an image to your post! Click the "Browse" button below and select an image from your hard drive. Please only select gifs or jpegs. If you have any problems, just email the image to images@thriftyfun.com


If you want to post your email address for responses from readers, obscure it in some way like put spaces between the name and @ sign and service address with (remove spaces) behind it or name (at) server (dot) com . This is for your protection from those creepy Robots.

(1x1 graphic )

© 1997-2008ThriftyFun.com - Design by Cumuli Design
Disclaimer: ThriftyFun.com cannot accept any responsibility for any injury or damage that you may cause to yourself, others, or property when following any advice given on this site. Read the full disclaimer. If you find any information on ThriftyFun.com or in our newsletters that is either erroneous and/or potentially harmful to others, please Contact Us, immediately.