Home |  Index |  Submit Request |  Share Photos |  Share Tips |  Active Topics |  New Feedback  |  Contact Us  |  Search
 User Login:  Username:    Password:      Forgot It?  | Join ThriftyFun!

 Popular Topics
 - Beauty
 - Budget and Finance
 - Christmas *
 - Cleaning
 - Consumer Advice
 - Craft Projects
 - Craft Tips
 - Food Tips
 - Garage Sales
 - Gardening
 - Gifts
 - Green Living
 - Home Improvement
 - Organizing
 - Parenting
 - Parties
 - Pest Control
 - Pets
 - Product Reviews
 - Recipes
 - Repair
 - Thanksgiving
 - Weddings for Less

More Topics

Google Search:

Web thriftyfun.com

About:
RSS Feed
About Us
Media
Advertising
Contact Us
Privacy Statement
Disclaimer

Wooden Snowflakes

By Christine Weber
1x1
Date: 12/07/2005 Topics: Christmas > Decorations > Tree | Craft Projects > Christmas > Ornaments  
1x1
1x1
Post Feedback! | Email Friend | Print | Get Responses | Bookmark | del.icio.us | Link | Rate: Thumbs Up Thumbs Down
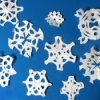
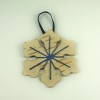
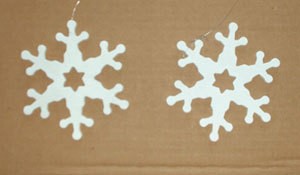
Intricate wooden snowflakes are painted white and hung on the tree with silver thread. An optional touch of glitter provides extra pizzazz for those who like their holidays to sparkle!

Wooden Snowflake

Materials and Equipment:

  • a large plastic bag or several sheets of newspaper
  • several three-dimensional wooden snowflake forms, unpainted (I like to use snowflakes that are 4" x 4", and about 1/8" thick.)
  • white acrylic decorating paint
  • one spool of silver metallic thread
  • a small paintbrush
  • two lids from used plastic containers (such as a yogurt container)
  • white or silver glitter (optional)
  • craft glue (optional)
  • a glue spreader or Q-tip (optional)
  • bottle caps or buttons, one for each snowflake (optional)

Instructions:

1. Before you start, clear the table and cover it with newspaper or a large garbage bag to avoid getting paint on the table.

2. Pour a small puddle of white paint onto one of the plastic container lids.

3. Load your paintbrush with the paint and paint one side of a wooden snowflake form until evenly covered. Place the snowflake on the plastic or newspaper paint side up to dry.

4. Repeat step three for all the snowflakes you wish to complete. Allow to dry.

5. Next, paint the reverse side of each snowflake. Allow to dry again.

6. Finally, paint the rim of each snowflake. Allow to dry.

7. If applying glitter, pour a small puddle of glue onto the other plastic container lid. With the glue spreader or Q-tip, spread glue along the edges of each snowflake. Shake glitter over the glue until covered, tapping off any excess. Allow each snowflake to dry, placing bottle caps or buttons under them, or any thing that will prevent the glue from touching the table.

8. Once all your snowflakes are completely dry, tie a piece of the metallic thread to each one (about 6" of thread per snowflake). Tie the other end into a loop.

9. Hang snowflakes from your Christmas tree or in a window and "Let it snow"!

Jump to Feedback | Post feedback
Related Links:
Previous: Woodland Log ThriftyFun Next: Bouquet of Stars
1x1
 Feedback
1x1
1x1
1x1
1x1
 Sponsors
1x1
1x1

Post By Jackie from Manitoba Canada (Guest Post) (12/08/2005)
Cool idea...NEver thought of that but what a great idea....

Report Spam or Abuse


1x1

Post Feedback:
Login using the form on the top of the page to post feedback if you have registered with ThriftyFun. If you have not yet registered, click here. It's FREE!. If you are not registered you can post feedback as a guest below. Please don't use your email address for your name because spam robots can dredge it from our site. Please do not post your feedback more than ONCE. We need to approve all guest feedback and it may take from minutes to hours for that to happen.
(1x1 graphic )
Your Name

Subject

Feedback

text tool text tool text tool text tool

Image Upload: Add an image to your post! Click the "Browse" button below and select an image from your hard drive. Please only select gifs or jpegs. If you have any problems, just email the image to images@thriftyfun.com


If you want to post your email address for responses from readers, obscure it in some way like put spaces between the name and @ sign and service address with (remove spaces) behind it or name (at) server (dot) com . This is for your protection from those creepy Robots.

(1x1 graphic )

© 1997-2008 ThriftyFun.com - Design by Cumuli Design
Disclaimer: ThriftyFun.com cannot accept any responsibility for any injury or damage that you may cause to yourself, others, or property when following any advice given on this site. Read the full disclaimer. If you find any information on ThriftyFun.com or in our newsletters that is either erroneous and/or potentially harmful to others, please Contact Us, immediately.