ThriftyFun Logo
Home   Find   Ask   Share   Answer   Join   Index   Login  
 
 User Login:  Username:    Password:      Forgot It?  | Join ThriftyFun!

 - Beauty
 - Budget and Finance
 - Cleaning
 - Consumer Advice
 - Craft Projects
 - Craft Tips
 - Food Tips
 - Garage Sales
 - Gardening
 - Gifts
 - Green Living
 - Home Improvement
 - Organizing
 - Parenting
 - Parties
 - Pest Control
 - Pets
 - Product Reviews
 - Recipes
 - Repair
 - Weddings for Less

RSS Feed
About Us
Media
Advertising
Contact Us
Privacy Statement
Disclaimer

Light Bulb Santa Ornaments

By Monica Resinger
1x1
Date: 11/27/2004 Topics: Christmas > Decorations > Ornaments | Craft Tips > Christmas | Old Categories > Crafts  
1x1
Post Feedback | Get Responses | Bookmark | Link | Print | Print (With Feedback) | Rate: Thumbs Up Thumbs Down | Bookmark and Share
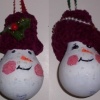
Here's a great way to recycle light bulbs! Make a bunch of them to hang on the tree or give as gifts. This also is a great craft to sit down and do with the kids.

Supplies:

  • Burnt out light bulb
  • small piece of sandpaper
  • white, flesh or beige, and red acrylic paints
  • small paintbrush
  • snow textured paint

Directions:

1 Start with any size or shape burned out light bulb. Sand it lightly with sandpaper so the paint will adhere better. Paint the glass with a base coat of white acrylic paint.

2 Holding the light bulb with the skinnier side up, paint a 1 - 1 1/2" circle in beige or flesh on the wider part of the bulb for Santa's face.

3 Paint snow textured paint over the white paint.

4 Paint facial features and rosy cheeks on the beige. Tip: The rosy cheeks can be done with lipstick.

5 Paint the metal portion of the bulb red for Santa's hat.

6 Finish off by glueing a cotton ball on the very top of the hat. Also glue some stretched cotton around the base of the hat. Hot glue a piece of red ribbon to hang by.

About The Author: Copyright, 2000, Monica Resinger - Monica Resinger is the creator of 'Homemaker's Journal E-Publications' where you will find many fun and informative home and garden related e-books, tip sheets and how to sign up for her FREE home and garden newsletter! Click here to visit: http://homemakersjournal.com/

(1x1 graphic )
Previous: Firing Small Clay Items ThriftyFun Next: Using up Leftover Stuffing
(1x1 graphic )
1x1
1x1
 Feedback
1x1
1x1
1x1

By Joyce (Guest Post)
An illustration of the finished ornament would be helpful for those of us who are "visual" learners.

Posted on 11/29/2008 | Report Spam or Abuse

1x1
1x1
 Post Feedback:
1x1
1x1
1x1

Login using the form on the top of the page to post feedback (if you are a registered user). If you have not yet registered, click here to do so. It's FREE!.

1x1
(1x1 graphic )

© 1997-2009 ThriftyFun.com - Design by Cumuli Design
Disclaimer: ThriftyFun.com cannot accept any responsibility for any injury or damage that you may cause to yourself, others, or property when following any advice given on this site. Read the full disclaimer. If you find any information on ThriftyFun.com or in our newsletters that is either erroneous and/or potentially harmful to others, please Contact Us, immediately.