If, like me, when you make signs, you have a hard time writing in a straight line, or making your letters a uniform size, write the words in capital letters, tilting them slightly, and purposely making one high and one low. This also allows for more letters in less space. Finish each letter by making dots at the ends.
(Note: The title above is an example)
To avoid bleeding into the wood grain when writing on raw wood with a felt tipped pen, first sand the area, then apply a coat of Elmer's Glue. It goes on white, and dries clear. If it is too thick, thin a little with water. A second coat will make it smoother to write on. When dry, you can write on it easily and it will not bleed. If you make a mistake in your writing, you can hold it under running water, and scrub the writing and the glue off, and start over.
If you are using a permanent felt tip marker on your work, do not brush on a clear finish as the marker will run and smear. Instead spray a couple light coats of clear varnish or clear paint. Let the first coat dry before adding the second coat.
To keep the lip on a paint can neat and clean when pouring paint, use a plastic container with the bottom cut out. For a gallon can, use a cottage cheese container, and for a quart can, use an 8 oz. margarine tub. Just place them firmly into the opening, and pour your paint. Wipe the excess back into the can with a paintbrush, remove the container, and wash or toss.
Instead of buying expensive and messy wood stains for inexpensive items, use latex paint in your choice of color. I thin it down using about 1 part paint to 2 parts water, but you can experiment with this formula. If your items are small, just dip them and let them drain. With large items, pull on a pair of rubber gloves and apply with a sponge. For a classic stain look, use a shade of brown, but I also use this process for toys, using bright colors. Much cheaper and quicker than oil based stains. However, I don't recommend this for furniture items.
If you have patterns that you are going to use many times, make a copy of the pattern from Masonite board, wall paneling, or 1/4 inch plywood. They will be easier to draw around, and last longer than cardboard.
Here is another tip for pattern making, especially with small pieces that are hard to draw around. Make copies of the pattern, and apply them to your wood with adhesive spray. Then just cut around the outline and peel off the paper.
When cutting out duplicate pieces from thin wood, stack the wood 3 or four high and put a small nail through each corner. Use a nail that is just a little shorter than the thickness of your stack, so that the point doesn't come completely through and catch or scratch your saw table. Then just draw your pattern on the top piece and cut them all at the same time.
If you use large amounts of paint as I do, consider buying your most used colors in quarts - many paint stores will now mix to match, this saves a great deal of money in the long run. Most stores now have a computer to match any color you want. Just take a paint chip of the color with you to the store.
When you find a color you like, write down the formula that the paint store uses, the name of the color, and a spot of the actual paint on an index card for future reference.
When painting a large number of small identical items, stack the items in piles that are comfortable to hold in one hand and paint all the sides at once - a real time saver!
If you are interrupted before you finish a painting project, wrap your brush in plastic wrap, and you will not have to clean it before resuming your painting. If it is going to be a lengthy interruption, pop the plastic wrapped brush into the freezer.
When you have to paint dots, such as tiny white dots for highlighting eyes in your projects, use a small dowel, a toothpick, or the tip of your paintbrush handle to make them. Dip in paint before each dot so they are pretty equal in size.
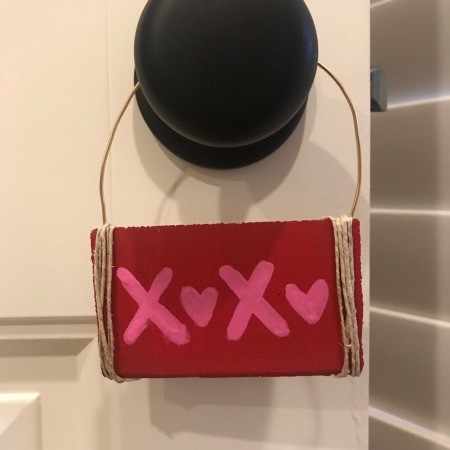
Do you have any thin/small wood scraps? You can create cute little wood signs as Valentine's decorations.