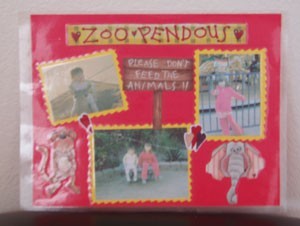
If you have a lot of extra photos and dread putting them all in albums, a photo placemat is a great way to show them off to everyone. You can use your scrapbook skills and supplies to create an entertaining place at the dinner table. The photo fun placemat is a great gift to give to friends. However, I find that young kids really like to see themselves when they eat. I made this one after a trip to the zoo.
Supplies
- 8 1/2 x 11 scrapbook paper - red
- photos
- solid color scrapbook paper - yellow
- die cuts
- scrapbook markers
- scissors - regular
- scissors - designer edged
- sticky adhesive dots
- double-sided sticky tape
- self-laminating sheets
Instructions:
- Take pictures and stick them to yellow scrapbook paper using double-sided sticky tape.
- Cut around the pictures using designer-edged scissors, giving the pictures a framed feel.
- Put the die-cut with the "title" on the top. In this case the title is "Zoo-pendous." You can use the double sided sticky-tape. Remember, you will want the paper to be horizontal rather than vertical.
- Lay out the pictures and stick them to the red paper. Using the double sided sticky tape.
- Use the sticky dots for the die cuts to give them a "sticker" back, and place them around the pictures.
- When your layout is complete, use the self-laminating sheets to turn your page into a placemat. Take one sheet and place it over the top, then turn the placemat over and stick another laminating sheet to the bottom. If you have a laminating machine, even better, as you can use it to laminate the placemat.
- These are also nice for putting up on the fridge, too. Just add magnets to the back of the placemat.
Add your voice! Click below to comment. ThriftyFun is powered by your wisdom!
By debbie (Guest Post)
April 10, 20060 found this helpful
What a great idea, my daughter is going to the circus next week, maybe i will make her one afterwards.
By SunshineRose (Guest Post)
August 31, 20070 found this helpful
I put a glass top on a small table. On the back I taped favorite photos so they
showed through when it was on the table.
I get to enjoy the photos more this way.
I got my glass table top at Walmart.
Add your voice! Click below to comment. ThriftyFun is powered by your wisdom!