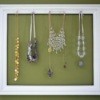
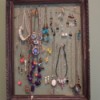
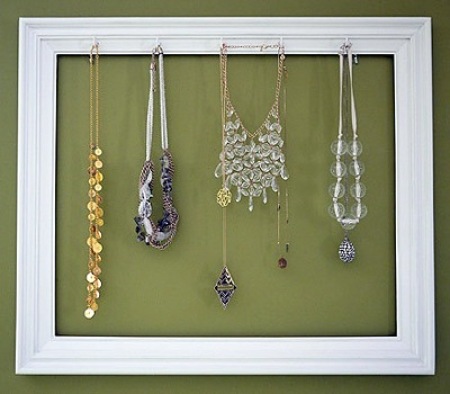
Home |  Index |  Submit Request |  Share Photos |  Share Tips |  Active Topics |  New Feedback  |  Contact Us  |  Search
 User Login:  Username:    Password:      Forgot It?  | Join ThriftyFun!

 Popular Topics
 - Beauty
 - Budget and Finance
 - Christmas *
 - Cleaning
 - Consumer Advice
 - Craft Projects
 - Craft Tips
 - Food Tips
 - Garage Sales
 - Gardening
 - Gifts
 - Green Living
 - Home Improvement
 - Organizing
 - Parenting
 - Parties
 - Pest Control
 - Pets
 - Product Reviews
 - Recipes
 - Repair
 - Thanksgiving
 - Weddings for Less

More Topics

Google Search:

Web thriftyfun.com

About:
RSS Feed
About Us
Media
Advertising
Contact Us
Privacy Statement
Disclaimer

Picture Frame Earring Holder

By Kelli Mahoney
1x1
Date: 04/05/2006 Topic: Craft Projects > Recycled > Frames  
1x1
1x1
Post Feedback! | Email Friend | Print | Get Responses | Bookmark | del.icio.us | Link | Rate: Thumbs Up Thumbs Down
A jewelry box is a nice place to put your earrings, but what if you have some favorite pairs that you wear all the time. I got tired of digging through my earrings to find the pairs, so I made picture frame that could hold my earrings in a decorative manner. A friend of mine loved the idea so much that she asked me to make this one for her daughter.

Picture Frame Earring Holder

Ingredients:

  • Wooden picture frame (no glass)
  • Plastic canvass
  • Ribbon
  • Buttons
  • Decorative Crown (pre-painted)
  • Sanding Pad
  • Acrylic Paint: Pink
  • Paintbrush
  • Hot Glue Gun
  • Hot Glue

Directions:

1. Sand down the wood frame so that it is smooth. Wipe it with a slightly damp rag to get all the dust off of it.

2. Using the pink paint, paint the entire picture frame, front and back.

3. Let the paint dry overnight.

4. Cut a piece of plastic canvas to the size of the picture opening and place it where the picture would go. If there are prongs to hold it, you do not need to glue it in. Otherwise, use your hot glue to hold the canvas in.

5. Cut four pieces of ribbon. Two cut to go down the vertical sides of the frame, and two to the size of the horizontal.

6. Hot glue the ribbon to the frame. With hot glue it can stain the ribbon, so only glue the ends. Just be sure you pull tight so your ribbon does not ripple.

7. Using the buttons, glue three to each corner.

8. Taking the crown, glue it to the top of the picture frame.

9. Hang your earrings on the plastic canvas.

Jump to Feedback | Post feedback
Related Links:
Previous: Poll: Is there a pack rat living in your house? ThriftyFun Next: Roasted Garlic Potatoes
1x1
 Feedback
1x1
1x1
1x1
1x1
 Sponsors
1x1
1x1

Post By Bella (Guest Post) (06/05/2007)
nice idea thanx :D


Post By MarySue (Guest Post) (04/10/2006)
Oh, so cute, cute, cute. I'm moving into
a new house and doing "my" bathroom in
pink, black and white. The old fashion
poka-dots, strips, with shoes, hats,
etc. This will be perfect for earrings
in my bathroom. Thank you so much for
sharing!!


Post by truerblue (60) | (04/06/2006)
Contact
You can also make a similar version for the adult ladies by stapling aluminum or fiberglass window screening to the back of a wooden picture frame with the glass, etc. removed. Hang your favorite earrings in the screening. I saw this on a TV craft show where they used an old ornate gilded type frame, and it looked pretty hanging on a wall.

truerblue in PA


Post by Ziggee (151) | (04/06/2006)
Contact
Instead of using plastic canvas, you could use a piece of styrofoam.

zig


Post by grammar (187) | (04/05/2006)
Contact
That is a cute idea........done something like this for my dd when she was younger but all in plastic canvas but this one is kewl too thanx for sharing :-)


Post by wdyjsu (278) | (04/05/2006)
Profile |Contact
Very cute idea! I like that a lot!


1x1

Post Feedback:
Login using the form on the top of the page to post feedback if you have registered with ThriftyFun. If you have not yet registered, click here. It's FREE!. If you are not registered you can post feedback as a guest below. Please don't use your email address for your name because spam robots can dredge it from our site. Please do not post your feedback more than ONCE. We need to approve all guest feedback and it may take from minutes to hours for that to happen.
(1x1 graphic )
Your Name

Subject

Feedback

text tool text tool text tool text tool

Image Upload: Add an image to your post! Click the "Browse" button below and select an image from your hard drive. Please only select gifs or jpegs. If you have any problems, just email the image to images@thriftyfun.com


If you want to post your email address for responses from readers, obscure it in some way like put spaces between the name and @ sign and service address with (remove spaces) behind it or name (at) server (dot) com . This is for your protection from those creepy Robots.

(1x1 graphic )

© 1997-2008ThriftyFun.com - Design by Cumuli Design
Disclaimer: ThriftyFun.com cannot accept any responsibility for any injury or damage that you may cause to yourself, others, or property when following any advice given on this site. Read the full disclaimer. If you find any information on ThriftyFun.com or in our newsletters that is either erroneous and/or potentially harmful to others, please Contact Us, immediately.