|
Creating Labels for Storage Boxes |
|
|
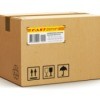
When you are storing items within a larger box (such as what reams of paper are housed in) for long-term storage, make the label of the contents on the computer, and then do a copy-and-paste two additional times so that you have 3 identical labels. Tape one on the top, one on the long side and one on the short side or end of the box.
This way, no matter how you stack the boxes, you will be able to see what is in it. Just make sure all the labels are complete on one page. This is great way to use up junk mail letters that are only used on one side.
Additionally, if you will use the sharper edge of a 12 inch ruler to "rip" the excess off, you can avoid the tedious job of cutting the labels out. Put enough pressure on the ruler as you rip the paper to hold it securely during the operation. Makes very short work of trimming out the labels.
By Ronsan from southwest Missouri
|
|
|
|
|
|
|
 |
|
RE: Creating Labels for Storage Boxes
After labeling boxes, I also print the list of box contents and place that list in my storage notebook. For instance, Box #1..baby bottles, 0-3 mo clothes, etc. Box #2 Cooking gear for camping, plates, cups, silverware. That way when I need something, I look first at the lists in the notebook to determine what # box the item I want is stored in. This one step can saves me a lot of time!
|
|
 |
|
| Login using the form on the top of the page to post feedback if you have registered with ThriftyFun. If you have not yet registered, click here. It's FREE!. If you are not registered you can post feedback as a guest below. Please don't use your email address for your name because spam robots can dredge it from our site. Please do not post your feedback more than ONCE. We need to approve all guest feedback and it may take from minutes to hours for that to happen. |
 |
|
|
|
 |
|
|