Home |  Index |  Submit Request |  Share Photos |  Share Tips |  Active Topics |  New Feedback  |  Contact Us  |  Search
 User Login:  Username:    Password:      Forgot It?  | Join ThriftyFun!

 Popular Topics
 - Beauty
 - Budget and Finance
 - Christmas *
 - Cleaning
 - Consumer Advice
 - Craft Projects
 - Craft Tips
 - Food Tips
 - Garage Sales
 - Gardening
 - Gifts
 - Green Living
 - Home Improvement
 - Organizing
 - Parenting
 - Parties
 - Pest Control
 - Pets
 - Product Reviews
 - Recipes
 - Repair
 - Thanksgiving
 - Weddings for Less

More Topics

Google Search:

Web thriftyfun.com

About:
RSS Feed
About Us
Media
Advertising
Contact Us
Privacy Statement
Disclaimer

Beeswax Christmas Trees

By Christine Weber
1x1
Date: 12/15/2005 Topics: Christmas > Decorations > Crafts | Craft Projects > Candlemaking | Photos > Holiday > Christmas  
1x1
1x1
Post Feedback! | Email Friend | Print | Get Responses | Bookmark | del.icio.us | Link | Rate: Thumbs Up Thumbs Down
Beeswax Christmas Trees
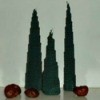
Make your own evergreen forest of tapered beeswax candles shaped like Christmas trees. Leave plain or cover with a healthy snowfall of glitter. These candles make a lovely hostess gift that can be set right on the buffet table!

Materials and Equipment:

  • one sheet of honeycomb textured beeswax, in green
  • one foot of candle wick
  • an exactoknife
  • a thick piece of cardboard or plywood to cut on
  • a ruler with a hard edge for cutting, two feet or longer
  • scissors
  • glitter, your choice of color (optional)
  • glue stick (optional)

Instructions:

1. Before starting, clear the table and cover it with a thick piece of cardboard or plywood to protect it from cuts.

2. Cut a sheet of wax lengthwise on the diagonal. You should now have two triangles. Place these on top of each other. Turn the shortest end of the wax towards you.

3. Cut a piece of wick that is just a touch longer than the short edge of the wax triangles. Press the wick onto the short edge and roll the wax over the wick. Continue rolling the two triangles, pressing the wax tightly as you go. Press the end of the wax flush against the candle when you finish rolling it.

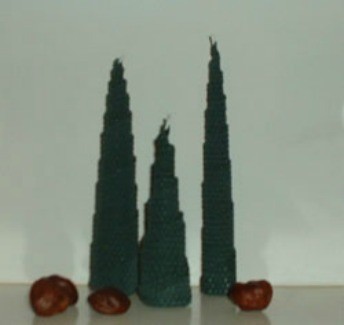
4. Step three will make one tall, medium-width Christmas tree candle. If you would like to make a thinner candle, use only one triangle of the wax. If you would like to make a shorter, fatter candle, cut a sheet of wax in half lengthwise, and then cut each half into four triangles. Place three of the four triangles on top of each other and roll. Staggering the wax so the triangles are placed over each other unevenly can also result in interesting effects.

5. Make several of these candles in different sizes and widths, and place them together on a table to make a candle 'forest'. If you are not burning the candles, you can lightly run a glue stick over the sides and sprinkle the candles with glitter 'snow'. They are also lovely on their own.

Jump to Feedback | Post feedback
Related Links:
Previous: Growing With Artificial Lights ThriftyFun Next: Nut Ornament
1x1
 Feedback
1x1
1x1
1x1
1x1
 Sponsors
1x1
1x1

No Feedback Yet

Be the first to post feedback! Click here to post feedback.

1x1

Post Feedback:
Login using the form on the top of the page to post feedback if you have registered with ThriftyFun. If you have not yet registered, click here. It's FREE!. If you are not registered you can post feedback as a guest below. Please don't use your email address for your name because spam robots can dredge it from our site. Please do not post your feedback more than ONCE. We need to approve all guest feedback and it may take from minutes to hours for that to happen.
(1x1 graphic )
Your Name

Subject

Feedback

text tool text tool text tool text tool

Image Upload: Add an image to your post! Click the "Browse" button below and select an image from your hard drive. Please only select gifs or jpegs. If you have any problems, just email the image to images@thriftyfun.com


If you want to post your email address for responses from readers, obscure it in some way like put spaces between the name and @ sign and service address with (remove spaces) behind it or name (at) server (dot) com . This is for your protection from those creepy Robots.

(1x1 graphic )

© 1997-2008 ThriftyFun.com - Design by Cumuli Design
Disclaimer: ThriftyFun.com cannot accept any responsibility for any injury or damage that you may cause to yourself, others, or property when following any advice given on this site. Read the full disclaimer. If you find any information on ThriftyFun.com or in our newsletters that is either erroneous and/or potentially harmful to others, please Contact Us, immediately.