ThriftyFun Logo
Home   Find   Ask   Share   Answer   Join   Index   Login  
 
 User Login:  Username:    Password:      Forgot It?  | Join ThriftyFun!

 - Beauty
 - Budget and Finance
 - Cleaning
 - Consumer Advice
 - Craft Projects
 - Craft Tips
 - Food Tips
 - Garage Sales
 - Gardening
 - Gifts
 - Green Living
 - Home Improvement
 - Organizing
 - Parenting
 - Parties
 - Pest Control
 - Pets
 - Product Reviews
 - Recipes
 - Repair
 - Weddings for Less

RSS Feed
About Us
Media
Advertising
Contact Us
Privacy Statement
Disclaimer

Craft Project: Easter Deviled Eggs Tray

By Debra Frick
1x1
Date: 03/18/2008 Topics: Craft Projects > Easter > Decorations | Easter > Crafts | Photos > Crafts  
1x1
Post Feedback | Get Responses | Bookmark | Link | Print | Print (With Feedback) | Rate: Thumbs Up Thumbs Down | Bookmark and Share
Easter Deviled Egg Tray
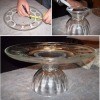
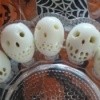
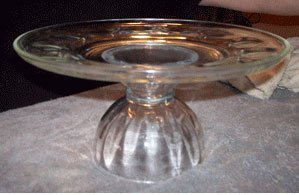
When we do dyed eggs for our grandchildren I always end up making deviled eggs to go with our Easter Ham or Leg of Lamb. I love to set a beautiful table so I decided this year I was going to try and make myself an elevated egg stand. This is a quick and easy project with parts that I bought a my local thrift store when they had a 50% off sale. The total was 3.00 dollars total.

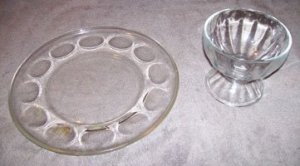
I chose clear glass because this way I could also use my egg stand when ever I did a buffet but if you wanted to use a ceramic egg tray and a ceramic bowl or cup that would contrast or match one of the colors in your egg tray you could do that too. You just need to make sure that the base is large enough to support your egg tray.

Time to complete: 10 minutes plus drying time

Materials

  • One egg tray
  • One large sundae glass
  • Clear silicone caulk
  • Grease pencil
  • Measuring tape
  • Wired ribbon to make a bow

Instructions

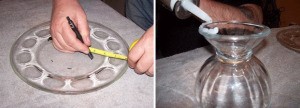
The instructions on this one are really a no brainer. Remove the price tags and wash both pieces thoroughly. I turned my sundae glass upside down so that the large mouth was the base.

EggTray1_361x200.jpg

Using a grease pencil I marked and measured the middle of my egg tray. Now you can just eyeball this or if you want to be more precise you can measure the base and the mark the middle of your egg tray or using the grease pencil just lay the plate flat and draw around the base.

With the silicone caulk make a small bead around top edge of your base. Smooth with your finger. Gently lay the tray on the base centering it to your marks and gently rotate. Do not apply any force downward because most adhesives work well if not pushed out in-between the contact surfaces. Let dry for at least 2 hours before moving and let it dry for a complete 24 hours before using.

This will need to be hand washed as it will not be dishwasher safe. Use the wired ribbon to make a bow for the base if you like.

>EggTray2_621x225.gif

About The Author: Debra Frick is a mother of 5 and a grandmother to 8 grandsons and one granddaughter. She is a published author and poetress. Recycling and saving money are her passions. She also loves crocheting and cooking. She is also a pet rescue volunteer and has many pets of her own.

(1x1 graphic )
Previous: Appraising Inherited Rings ThriftyFun Next: Using Terramycin Powder Instead of Ointment For Cat
(1x1 graphic )
1x1
1x1
 Feedback
1x1
1x1
1x1

By ApacheAngel (12) Profile Contact
Thanks for the great idea! I found the glass items at a thrift store for 35c each and I had some colored glass marbles I put in the sundae glass to give it a little flair. Used it at a small get together and got rave reviews! Thanks again!

RE: Craft Project: Easter Deviled Eggs Tray

Posted on 03/11/2009 | Report Spam or Abuse

By KimmyLynn (113) Blog! Contact
i do this with things from the dollar store and i also do this with tea cups and saucers i just use epoxy in a pinch i use hot glue if it comes aopart i figure i can always reglue!!!!!

Posted on 03/19/2008 | Report Spam or Abuse

By (Guest Post)
Very nice. You could also do this with a dinner plate and make a cake plate.

Posted on 03/18/2008 | Report Spam or Abuse

1x1
1x1
 Post Feedback:
1x1
1x1
1x1

Login using the form on the top of the page to post feedback (if you are a registered user). If you have not yet registered, click here to do so. It's FREE!.

1x1
(1x1 graphic )

© 1997-2009 ThriftyFun.com - Design by Cumuli Design
Disclaimer: ThriftyFun.com cannot accept any responsibility for any injury or damage that you may cause to yourself, others, or property when following any advice given on this site. Read the full disclaimer. If you find any information on ThriftyFun.com or in our newsletters that is either erroneous and/or potentially harmful to others, please Contact Us, immediately.