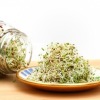
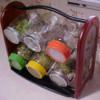
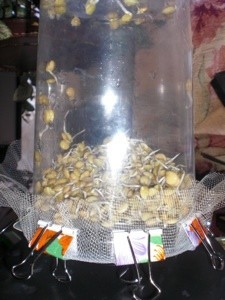
|
|
|
Start with a clean clear plastic container and a piece of gauze or netting to fit snuggly over the top of the container.
Clip the netting over the top using enough clips so your sprouts don't slip out while rinsing. In the photo I used 8 clips. This allows that your container either be hung by one of the clips on a hook,possibly in the window on a suction cup with a hook or elsewhere that it will get plenty of light or set in a sunny place.
The key is plenty of light and lots of air. The netting or gauze will allow plenty of air into your grow jar.
You may want to turn it every so often to rotate the ones on top.
Remember to rinse them and drain well 2-3 or more times a day so bacteria can't grow.
Source: Internet research
By Melody_yesterday from Otterville, MO
Below you can read previous posts and comments about this topic. The discussions on this page have been archived 4 times. Select a discussion and read the feedback here.
(Archived Feb 09, 2010)Growing Your Own Sprouts
![]() |
YouTube has a lot of videos about both of the two ideas above and I watched in awe to learn that in tiny apartments in crowded cities a whole fresh homegrown salad can be grown PER WEEK using the concept given in the videos!
Sprouting also has a lot of appeal to me. You don't really need all the commercial items available to sprout successfully! A bulk store near me carries several different sprouting seeds. I called a seed store and was told they can't sell their seeds as "sprouting seeds" without a special room to keep them and a separate scale on which to weigh them. So they don't advertise them as such. A person would have to be knowledgeable enough on their own to decide which are and which are not safe for this particular purpose. Also you "spend" 1 part seeds and "earn" 7 parts sprouts! So it is a good way to stretch food inexpensively.
Here is a site that has some suggestions for using sprouts in recipes:
The picture is of old flower seeds I wasn't sure about being too old or not. I am sprouting in a recycled plastic cookie box and dryer lint ! "Never say never!"
By Melody_yesterday from Otterville, MO
Editor's Note: Buy sprouting seeds from a natural foods store or seed supplier that are untreated seeds for sprouting. You can also use your own seeds leftover from last year that you have collected, if they were grown without chemicals. Don't use the growing seeds right out of the packets because many have been treated with fungicides which wouldn't be good to eat.
Here is a link to a website regarding Window Farms. If you have any personal experience with Window Farms, please share it as a tip on our home page.
Feedback:
It's fun to see the sprouts with the full blown winter scene in the background! I just placed an online order for a variety of seeds/beans so I will soon be eating much preferred RAW food and hopefully become the picture of youth! ;)
I won't leave them there in the night. We are under a windchill advisory for -22F and I wouldn't want my sprouts to take chill and die ! (01/08/2010)
The jar is on it's side because more seeds can get maximum light.
I secured a piece of netting on the jar mouth with a rubber band as shown in some videos I watched.It works fine and is tight enough that I can do the rinse/drains needed without removing the sprouts from the jar. (01/08/2010)
By Amandablue
Cheesecloth can be cleaned and sanitized with hot water and some bleach, without detergent and fabric softener. (02/03/2010)
By Sappie
(Archived Jan 07, 2010)Growing Your Own Sprouts
Sprouts are an excellent source of digestible protein, fibre, and Vitamin C, and are full of antioxidants. A 1997 study at John Hopkins University found that broccoli sprouts contain higher levels of cancer-fighting compounds than fresh broccoli itself.
Sprouting is so low-tech that it doesn't even require a green thumb. Some simple equipment and just a few steps will ensure that you and your family have a safe supply of this extremely nutritious food source.
Most people have heard of sprouting seed in a jar. However, as easy as thismethod sounds, it can be difficult to ensure that all of the excess moisture has drained. The humid environment inside a sprouting jar can encourage fungi and bacteria to grow. You'll find a slimy film on sprouts that have been sitting in water too long without being rinsed properly. I would not recommend growing sprouts in jars for anyone suffering from a suppressed immune system or for young children or the elderly.
The safest way to grow sprouts at home is to actually grow the seeds in soil. Any type of soil can be used but sterilized potting soil is the easiest to work with. Use whatever containers you have around the house - yoghurt containers, bowls, even baking dishes, the shallower the better. The sprouts won't require any fertilizer since all the nutrients required for growth are in the seed.
Next, just follow these simple steps:
To harvest, just take your kitchen scissors and cut what you need. The rest can be left to keep growing and harvested later. Refrigerate any unused, harvested sprouts. Sprouts grown from barley, wheat and rye will actually give you more than one crop and can be cut a number of times.
If you still prefer the soil-less method, I would encourage you to invest in a spouter that has multiple layers and trays with drainage holes. Not only do the drainage holes ensure that the sprouts remain disease-free, sprouters will encourage you to keep growing more sprouts when you see how easy it is to use them. Sprouters work best with small seeds like alfalfa, clover, and onion. All you have to do is rinse the sprouts once a day and refrigerate them once they have sprouted.
Sprouts can be grown from a wide variety of seed, each with their own distinctive flavour. While most people are familiar with alfalfa, clover, and mung bean sprouts, you can grow sprouts from the seeds of radish, fenugreek, Azuki bean, lentils, lima bean, kale, cabbage, broccoli, sunflower, onion, rye, barley, wheat and even buckwheat.
The key to starting sprouts is to find a good source of organic, untreated seed. Common garden seed found in your garden centre is often treated with chemical fungicides and should not be used for sprouting. You can find packages of organic sprouting seed at your local health food store or from a variety of mail-order companies.
For more information about sprouting, you can refer to the following resources:
International Sprout Growers Association: http://www.isga-sprouts.org
About The Author: Arzeena Hamir is an agronomist and garden writer based in Vancouver, BC. She has worked in the organic gardening industry for 8 years as a consultant and trainer. When she's not planting peas or harvesting zucchini, she runs Terra Viva Organics
Feedback:
By h_fenwick
Editor's Note: Buy sprouting seeds from a natural foods store or seed supplier that are untreated seeds for sprouting. You can also use your own seeds leftover from last year that you have collected, if they were grown without chemicals. Don't use the growing seeds right out of the packets because many have been treated with fungicides which wouldn't be good to eat. (04/20/2006)
By ThriftyFun
(Archived Jan 07, 2010)Growing Sprouts
By gran1cook from OK
Feedback:
By Dj402
By Sappie
(Archived Jul 01, 2009)Growing Sprouts
Q: I do well growing Mung beans in a jar and get good bean sprouts, but when I have tried to grow tiny Alfalfa and Radish seeds in jars and trays I have problems. Either they are hard to rinse, or the Radish seeds (in particular) develop a slight but noticeable white mold, so they are inedible. Any ideas please?
Browser from UK
A: Dear Browser,
Mung beans are supposed to be harder to grow, so obviously you're doing something right! The key to sprouting alfalfa and radish seeds is frequent rinsing. Try these steps:
1. Cover the bottom of a clean glass jar (mason, peanut butter, or mayonnaise jars work well) with seeds (about 2 seeds deep). Don't use too many seeds or you'll have problems.
2. Fill the jar about half full of cool water and let the seeds soak for at least 6 hours (or overnight).
3. After the seeds have soaked, strain off the water using a fine mesh strainer or screen that you can fit over the end of jar so you don't dump out the seeds.
4. Wait another 6 hours or so and fill the jar half full of cool water again. This time pour the water off immediately. You only need to soak the seeds overnight the first time.
5. Continue to rise and drain the sprouts TWICE each day (three times is best). This constant rinsing will prevent the seeds from drying out or from forming mold.
Take out the sprouts when they are ready to eat. For best results, keep new jars sprouting to replace the older ones as you use them.
Ellen
About The Author: Ellen Brown is our Green Living and Gardening Expert. Click here to ask Ellen a question! Ellen Brown is an environmental writer and photographer and the owner of Sustainable Media, an environmental media company that specializes in helping businesses and organizations promote eco-friendly products and services. Contact her on the web at http://www.sustainable-media.com
Feedback:
By Elizabeth
By bulrush
Set the strainer in a bowl and fill the bowl with room temp water until the seeds in the strainer are covered at least a half inch with water. Set in a dark cupboard overnight. In the morning lift the strainer out of the bowl and empty the water from the bowl and rinse the bowl. Then hold the strainer with soaked seeds under the tap using cool, but not cold water and rinse for about a minute. If your kitchen faucet has a spray unit then that is good to use also.
Set the rinsed seeds back in the empty bowl and return to dark cupboard. Rinse at least three times a day. Try to rinse before going to bed. Repeat until seeds are sprouted. Rinse again and place in refrigerator containers lined with paper towels. Hope this was a help. It works for me. (03/04/2006)
By Liberty Justice