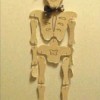
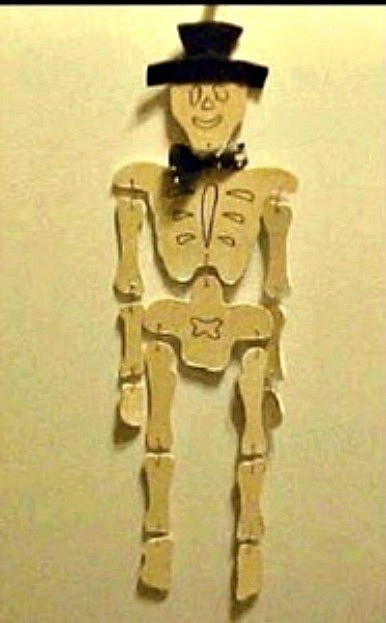
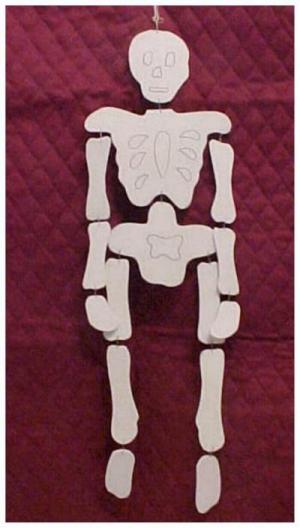
These skeletons are great fun to make and hang around for Halloween. They can be made of wood 1/4 inch plywood. Easy to make from scraps. Or if you don't have the tools to do wood, you could make them with a sheet of art foam. I made mine about 17 inches tall, but you can reduce or increase the size to suit your wishes. My picture is of a wooden one.
Materials And Tools
- thin 1/4 inch plywood or white art foam sheets
- thin wire or strong thread
- Sharpie for details
- scissors for foam - scroll saw for wood
- white acrylic paint for skeleton bones
- fluorescent paint if you want to make them glow in the dark.
- small foam paint brush
- black ribbon for bow tie
- black felt or foam for top hat
Directions:
- Print out the pattern pieces on light card stock. You can change the size if you like.
- Cut the pieces out, and reverse the arm and leg pieces for the opposite limbs.
- Make a second copy as a guide to use in placing the pieces in the correct order.
- If you make your skeleton from wood, drill a small whole as indicated by the dots. Using fine wire, loop it through adjacent bones, twist to fasten leaving enough wire to let it hang freely.
- When using foam, you can assemble them with a needle and strong thread. Make your thread long enough to let them hang freely. Make a hanging loop and fasten at the top of the head.
- The wood pieces should be painted before you assemble them. I used white acrylic paint, then painted the front with fluorescent (glow-in-the-dark) paint. Let this dry and then draw on the details with a black Sharpie.
- Use black foam or felt and cut a double hat piece. Match them up over the top of the skull (see picture) and glue into place.
- Tie a black ribbon bow between the skull and the rib cage.
By Harlean from Arkansas
Click Here to download the instructions.
About The Author: Harlean Greathouse is a mother of three who has been married for 45 years. Long time readers of ThriftyFun will probably recognize her as Harlean from Arkansas, the name she has posted under as a valuable member of the ThriftyFun community. She specializes in wood crafts and enjoys designing crafts using recyclable materials, knitting, crochet and has been an arts and crafts vendor for over 35 years.
Add your voice! Click below to comment. ThriftyFun is powered by your wisdom!

Harlean
Bronze Post Medal for All Time! 148 Posts October 28, 20080 found this helpful
Top Comment
Hey guys!
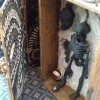
This is an update to my pattern. I now have a picture of this skeleton made with art foam instead of wood. And although my directions say to assemble him with thread, I used staples with better results. Just separate the staples from the strip, push one end into each of two adjoining pieces and then crimp the ends to secure.
And here is my photo of the finished skeleton...without the hat and tie.
Harlean from Arkansas
Add your voice! Click below to comment. ThriftyFun is powered by your wisdom!