I'm looking for help in obtaining pattern/patterns for cloth sanitary napkins/pads. My group and I will be submitting the pads to different organizations that need help for girls in Africa.
We are nurses and social workers who are novice sewers, returning to the craft to help others!
We have been to donatepads, but some of the group say we need to find something simpler. Please advise! We appreciate your help!
By Cheryl E. Dimery,LPN from Fayetteville, NC
Add your voice! Click below to answer. ThriftyFun is powered by your wisdom!
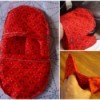
Homemade pads don't need to be too complicated. Keep them simple. An easy way is to take a facecloth, fold it into a long rectangle about 3" wide. You get about 4 layers out of a washcloth, then stitch edges on a sewing machine. Use scrap material (old tee shirts, towels, or old flannel pajamas work well) and experiment with folding layers into the appropriate rectangle shape., then sew into a rectangle.
For a very heavy flow the commercial disposable pads are better (days 1-3 of your cycle). Homemade pads work better for a lighter flow. I made some that weren't too thick to be used as mini pads. These didn't irritate my skin the way the paper pads did.
I don't buy pads at all to toss in the garbage. I have a very heavy flow. I use the large heavy ones I bought online. I am now having them custom made for me to put in my online store. They are truly wonderful. I have to say I am blessed.
www.diapersewing.com/
www.borntolove.com/
www.hillbillyhousewife.com/
www.sleepingbaby.net/
www.treehugger.com/
Mz. Scarlett: I am not sure what this has to do with sanitary pads, so my guess is you got the wrong request for your advice.
I think the idea of the washcloth is great, and you might be able to make the covering like a sleeve you can slip them in and out of for washing.
Good luck ladies. This is the link to google's ideas.
www.google.com/
I haven't read the directions for all the links, but in the past, I remember reading that you can make the last inner layer from nylon to stop accidents. You can buy nylon fabric from a fabric store, use an old windbreaker, or buy a nylon shower curtain.
I saw a website that uses PUL fabric from JOANN's @ 7.99-8.99 a yd. The pattern was like a plus sign with tabs on the side to stick on panties. I think the name is 'dignity'.
Add your voice! Click below to answer. ThriftyFun is powered by your wisdom!