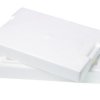
From Styrofoam blocks taken from a new TV box, I created 4 different organizers and a wall flower display with dried or artificial flowers.
I made organizers for my desk, bedroom night stand, bathroom sink top and kitchen counter. Each block came with 2 holes, 6 1/2 inches long and 3 inches deep, 1 inch wide and one other hole 3 inches long, 3 inches deep and 1 inch wide The length of each entire block is 22 inches by 6 inches high and 4 1/2 inches wide.
On the desk and bedroom organizer, I cut their size to 13 1/4 inches in length. The Desk Organizer stores craft knife pens and pencils glue stick note pad, bills to be paid, postage stamps in book, a few different size envelopes, and even a small chain of paperclips.
The Bedroom Organizer holds 3 plastic tubes to put loose change in It also holds various change wrappers, a pencil and pen, a note pad and a place to hold an empty cd case or to put my wallet, keys and watch.
The Bathroom Organizer had a built in soap dish or a place to lay your watch or rings tray.
In the kitchen, the whole small section was used to store plastic utensils, while the 2 larger ones stored favorite recipes cards and coupon organizers. The soap dish side holds about a dozen dish rags. And, yes, I kept the kitchen organizer away from all heat.
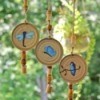
Now for the wall centerpiece/artificial or dried flower planter. Cut it to size and turn it to the solid side. Decorate with colored magazine pictures. Arrange your flowers then either hang on wall with picture hangers or display on tables or counters.
Decorating these Styrofoam blocks should be done to your tastes.I prefer using parts of landscape from magazines pictures cut to fit. This is, in my opinion, the hardest part. I cover the picture over with plastic wrap. I fasten the pictures with plain straight pins.
So, there you go! The next time you buy a TV or other appliance, don't just right away discard the Styrofoam. Make something useful out of it.
Oh I guess you want to know what tools I used.
For me it took a many an hour to select and cut out the right pictures to size. I wish I could show you them, but I don't have a scanner.
Good Luck To You All, Happy Crafting.
By Mr. Thrifty from Shermans Dale, PA
Add your voice! Click below to comment. ThriftyFun is powered by your wisdom!
I gotta say you take 1st place for THE MOST frugal idea in recycling that I have ever heard of- hats off to you!
I wish you posted a picture of how it looks like...
I used a small block of Styrofoam to make a business card holder. I carved a notch across the top and then covered it with pretty fabric. I could have bought one, but I already had the things laying around to use that would otherwise be put in the trash.
Add your voice! Click below to comment. ThriftyFun is powered by your wisdom!