Home |  Index |  Submit Request |  Share Photos |  Share Tips |  Active Topics |  New Feedback  |  Contact Us  |  Search
 User Login:  Username:    Password:      Forgot It?  | Join ThriftyFun!

 Popular Topics
 - Beauty
 - Budget and Finance
 - Christmas *
 - Cleaning
 - Consumer Advice
 - Craft Projects
 - Craft Tips
 - Food Tips
 - Garage Sales
 - Gardening
 - Gifts
 - Green Living
 - Home Improvement
 - Organizing
 - Parenting
 - Parties
 - Pest Control
 - Pets
 - Product Reviews
 - Recipes
 - Repair
 - Thanksgiving
 - Weddings for Less

More Topics

Google Search:

Web thriftyfun.com

About:
RSS Feed
About Us
Media
Advertising
Contact Us
Privacy Statement
Disclaimer

Craft Project: Miniature Dollhouse Dolls

1x1
Date: 04/10/2008 Topics: Craft Projects > Doll making | Photos > Crafts  
1x1
1x1
Post Feedback! | Email Friend | Print | Get Responses | Bookmark | del.icio.us | Link | Rate: Thumbs Up Thumbs Down
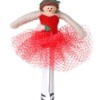
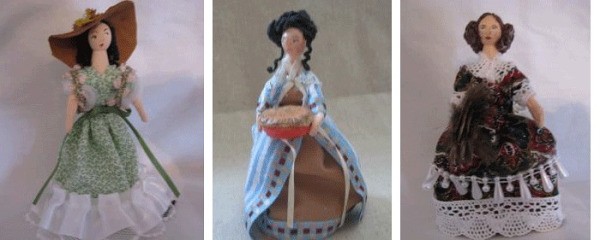
Make your own miniature doll characters to put in any doll house, book shelf, or just as a gift to someone special!

Approximate Time: a few hours

Supplies

  • clothespin
  • fabric
  • thin bendable wire
  • air-dry clay
  • fabric glue
  • acrylic paint
  • yarn
  • fine point paint brush
  • cotton yarn

Instructions

  1. Take your clothespin and drill a small hole below the "head" apporoximately where the shoulder should be.
  2. Thread the wire through the hole untl you get the length you want for the arms, then clip with wire cutters.
  3. Take a small bit of clay and mold around each "arm" and let dry.
  4. Paint flesh colored paint on head and arms, and paint face on with small paint brush. ( You could also use a fine point sharpie pen if you don't feel comfortable with a paint brush.)
  5. Cut our small pieces of fabric and glue onto doll according to the type of outfit you want the doll to have.
  6. Add any lace trims or embellishments you want .
  7. You can now add the kind of hair you want for your doll braiding the yarn, or gluing it on the head and twisting it in a bun etc. (or, you can use the air dry clay to shape a hairstyle, glue it on the head, then paint the hairdo the color you want.
  8. If you want your doll to stand, you can use a small ball of clay, stick the feet in to it, then press and glue it on a small flat disk.

By Debbie from Fisher, IL

Dolls700x281.gif

Jump to Feedback | Post feedback
Related Links:
Previous: Can you get fleas in your house without pets? ThriftyFun Next: Animal Themed Celebration For 11 Year Olds
1x1
 Feedback
1x1
1x1
1x1
1x1
 Sponsors
1x1
1x1

Post By Lori (Guest Post) (04/11/2008)
Dear Debbie-These are so pretty! I didn't know what they were made from when I first saw them. I don't think I've ever seen such lovely clothespin dolls. What an inspiration! Thanks for sharing.

Report Spam or Abuse


Post by pam2cats (62) | (04/11/2008)
Profile |Contact
I made dolls like these many years ago. They were beautiful. But a little simpler. I used pipe cleaners for arms (no holes to drill,just wraparound, I think. And I just painted on a little hair ('m not good at making hair) and made pretty bonnets or hats to put over head. It was great fun and everyone loved them. I had them on display for a long time. Thanks for the reminder.

Report Spam or Abuse


Post by luvmygingerkids (389) | (04/10/2008)
Profile |Blog! |Contact
These are lovely.

Report Spam or Abuse


Post by Lily 59 (168) | (04/10/2008)
Profile |Contact
OMG!!!!!!!!!!!!!!! Those are soooooooo beautilful!!!!!!! thanks sooooooooo much! You deserve much more than 25 dollars! You could seriously sell those! And I have so many mini dollhouse furniture - Ive got to try to do that! Thank you again! That is just crazy KOOL!

Report Spam or Abuse


Post by Sewing Granny (119) | (04/10/2008)
Profile |Contact
Let me say in again, this is an adorable idea!! How cute!!

Report Spam or Abuse


Post by Sewing Granny (119) | (04/10/2008)
Profile |Contact
This is a wonderful idea! Boy, if you don't win for this entry something is wrong. Cute idea!!

Report Spam or Abuse


1x1

Post Feedback:
Login using the form on the top of the page to post feedback if you have registered with ThriftyFun. If you have not yet registered, click here. It's FREE!. If you are not registered you can post feedback as a guest below. Please don't use your email address for your name because spam robots can dredge it from our site. Please do not post your feedback more than ONCE. We need to approve all guest feedback and it may take from minutes to hours for that to happen.
(1x1 graphic )
Your Name

Subject

Feedback

text tool text tool text tool text tool

Image Upload: Add an image to your post! Click the "Browse" button below and select an image from your hard drive. Please only select gifs or jpegs. If you have any problems, just email the image to images@thriftyfun.com


If you want to post your email address for responses from readers, obscure it in some way like put spaces between the name and @ sign and service address with (remove spaces) behind it or name (at) server (dot) com . This is for your protection from those creepy Robots.

(1x1 graphic )

© 1997-2008 ThriftyFun.com - Design by Cumuli Design
Disclaimer: ThriftyFun.com cannot accept any responsibility for any injury or damage that you may cause to yourself, others, or property when following any advice given on this site. Read the full disclaimer. If you find any information on ThriftyFun.com or in our newsletters that is either erroneous and/or potentially harmful to others, please Contact Us, immediately.