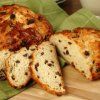
I got this recipe from a newspaper insert and gave it a try. It is a very heavy type bread, but was quick and easy.
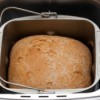
Preheat oven to 375 degrees F. Grease a baking sheet. Combine all-purpose flour, sugar, soda and salt; mix well. Cut in butter with two knives or a pastry cutter. Stir in whole-wheat flour and oats. Make a well in the center and pour in buttermilk all at once. Mix with a fork until well blended.
Turn dough out onto a floured board and knead one minute. Shape into a ball and set on baking sheet. Press into a 6-inch circle and cut a cross in the top. Bake 40 minutes or until well browned and loaf sounds hollow when tapped on the bottom.
Buttermilk substitute:
For 1 1/2 cups, I used 1 tablespoon and 1 1/2 teaspoons lemon juice into the measuring cup then added enough milk to make the 1 1/2 cups required for the recipe. Let stand five minutes before using.
Add your voice! Click below to comment. ThriftyFun is powered by your wisdom!