Browse   Newsletters   Contests   Ask   Share   Account   About Us

Clay Pot Angels

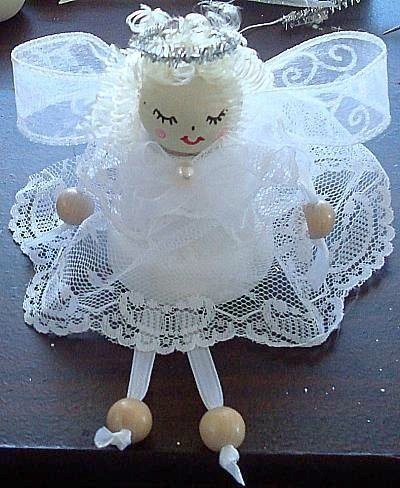
Sweet little angels to sit on your desk. Finished Clay Pot Angel

Approximate Time: 30 minutes

Supplies:

  • clay pot, 2 inches high x 2.5 inches across top
  • 3 inch section of silver metallic pipe cleaner
  • wired edged ribbon, sheer for wings, about an inch wide
  • doll hair
  • 4 wooden beads, 1/2 inch
  • hot glue
  • lace at least 2 inches wide
  • wooden bead 1.25 inches wide (I use dowel ends)
  • ribbon for legs, arms and bow
  • color markers for face
  • small bead or pearl
  • acrylic paint, white and flesh color

Instructions:

  1. Paint the clay pot white (or any color you want as a theme for your angel). Paint the round bead fleshtone. Will dry in about 10 minutes.
  2. Painting Pots White

  3. Meanwhile cut a length of ribbon about 10 inches long. Attach a bead at each end and knot the ends to keep in place. Cut another length about 6 inches long and attach a bead at each end, knotting the ends.
  4. When paint is dry, using markers (or paint if you'd like) make a face on the wood bead. I find making her eyes closed is easiest.
  5. Painted Wooden Angel Heads

  6. Cut a length of lace to go around the pot as her dress. The pot will sit upside down. I usually take a needle and loosely thread through the top to gather, but you can just glue if you have puffy lace.
  7. Painted White Pot With Lace Attached

  8. Fold the longer ribbon in half and thread through the hole in bottom of the pot. Bring up the loop a bit and thread the shorter length through the loop as shown in pic.
  9. Clay Pot Angel With Lace and Ribbon Loop

  10. Make the shorter length even on each side of pot as arms. Make the longer piece even for legs and gently pull the ribbons until flush with pot. Add a bit of hot glue to hold in place. If ribbon looks a little long, cut a bit off and re-knot.
  11. Clay Pot Angel With Wooden Beads Added

  12. Glue hair in strips until you are satisfied with the outcome. Hair can be painted if you would rather. Make a circle from the pipe cleaner and glue to head as a halo.
  13. Glue her head to the pot. Make a bow and glue to her front and add a bead or pearl in center of bow.
  14. Form a bow as wings from the wire edged ribbon and glue to her back.
  15. She is now ready to sit on your shelf or desk. Great gift for co-workers or someone in hospital.

By Myst from Muncie, IN

Feedback

Read feedback for this post below. Click here to post feedback.

By
12/06/2010

What a gorgeous idea! I hope to make this one day. I'll print it and put in my to-do craft folder.

By
12/01/2010

Real cute! I might try to make some.

By
12/01/2010

These are so cute. Thanks, I am going to make a few of these. I hope they turn out as cute as yours.

By
11/30/2010

I love it. Several of my friends collect angels. Thanks for sharing the craft, easy directions and wonderful photos.

Post Feedback

Add your voice to the conversation.

Follow ThriftyFun