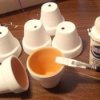
I like to dress up terra cotta pots with acrylic paints. One technique is to use three colors or more and a sponge. You only need a small squirt of each color, making it great for using those leftovers.
Make sure your pot is dry. First, spray inside and out with a good coat of polyurethane or lacquer and let dry. You'll want to use three or more colors of paint. It just takes a small amount of each. I squirt my darkest shade onto a paper plate.
Start with a slightly damp sponge, dip it into the paint, then blot onto a newspaper a few times. Lightly press the sponge to the pot to apply paint. You don't need to totally cover it. Each coat needs to dry completely.
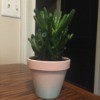
Next, repeat with the next lighter shade. Be sure to let some dark show through. Keep repeating dark to lightest. I usually paint the rim and inside just past the dirt line. It's finished when it's to your liking.
After the last color is dried, use a coat or two of clear lacquer or polyurethane inside and out to seal paint from moisture or your pretty paint will bubble and peel.
At the DIY TV site, there are all kinds of projects to do using clay pots. I've made bird feeders, light houses, and even a clay pot boy. These make terrific, low cost gifts out of pots folks want to toss or give you for cheap. My friends all say this would be a good moneymaker at bazaars or craft fairs.
Add your voice! Click below to comment. ThriftyFun is powered by your wisdom!
It's the lacquer or poly that really makes it. I've done a few without that protection and the paint just wears off.
While I have never painted clay pots, I have used the Krylon fusion paint on plastic pots, and they turned out fabulous! Not having the tangerine color I wanted in fusion, I simply used pumpkin in a regular spray-on and it has worked out well! The fusion paint will literally BOND with the plastic in 7 days. I used it on the patio table and much more! It has worked out extremely well. I would not believe how some old scarred and marred pots turned out looking fabulous!
My granddaughters and I have done this for years. My 8 year old was 4 when she started and the 4 year old was 2. Beautiful keepsakes for catchalls in the house too. They use acrylics but embellish with their fingers, finger tips, makes dandy violets, centers, polka dots, etc We use strips of masking tape to mark off designs too for colors.
However, our clear acrylic spray paint is the last coat on it. Mine are outside all summer with flowers potted and they never loose their paint, colors. One of our cutest is the jelly bean pot. All black and then one pinkie finger dipped in the colors and applied here and there. Most of our pots we choose a wash color--clear, mist, gold, bronze, etc and mix half with water. it gives it a glaze look.
Tegan did one with alternating strips, painted them orange, black, etc. Calls it her Tigger pot, as her Tigger hangs over the edge of it and catches things on her dresser.
We do these and put beanie babies in them. Paint accents the color off the animal used. We donate these to ACS Relay for Life auctions. They are snapped up quickly. We charge $10 and they go. We do all sorts of different sizes, depending on the need.
I forgot to add. When our 1 inch sponge brushes have paint in them and we come to the end of the color use, I have a large terricotta pot that sits on the table that we use to clean the brushes on. No specific design, just clean the brushes. It is a beautiful colored pot that will be clear sprayed for next summer to put plants in outside.
Add your voice! Click below to comment. ThriftyFun is powered by your wisdom!
I was wondering if anyone could give me some tips on how to paint clay pots and how to seal them after painting.
Thank you,
Di
I use acrylic paint and a water proof sealer. I am making clay pot garden buddies and this works for me. matsnana45 (06/30/2005)
By
Di, seal the pots before you paint on them, so that future moisture doesn't come through the absorbent clay and create mold under your painting. You can coat the pots with a water based sealer, paint with acrylic or gouache, and then seal with water based varnish. (07/28/2007)
By Deby