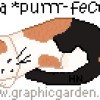
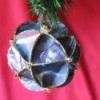
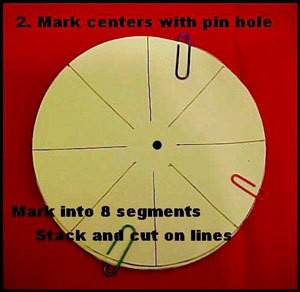
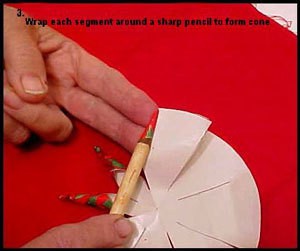
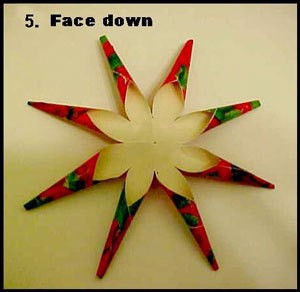
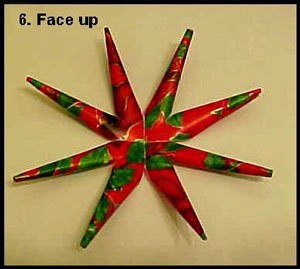
Recycle gift wrap to make unique tree ornaments or assemble a beautiful mobile.
This is a great way to recycle the wrappings from your gifts ~ be it from a birthday or from Christmas or any other occasion for that matter.


By Harlean from Hot Springs, AR
Add your voice! Click below to comment. ThriftyFun is powered by your wisdom!
Dear Harlean, this is a great idea and you are very clever to think of it. It wish I had the patience to make it. Thanks for sharing.
COOL!! My kids will LOVE making this. Thanks for the idea and great pictures.
this is definitely something Im making!! How beautiful and clever and God Bless you for sharing!! There are lots of families who can not afford to put much on thier trees and this is a beautiful way to decorate!!Im making a bunch of them and saving them to use for as many years as I possibly can-Thanks!!
You have done a great job in giving clear instructions, including the photos, for this clever ornament. Just imagine how impressive this will be with those metallic wrapping papers!!
Harlean, this is so gorgeous! I am going to make some of these to give to friends for Christmas! Thanks!
Thanks for the great directions, I'm going to attempt to do this with the elderly lady I take care of, it seems like something that we could both do together with not much difficulty
Thank you for this one!! I am always in the mood for Christmas way ahead of time with not much that I can be doing. This is a perfect thing to get me going!! Great instructions and the pictures are very good.
This really hit my eye. I have been thinking it might be fun to make it out of the sparkly felt or even some of the glittery material.
Had several of these from the '40's. Were made from left over wallpaper. Thank you for the pattern.
I can see it now......The Thanksgiving meal is cleaned up, the game is on, and a few of us are enjoying a conversation but we are also enjoying making these ornaments for my dream Christmas, having homemade ornaments on the tree! Thank you so much. You have really made my day.
Dear Harlean,
My mother grew up in a small village in Poland. Her family made decorations from scratch because they were too poor to buy them.
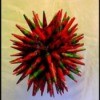
The children would collect tossed cigarette wrappers and save the silver foil to make decorations. My mom, Regina Wnukowski, has been making these Polish "porcupines" for us since as long as I can remember.
I have great memories, sitting at the dining room table with my mom and sisters, making these porcupines.
Last year, my mom started making HUGE ones, about 10 inches in diameter. Great for hanging from fans and ceiling fixtures at Christmas. Great directions. Sto lat.
Thanks,
Jean Conley
thanks for posting this! My mom taught me to make these when I was little (she learned as a young girl in Germany). I had forgotten how, and worried that I might not find instructions online. You're the best!
What a lovely ornament! I am itching to pull out my old wrapping paper! I bet this would be beautiful made from some of the lovely scrapbook papers available! Thanks for sharing!
I love these. I made some for a nursing home one year. Had forgotten all about them. Is there a way to save them from year to year? Thanks!
I was so thankful to find this pattern again. My children and I made these when they were young and they were used over and over for many years. I finally threw out the last one a couple of years ago and had wished for a long time to find the pattern.
Someone asked about storing them. I just gently put them in a box and sealed it. I wrote on the box what was in it and in large letters but handle with care.
They were used for at least 30 years until they were too faded to use.
Thanks again for the pattern.
great idea! looks fun and easy-thanks to your directions and pics. am dying to try this. if i succeed,everyone young and old alike in town will be making these. THANK YOU.
This is an awsome idea. I saw a post that someone had one made a while ago with wall paper. How would i do this idea with wall paper? I have several books that I could use.
Thanks
glo
These are so awesome. I remember making these as a child in the 50's. we used the paper wrappers from bread for the paper.
I have been looking for instructions for these for years. (I could only remember part of them) So THANK YOU VERY VERY MUCH
Hai, Iam jayanthy from India. Happened to see this site today and was taken aback by this X mas ornament. With shining gift wrappers, it is bound to show still better. Hats off to the idea . I will try today itself. Thanks.
Jayanthy
It's called a Polish Porcupine ball, and I make them from color pages out of a magazine.
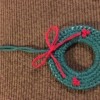
Found this great project searching for another homemade ornament. Reminds me of a wreath I made as a Cub Scout. We cut the center out of a paper plate, made the same points used here from 3x5 cards, glued them in rings around the plate from the outside in, with the tabs of the center ring wrapped around behind. Spray painted them silver or gold and put glitter on them. Scraps of wrapping paper as the "points" would have saved the den mother a lot of cleanup afterward. Great pictures. Thanks for sharing!
Add your voice! Click below to comment. ThriftyFun is powered by your wisdom!