Does anyone have any ideas on making your own peat pots? I have decided to experiment, but would like to know if someone already has the solution.
Hardiness Zone: 7a
By mary from Jackson, NJ
Add your voice! Click below to answer. ThriftyFun is powered by your wisdom!

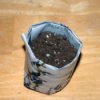
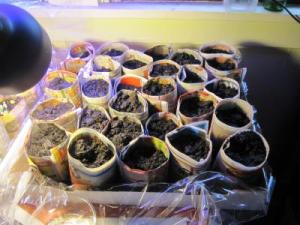
You can save your toilet paper rolls to fill with soil and ad a seed in them I put them in a pan with strait sides, I did it and it worked great much better then Pete pots.
For as far back as I can remember my mother & I have used the pressed paper-type egg cartons to start seedlings for our gardens. You may pay just a tad more for eggs in the paper cartons, but in the long run you save because those little peat pots can get expensive if you need a lot! The paper egg cartons keep you from over watering your seeds & drainage for the young plants before you have planted them in the garden. Just fill the paper egg cartons with garden soil about early to mid-February (we live in Oklahoma), plant the seeds, put them in some type of under liner to catch drips (I use cut down cardboard boxes with plastic in the bottoms), put in a sunny location (window or sun porch) or use sun lamps, & care for & water them as needed until ready for planting in late March or early April.
When ready for planting, take a pair of scissors or clippers & cut the individual egg/plant holders apart & plant the whole thing (starter plant & individual paper egg holder) in the garden. Since the egg cartons are paper, they have already started to deteriorate by planting time & deteriorate faster once planted in the ground. You can do the same thing with the styrofoam egg cartons, but you have to poke a hole in the bottoms of the styrofoam egg holders with a toothpick for drainage and of course you can't plant the little styrofoam holders in the ground because their deterioration time is so slow - so you have to take the plants out of the egg containers before planting in the garden & throw them away anyway. You're not saving anything from going into the landfill. Truthfully, the paper egg holders are lots better because you give back.
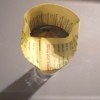
I do the same thing as described by sheilamay. One tip I would add is to use a wine bottle with a little indent in the bottom. This will let you make a flatter bottom to the pot. Here is my army of pots, snugly hanging out in a pizza box lined with plastic from my winter window plasticizing.
Here is a video of me making them. mike-is-bored.blogspot.com/
Oh shoot I was trying to respond to an archive post. in any event this is an nice recycled alternative. also you don't need tape as described in the original post.
Add your voice! Click below to answer. ThriftyFun is powered by your wisdom!