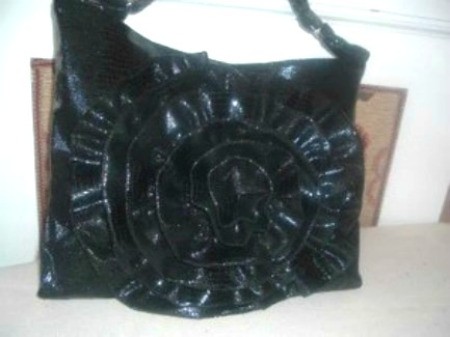
This is a unique tote bag that looks much more difficult than it is.
Approximate Time: 6 hours
Supplies:
- 1-1/2 yards fabric.
- 1-1/2yds fabric for lining and inside pockets
- 3 inches sew in Velcro
- thread to match lining and bag
- 1 yard of heavy iron on interfacing
- 2 rings for straps (optional)
Instructions:
- This bag is easy to make. It has a square bottom and inside pockets. First cut out the basic tote bag. Then use iron-on heavy interfacing to give it some body.
- In order to make the "rose", you have to use non-fray fabric. This was a very lightweight knit and it was very reasonable at only $1.50 per yard. The fabric was 60 inches wide.
- Any tote bag pattern would work. My pattern is a square that is approximately 15X17 inches. Cut the heavy interfacing the same size as the tote bag and iron on the wrong side. If you cannot find heavy duty interfacing, I have also used to layers of medium weight interfacing. Make sure you attach this before you sew the rose on the outside of your tote.
- To make the rose, I cut 3 strips across the width of the fabric that were about 4 inches wide. I then sewed the strips right sides together and folded in half lengthwise. To gather it, I laid string on the edge of the folded strip and set zig zag at widest and zigzagged over string, taking care not to catch in the string. Then I started gathering it up and started forming the rose from the center out on the bag, pinning in place. When I got it looking like a rose, I sewed it in on my machine. This is the part that takes the longest.
- To make the strap, I cut a 5 inch wide piece, cutting across the width of the fabric. I folded it in 1/2 and then folded that in 1/2 again to give me enough thickness to make a sturdy handle. I then top stitched the strap on the outside edges.
I cut two pieces of scrap fabric, approximately 7X3 inches to make a "loop" for the handles Sew right sides together lengthwise, leaving narrow end open. Turn. Fold in 1/2 and sew to ends of purse where seam is. This just serves as a loop to hold a ring to attach your handle to if you care to use the rings. You can also just sew the handle to the top of the bag before you put the lining in and omit the rings.
- I then make the lining the same as the bag, omitting the rose, of course, but put pockets across both sides of the lining. At this point, I sew the Velcro to each side of the lining, centering it in the middle of the top opening.
- I then put the wrong side of the lining to the right side of the bag, sewing it together at the top, but leaving an opening for turning either along the side or the bottom.
- I cut out a square of piece of plastic canvas and insert it in the opening between the lining and the bag and push it to the bottom to give the bottom some stability. Then sew opening shut.
I hope the picture is clear, because it makes a pretty bag. I get compliments on it everywhere I go. It would be pretty in a lighter fabric for summer too.
By Elaine from IA