Benetta
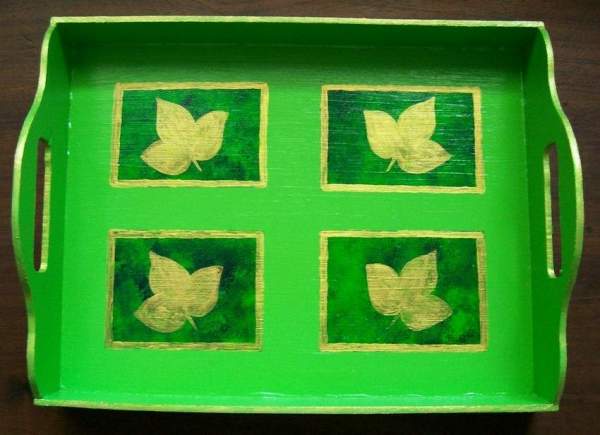
Silver Post Medal for All Time! 408 Posts One can change a relatively simple tray into something quite unusual through the application of painting and stenciling techniques.
Approximate Time:
Supplies:
- a small wooden tray, easily obtainable from most craft shops
It need not be made of an expensive or a very durable type of wood.
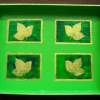
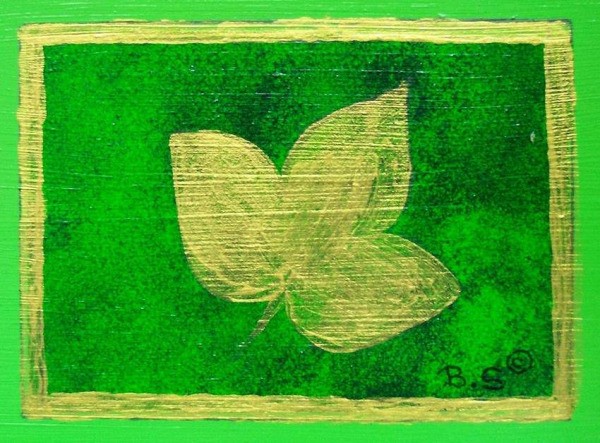
- acrylic paint in two colors of green
In the example I used leaf green for the background and emerald green for the sponging.
- gold acrylic paint
- a thick paintbrush, as well as a thin paintbrush
- fine sanding paper
- HB pencil to mark the rectangles on the tray before stenciling it
- a measuring tape
- two small sponges for the sponging
- quick-drying spray varnish
- two sheets of old newspaper
- one sheet of X-ray film, which will be used to make the stencil
- a sharp knife to cut out the design on the X-ray film
Instructions:
- Sandpaper the whole tray thoroughly inside and out. Dust well with a dry cloth before starting to paint.
- Paint the whole tray, inside and out, with the light green paint. Make sure that all the corners and edges are well covered with paint.
- Allow the paint to dry thoroughly. Apply a second coat of light green paint and then wait to dry for at least 12 hours before continuing with the next step of the project.
- Use the pencil and the measuring tape to mark on the bottom inside of the tray the four rectangles in which the stencil work will be done.
- Stick masking tape all around the outer edges of each of the four rectangles. This will prevent the paint from running when doing the sponging.
- Dip the sponge into the dark green paint. Remove excess paint from the sponge by dabbing it on one of the sheets of newspaper. Then do the sponging in each of the four rectangles.
- Once more allow the paint to dry thoroughly. Remove the masking tape once the paint is completely dry.
- Now use the gold paint and the stencil. For this example I used the design of a leaf for the stencil, but any other design will be suitable. One could even use two different designs, or four different ones, if so desired. Place the stencil in one of the four rectangles and stick it lightly to the bottom of the tray with masking tape, so that it will not move while applying the paint.
- Dip the second sponge into the gold paint and remove excess paint from the sponge by dabbing it on one of the sheets of newspaper. Then paint the stencil design onto the tray by repeatedly dabbing all over the design.
- Allow the paint to dry before the stencil is removed carefully. Then follow exactly the same procedure in each of the other three rectangles.
- As soon as all four the stencil patterns have been completed, one can use the gold paint to draw a gold frame around each of the four rectangles. Also use gold paint to highlight all the edges of the tray.
- Leave to dry thoroughly.
- To protect the paint from wear and tear, apply one coat of the quick-drying spray varnish.
Note: This article was first published on www.betterbudgeting.com
By Benetta from Pretoria, Gauteng
Add your voice! Click below to comment. ThriftyFun is powered by your wisdom!

June 22, 20110 found this helpful
That is so pretty. Great instructions! Hmmm. I wonder if I can find my wooden tray around here somewhere.
Add your voice! Click below to comment. ThriftyFun is powered by your wisdom!