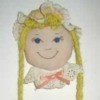
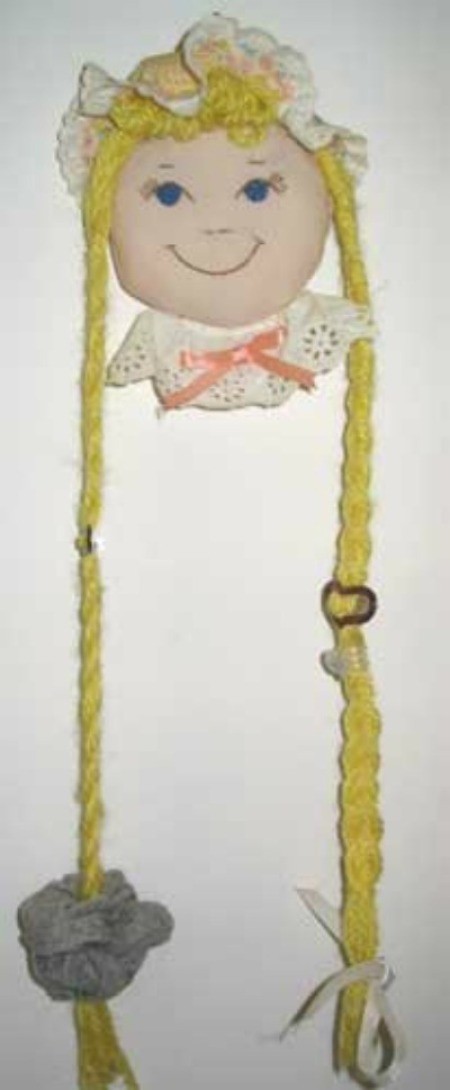
Are you tired of helping your daughter search for her hair clips and scrunchies? I have the perfect solution. Make her a doll to hang on the wall or door and she can put them there. They're always easy to find and it is easy to pick out the one she wants. It can be a cute decoration for her room or bathroom, too.
Material
- two 5 inch diameter circles of flesh colored cloth
- one 6 inch diameter piece of print fabric
- matching thread
- polyester or other stuffing material
- yarn for hair - 10, 48 inch pieces
- one piece of eyelet lace trim, 2 inches wide x 4 inches long
- one 20 inch piece of 1/4 eyelet lace trim
- 1/4 satin ribbon for trim
- fabric paint
Directions
- First, make the face. Cut out the flesh colored fabric into the two circles. Paint a smiling face on one piece. Let it dry. (I did this one in embroidery, but fabric paint is much easier.)
- Pin the two pieces of fabric, right sides together. Sew 1/4 inch from the edge leaving a 1 1/2 inch opening at the top of the face. Remove pins. Turn the fabric right side out. Stuff the face. Don't use too much stuffing because you want the face to be fairly flat. Sew the opening shut.
- Next, make the cap. Cut the print material into a 6 inch circle. Sew the 1/4 inch eyelet trim all around the edge of the material. Sew a basting stitch seam along the inside edge of the lace. Pull one thread of the baste thread to gather the cloth.
- Next make the hair. Attach securely the middle of all but one piece of yarn to the top of the face and down about two inches along the sides of the face. Then braid each side of the hair into braids going down the side of the face. Secure the ends like you would hair braids. Take the last piece of yarn and fold it back and forth into 2 inch loops. Sew this across the top of the face for bangs.
- Place the cap on the head. Adjust the basting thread to make the cap fit. Hand stitch to hold in place.
- Attach the edge of the 2 inch wide lace trim at the bottom of the face to form a collar.
- Make and attach a ribbon bow in the center of the collar.
- Now sew a yarn loop onto the top center back of the head to use as a hanger for the doll.
Hang this on the wall and have your child put her hair clips and other accessories to the braids to make the easy to find.
By Kim D.
Add your voice! Click below to comment. ThriftyFun is powered by your wisdom!

August 24, 20050 found this helpful
This is great ! I was always looking for a solution for my daughter's barettes..
By (Guest Post)
August 25, 20050 found this helpful
That doll is precious!!!!! Thanks for the neat idea. I plan on making one for my daughter

June 14, 20070 found this helpful
oh i love this idea.. bren
Add your voice! Click below to comment. ThriftyFun is powered by your wisdom!