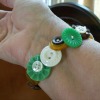
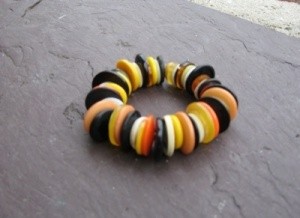
The Halloween button bracelet is a very simple project that can be done by adults and children. This project can be a very personal and special project because you can use new buttons or older buttons that may have been your mother's, aunt's, or grandmother's.
Advertisement
Approximate Time: 10 - 15 minutes
Supplies:
old, new, or used buttons
.8 or .1 mm jewelry beading elastic
Scotch tape or small clothespin
scissors
Instructions:
Cut a piece of jewelry elastic 9 inches long. (7 inches is generally the standard size for an adult bracelet and this leaves 2 inches to tie the knot.)
Then tape one end of the elastic to a desk or table and begin stringing your buttons onto the elastic starting with orange, then yellow, then white, and then black buttons. Repeat the process until your bracelet has been filled to 7 inches, leaving 2 inches to tie a knot.
Carefully remove elastic from taped surface or unclip the clothespin and take both ends of elastic and tie first overhand and then reverse the tie and pull elastic snug and then tie another reverse tie and pull snug and trim off excess elastic leaving a quarter inch tail on both tails. You can tie another knot if you would like to secure your button bracelet even further.
 The Halloween button bracelet is a very simple project that can be done by adults and children. This project can be a very personal and special project because you can use new buttons or older buttons that may have been your mother's, aunt's, or grandmother's.