If you always seem to be "on the go" then you surely understand that kids don't go anywhere without their "stuff." That is why this craft idea is so handy. With this easy-to-make backpack, your child can take their treasures with them wherever they go!
Materials:
Tools:
Steps:
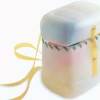
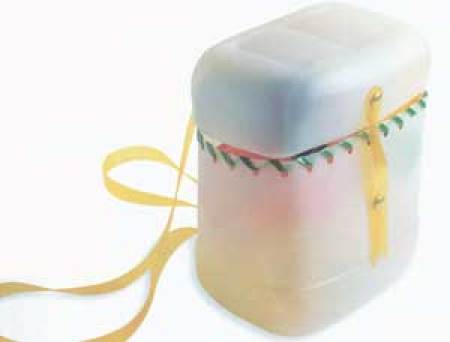
1. Cut off one of the milk jugs 6 1/2 inches above the base. This is the body of the backpack.
2. Cut off the other milk jug 2 inches above the base. This is the lid of the backpack.
3. Make holes with the hole puncher about 1/2 inch from the edge of backpack's body. Space the holes about 1/2 of an inch apart.
4. Wrap the plastic cord through the holes going over the edge and back through a hole to create a finished look.
5. Cut w 18 inch long pieces of plastic strips and another one 4 inches long.
6. Make a notch in one end of the short piece and round off the other end using scissors.
7. Cut two slits on one of the wide sides of the backpack's body. Make the slits near the bottom and about 4 inches apart. Also cut a slit in the center of the opposite side.
8. Make 2 slits in the lid. They need to be near the top and about 4 inches apart. Also, make a slit in the center on the opposite side.
9. Put the lid on the backpack, making sure that the two slits in the lid and the two slits in the body are on the same side. This will be the back of your backpack.
10. You need to attach one of the long straps from the slit on the right side of the lid to the slit on the right side of the body. Attach them with paper fasteners. Do not pull the straps tight - these are the straps you will use to hold the backpack over your shoulders.
11. Now attach the left side of the body to the left side of the lid in the same manner.
12. Finally, you need to add the button fastener for your backpack. Take the short plastic strip. The rounded end should be fastened to the hole in the lid front. The notched end should be fastened to the body part. Simply hook and unhook the clasp on the body to open and close your backpack.
Fill it up, strap it to your back, and you are ready to go! Now you will never have to leave home without everything you need!
Additional Ideas: You can paint your backpack with acrylic paints or decorate it with stickers!
© 2005 ThriftyFun
About The Author: Teri Clark's interest in the new and different has led to a successful online writing career collaborating on nearly 100 books and hundreds of articles as an editor, researcher, ghostwriter and author. The North Carolina resident, along with her husband, homeschools their four children. Learn more at http://ghost-writer.blogspot.com
Add your voice! Click below to comment. ThriftyFun is powered by your wisdom!
That's very fun, a row of those on a bookcase could be personally decorated and used to hold toys for my kids. Thanks for the idea. :)
WOW! THAT IS A REALLY COOL IDEA.IT LOOKS NEAT TO....YOU GO GIRL!!!AWESOME IT IS GREAT TO CARRY IN THE CAR FOR ODDS AND ENDS..
thats really awsome ~
i started to think of more uses for it (as applied to me in my own life) soon as i saw it
...i'm thinking a hinge is in order to make it a flip top
Add your voice! Click below to comment. ThriftyFun is powered by your wisdom!