ThriftyFun Logo
Home   Find   Ask   Share   Answer   Join   Index   Login  
 
 User Login:  Username:    Password:      Forgot It?  | Join ThriftyFun!

 - Beauty
 - Budget and Finance
 - Cleaning
 - Consumer Advice
 - Craft Projects
 - Craft Tips
 - Food Tips
 - Garage Sales
 - Gardening
 - Gifts
 - Green Living
 - Home Improvement
 - Organizing
 - Parenting
 - Parties
 - Pest Control
 - Pets
 - Product Reviews
 - Recipes
 - Repair
 - Weddings for Less

RSS Feed
About Us
Media
Advertising
Contact Us
Privacy Statement
Disclaimer

Modge Podge Designer Shelves

By Shauna Smith Duty
1x1
Date: 06/23/2005 Topics: Craft Projects > Home Decor > Bathroom | Photos > Crafts  
1x1
Post Feedback | Get Responses | Bookmark | Link | Print | Print (With Feedback) | Rate: Thumbs Up Thumbs Down | Bookmark and Share
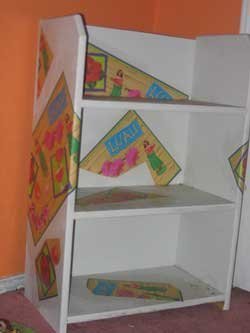
An old shelving unit can be renewed to look like a designer accent piece with just a little ingenuity. Whether you want to give your tired shelves color and life for a child's room or make them look sophisticated for a library, this project will allow you to create a perfect one-of-a-kind look for your specific décor.

What you will need:

  • Paper Napkins, Gift Wrap, or Placemats (or other printed paper that matches your décor)
  • Modge Podge
  • 2 Foam Paintbrushes (regular brushes will work)
  • White Latex Paint (or another base color)
  • Drop Cloths
  • Scissors

Clean your old shelving unit and set it on a drop cloth. Sand any rough edges and imperfections to create a smooth surface, then wipe down the unit with a dry cloth. Paint three coats of white or base color latex onto the unit, allowing time to dry between coats.

While the paint is drying, study your printed paper. Cut the paper into shapes you want to adhere to your shelves. For larger shelves, use larger shapes. A placemat can be used in its original form, but napkins and gift wrap should be cut into pieces that follow the printed design.

Once the shelves are dry, hold your paper shapes up to the unit to determine placement. Adhere the paper by painting Modge Podge onto the surface of your shelves in the area you want to place your paper. Then lay the paper against the tacky surface. Rub it flat with your fingers to remove air bubbles and wrinkles. Paint two layers of Modge Podge over the paper. Repeat until you have the desired amount of paper on your shelves. Finish your shelving unit with a coat of varnish to create a shiny surface, easy to clean.

This same application can be used on boxes, trunks, lamps, and other hard surfaces. Produce matching pieces by using the same printed paper on your shelves and accessories.

© 2005 ThriftyFun

About The Author: Shauna Smith Duty is a freelance writer with a penache for writing family and parenting articles. She composes articles for both print and web publications, reviews children's books and movies, writes short plays, and provides editing services. Visit her online at http://www.shaunasmithduty.com

(1x1 graphic )
Previous: 2 Course Meal for Under $4 ThriftyFun Next: Give Your Plants Companions
(1x1 graphic )
1x1
1x1
 Feedback
1x1
1x1
1x1

By (Guest Post)
Great idea! Thanks !
Jennifer CA

Posted on 07/04/2005 | Report Spam or Abuse

1x1
1x1
 Post Feedback:
1x1
1x1
1x1

Login using the form on the top of the page to post feedback (if you are a registered user). If you have not yet registered, click here to do so. It's FREE!.

1x1
(1x1 graphic )

© 1997-2009 ThriftyFun.com - Design by Cumuli Design
Disclaimer: ThriftyFun.com cannot accept any responsibility for any injury or damage that you may cause to yourself, others, or property when following any advice given on this site. Read the full disclaimer. If you find any information on ThriftyFun.com or in our newsletters that is either erroneous and/or potentially harmful to others, please Contact Us, immediately.