ThriftyFun Logo
Home   Find   Ask   Share   Answer   Join   Index   Login  
 
 User Login:  Username:    Password:      Forgot It?  | Join ThriftyFun!

 - Beauty
 - Budget and Finance
 - Cleaning
 - Consumer Advice
 - Craft Projects
 - Craft Tips
 - Food Tips
 - Garage Sales
 - Gardening
 - Gifts
 - Green Living
 - Home Improvement
 - Organizing
 - Parenting
 - Parties
 - Pest Control
 - Pets
 - Product Reviews
 - Recipes
 - Repair
 - Weddings for Less

RSS Feed
About Us
Media
Advertising
Contact Us
Privacy Statement
Disclaimer

Craft Project: Gold Rose Ornament

1x1
Date: 07/03/2009 Topics: Christmas > Decorations > Crafts | Craft Projects > Christmas > Decorations | Photos > Crafts  
1x1
Post Feedback | Get Responses | Bookmark | Link | Print | Print (With Feedback) | Rate: Thumbs Up Thumbs Down | Bookmark and Share
Craft Project: Gold Rose Ornament
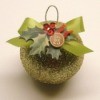
This charming, round Christmas ornament is fun and easy to make yourself. It comes out as a fancy golden rose ball with a traditional bow. Don't feel limited to keeping the roses gold though, you can make several of these ornaments using different colored roses too!

Approximate Time: 20 minutes without drying time

Supplies:

  • styrofoam ball, 2 inch
  • gold fabric roses, about 40 (1/2 inch big)
  • gold seed beads, about 40 (1/8 inch big or smaller)
  • sheer gold ribbon, 12 inches (1/3 inch thick)
  • gold wire edged burgundy ribbon, 20 inches (1 inch thick)

Instructions:

  1. Cut rose stems until they are 1 inch long.

  2. Take a rose and place a little glue at the end of the stem.

  3. Poke the stem into the Styrofoam ball.

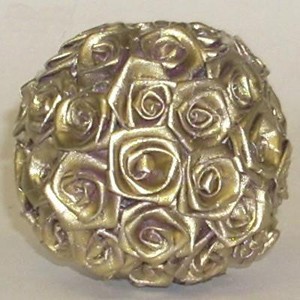
  4. Repeat process, placing roses close together, until the whole ball is covered.

  5. Take a tiny bit of glue and dab it into the middle of a rose.

  6. Glue a gold, seed bead to the middle of the rose.

  7. Repeat process until all roses have beads and let dry.

  8. Fold the sheer gold ribbon in half and knot the two ends together, leaving only a tiny bit of ribbon at the edges.

  9. Glue the ribbon onto the top of the ornament.

  10. Tie burgundy ribbon into a bow with long ends.

  11. Glue the bow over the place where the ornament and sheer ribbon meet.

  12. Let dry.

By Aysha from Boise, Idaho

(1x1 graphic )
Previous: Craft: Patriotic Wedding Topper ThriftyFun Next: Craft Project: Americana Crocheted Coasters
(1x1 graphic )
1x1
1x1
 Feedback
1x1
1x1
1x1

By Butterflytouch (49) Contact
Very beautiful! Nice to see another person from Idaho posting! From Burley here!

Posted on 07/14/2009 | Report Spam or Abuse

1x1
1x1
 Post Feedback:
1x1
1x1
1x1

Login using the form on the top of the page to post feedback (if you are a registered user). If you have not yet registered, click here to do so. It's FREE!.

1x1
(1x1 graphic )

© 1997-2009 ThriftyFun.com - Design by Cumuli Design
Disclaimer: ThriftyFun.com cannot accept any responsibility for any injury or damage that you may cause to yourself, others, or property when following any advice given on this site. Read the full disclaimer. If you find any information on ThriftyFun.com or in our newsletters that is either erroneous and/or potentially harmful to others, please Contact Us, immediately.