Can you make earrings from ice cream sticks? That was the challenge a friend was gave me.
Back then as a student, I would make jewelry out of anything that caught my attention. A worn out tubing from an old sewing machine. A broken plastic stick. Shells. Paper clips. These would be transformed into costume jewelry behind closed doors in my hostel room. How I did that, the things I used. All that was top secret, while I was still selling my hand made jewelry.
Now that I have long since quit making jewelry and have other sources of income, I am willing to share my secrets with you.
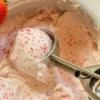
My friend who knew my hobby had just finished an ice cream with 2 sticks. I bet with her I could make earrings out of those. She took on the bet and gave me the ice cream sticks. I set off to work.
First, I washed those sticks thoroughly with plenty of soap and water. The last thing you want on your earrings are lots of ants running over them because of left over ice cream.
Now, those ice cream sticks were made of wood. Wood is a very versatile material that can be transformed into virtually anything. The ice cream sticks were way too long to be worn as they were, so they had to be broken up. Out came my trusty old pen knife.
For the next 2 or 3 hours or so, I slowly, patiently sawed those ice cream sticks into smaller pieces, about an inch long per piece.
Now I have lots of wires I used for jewelry making. They look like gold and silver, but they are of much cheaper materials. Everyone knows they are not gold and silver, and I warn them that the gold colored ones will tarnish, but the color turns into a bronzey shade that still goes well with my choice of materials.
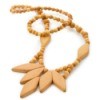
I use these wires to join the pieces of ice cream stick with the rest of the design. I chose some black plastic beads as they are light and they go well with gold and that combination would look great on my pal.
The next challenge was to get these wires through the sticks. I did not have a drill. Can you imagine the chaos if the school authorities were to hear drilling sounds coming from a hostel room. We were supposed to be studying anyway. All I had were pin, needles, and a metal pencil box. I used a pin as a nail and a metal pencil box as a hammer and spent the next 2 hours or so slowly hammering holes near the edges of each wooden stick. Once the pin penetrated right through the stick, I would slowly twist the wire securely, right through the hole and twist the ends together to secure them.
Now came my trusty can of gold paint. I lined the floor with old newspaper, placed the pieces of ice cream sticks with the wires secured in them and spray painted both sides of the sticks. Spray one side first. Leave it an hour or 2 to dry while I go out for some fresh air. Spray the other side and let it dry while I go out for more fresh air. Come to think of it, there were rumours going on about me glue sniffing.
I could never fathom then how they could think about such a thing. Now I realize the closed doors to hide my trade secrets and all those spray paints I use for my jewelry gave people the wrong impression.
Finally, with everything in place, I would string the wire through my chosen beads and then through the bottom hole of the stick above it, forming a long chandelier type earring. 2 of those made a pair of earrings that would look stunning on her. The final wire at the top of each earring would be twisted and looped into the eye of an earring hook, and twisted above the bead again to fasten it securely.
The final result was a pretty pair of black and gold chandelier earrings.
Later, I met her again with the rest of our pals. Our gang of girls having our regular chats. I proudly presented her with these earrings. While the rest of the girls were admiring my latest works, she was laughing away as she knew the origins of these earrings.
I do miss those days. Have not seen them since we left the hostel as we are from different countries. You know who you are. This is what I have been up to lately.
I have since stopped making earrings. It is a lot easier on my hands buying them instead.
Janice