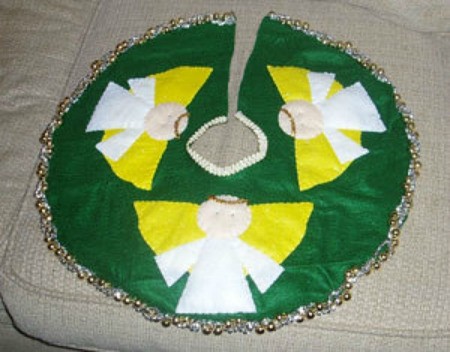
This Christmas tree skirt gives your tree that country-home feel. It is simple to make and can be embellished in any number of ways. Since it is all done with felt, the sewing can even be done by the novice or use a dull needle to let a child sew on the pieces.
Supplies:
- 2 large felt squares (in color of your choice)
- 2 felt squares each of white, yellow, peach
- gold pipe cleaners
- embroidery needle
- embroidery/cross stitch thread in white, yellow, peach, blue, and green/gold
- scissors
- quilt batting
- bead garland, ribbon, or lace
Instructions:
- Take large felt squares and cut out 2 large circles to fit under your Christmas tree. In center of circles, cut smaller hole to fit around base of tree. Cut slit from outside to inside along back of circles.
- Take white felt square and cut three triangles with flat top. The triangles from top to bottom should be 1/2 the length of the radius of the skirt. This will be the body of the angel.
- Cut small right angle triangles from the white felt for the sleeves.
- Take the yellow felt. Fold it in half and cut out the angel wings. Each wing should be at least an inch longer than the angel's body. If you fold it in half, you will be able to cut out one piece with two wings.
- With the peach felt, you will need to cut out three large circles for the head of each angel. The circles should be one third the size of the body of your angel.
- Take the quilt batting and use the body to cut out three pieces of batting the same shape as the body. Do the same with the angel's head.
- Begin by pinning the angel wings to one piece of the tree skirt. Then use two strands of yellow embroidery thread to make large stitches sewing the wings to the skirt.
- Then pin the sleeves to the skirt. You should place the body of the angel so that the bottom of the body comes at least 1/2 to 1 inch beneath the bottom of the wings and fit the sleeves under the body to determine placement.
- Then pin the body of the angel to the skirt with the body shaped batting under the felt. Remember, the top of the triangle should be placed so that at least 1/2 to 1 inch of the body comes below the body of the wings. Continue to sew on the body with the same large stitches you used on the wings, but use the white embroidery thread.
- Take the flesh circles and the quilt batting and pin at the top of the triangle for the head. Use the peach colored threat to sew on the head.
- Using 6 strands of the blue embroidery thread (you can also use brown, black, or green) sew eyes toward the center of the face. You sew a small "X" and then a "+" for each eye.
- Take the gold pipe cleaners and cut a piece to form a light "U" for the halo and sew it toward the top of the head.
- Sew the finished front of the tree skirt to the back of the tree skirt using large stitching on the outside of the skirt.
- For embellishment, cut a piece of garland, ribbon, or lace to fit the outside of the skirt. Stitch onto the outside of the circle. Cut a smaller piece to fit the inner circle and stitch on.
- Place under tree.
Add your voice! Click below to comment. ThriftyFun is powered by your wisdom!

December 19, 20050 found this helpful
What a beautiful tree skirt!
Add your voice! Click below to comment. ThriftyFun is powered by your wisdom!