I had so much trouble locating directions on the internet for making a "solo" cup light ball that I just created my own free website that gives easy to follow step-by-step instructions. I call them sparkleballs. These balls cost under $10 to make (if the season is right for buying Christmas mini-lights) and they can be used to decorate showers, weddings, parties, teen's rooms; as well as at Christmas.
My website is http://www.sparkleball.com (it has lots of photos). Once again, I earn nothing from this. It is all free and in the spirit of thrifty crafting. If you'd like to share a photo of your creation, please let me know. I'm just a fanatic, fascinated by this American craft. Thanks for sharing!
Sparkleball Lady from San Diego, CA
Editor's Note: This looked so easy and pretty that we decided to make one for the site. It took about an hour but the next ones will go faster. The cups cost about $5.00 for 2 packs of 40 (you need 50), but you could probably get them in bulk for cheaper. We had the lights on hand but basic 100 strand light strings are usually only a dollar or two. We also needed to buy a cheap soldering iron, which was $8.00, but you might have one already.
The instructions on the site are detailed and have step by step photos. Here are a couple of helpful hints that we figured out along the way:
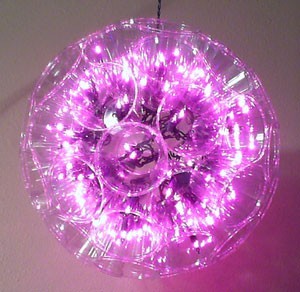
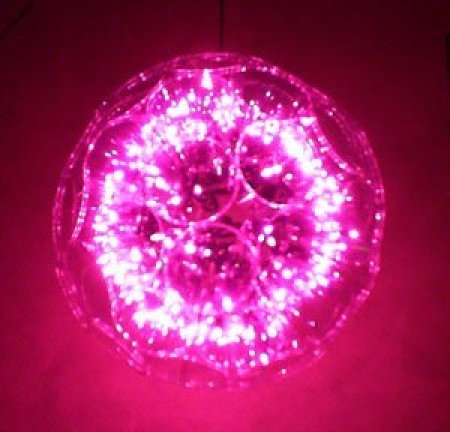
That's it, they are very sparkly and impressive when completed. The finished light is about the size of a small beach ball (about 13 inches in diameter). The lower photo is with the lights on, so you can see more detail.
Add your voice! Click below to comment. ThriftyFun is powered by your wisdom!
Wow! Clearly experts at work here. The tips you add are excellent and will make all the difference to someone making a sparkleball for the first time. Thanks for sharing your expertise and photos.
I made this years ago, the directions in which I had were to staple the cups together, your way seems that it would hold a lot better. They do indeed look really cool!
I, too, made these years ago using staples rather than a soldering iron. They look just as nice when put together with staples, so if you have a household stapler but you don't have a soldering gun or don't want the melted plastic fumes, give it a try!
What color cups and lights did you use to
make yours? Very pretty!
The one pictured above is made with clear cups and purple lights (kind of a pinky purple). We just used what we had on hand.
My children and I make these every year. They're cheap to make and very beautiful to look at. I use staples to make them. I also add garland in the middle to hide the green wire from the lights.
This year, we tried something different. We made two half balls and I placed the open part of the ball against my house and they look like a whole ball and they're just a nice. They look like they're coming out of the house ! You get two for one !
These are the coolest things ever, thanks for the great idea and website with clear directions.
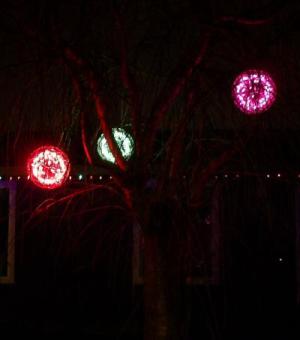
Here are some sparkleballs in our front tree. We are planning on adding more as we make them.
Jess
I've had one for several years now that I bought from a neighbor. She used the programmable lights and boy does it ever put on a great light show! I hang it on my front porch for all the neighbors to see and I get a lot of comments on how much they enjoy watching the colors change and "dance".
Locally there's a long street where homeowners have them hanging in the trees lining the street. It looks like they have covered them with clear plastic food wrap to keep the rain out them.
Hello from Canada!
I'm a sixty year old grumpy political activist on the Internet. Scrooge could take lessons from me! Life was not much fun until one day two weeks ago, I found your Sparkle Ball on ThriftyFun.com.
I love to make these! I have found that Sam's Club sells the best cups for this project. They are less than $8 for 400 cups and they don't smell when they are melted.
We've tried several times to make this sparkeling ball. It looks wonderful. We seem to be having a lot of trouble when it comes to bending the 12 or the roll of 9. While trying to pull it together to form a circle, them want to pop, crack or just break apart. We keep putting them back together but they start to look a bit trashey after so many meltings. Can you tell me how to bring them together to form a circle a little easier. Looking back on these we've wasted about 245 cups. Please help....
I had the same problem this year. Please let me know if/when you hear anything.
Try just a stapler
TJ,
Don't bend them, just melt them in place. Start with one cup and melt the next one to it, then the next one. Just build it as you go. Sometimes it is helpful to hold in place for a second or two so that it the melted plastic cools. The angle of the cups should continue in a circular shape until you get to the last one of the twelve. It should fit between the first and the last melted cup easily and then you can complete the circle. I would go through and Then start stacking the first of the 9 on top, melt it into place, and then add the next and so on. The last four sort of fit in any way they can.
We usually melt all the holes in the bottom of the cups first, then do the halves, one at a time. I have only had one break out of the dozen or more that we have done and that was dropped from several feet onto the ground.
sparkleball.com has nice step by step instructions but if you have any more questions, please just leave me another feedback or click on my name to send me a message directly through ThriftyFun.
I'm so sorry you have been having such a hard time. We have been very lucky. Our only tragedy has been when we dropped the hot soldering iron and bent the tip.
Good luck!
Oh and Joseph, I got my cups at Fred Meyer, which I doubt you have up there (they are a Kroeger store now). I have seen them at Target and I heard you could get them at Walmart but I don't shop there for any reason. I looked online but the prices were much higher than buying them at the grocery store. I've also seen them at Safeway and Alberton's. They need to be the 9 oz. squat cups, very broad.
Jess
I just added "no-melt" sparkleball instructions to www.sparkleball.com. Perhaps that would work better for TJ. You use the softer plastic (Solo or Solo-style) 9oz cups and zip-ties. Check it out.
We cant seem to find any suitable cups in Canada. Are SOLO still available? The ball we end up with, takes 80 to 100, 9 oz cups. Just cant seem to find the SQUAT cups, please help. Should we be gluing just the BOTTOM of the cups together, or the rims as well?
DG, we melted the bottoms and the edges, a join wherever it is touching. I know there is another brand of cups other than Solo but you really need the short and squat ones. I know you can order them online but they tend to be a lot more expensive than at my local stores. We found them at Target, not sure if that is available in Canada. Maybe you could ask your larger supermarket to special order them, or maybe ask at party supply stores?
Hi, I thought I would update you all on our sparkleballs one year later. My husband has been asked by two different people at work to make sparkleballs for them. He is charging $25.00 and has sold 5 so far. He is getting very fast at doing them. It took him about 2 hours to make 3, start to finish.
He is experimenting with LED lights and chaser lights, both of which seem to work very well.
One tip: If possible, buy the white cord lights, they look much nicer finished. I might try hiding some of the green ones with garland inside to hide it.
I have seen these balls used for placing on your awning when camping. They look really neat.
Linda
i'm wondering if you could hot glue the plastic cups together?
I never had luck using a glue gun. I've used a soldering iron and a hole puncher (with zip-ties) and others have told me that they've stapled the cups together. The glue just didn't bond well with the plastic cups for some reason.
If you're having trouble joining the cups, remember to join them at their bases (not the rims). This trick will insure that the first circle and next layers can splay out with a little give, rather than be too rigid and maybe break apart. Sometimes there are even gaps between the cup rims.
Good luck!
GREAT job Editor and thanks for your hard work! :)
Every year a neighbor puts across the front of their house. By day they look goofy out there.. by night they are BEAUTIFUL!
I use clothespins to hold the cups together while i solder them. Sure beats burned fingers. You can also use clothespins to try different sized cups to see how it will turn out before you attach them.
These are the most creative handmade things I've ever seen! They should be more than 10 bucks!
Those are amazing, when I first saw the picture of them, I had to see how they were made and what they were...how creative!
This would be probably the most creative thing I have seen on this site!
Can you use Styrofoam cups for this project? I made one with the plastic cups a few years ago....plastic was too HARD and had a LOT of cracks. Can't find the softer plastic cups (well, I DID find colored ones but not sure how the lights would show up).
I bet you could use styrofoam cups but the look would be very different. Not so sparkly and with more of a glow. My concern would be keeping them attached without breaking the styrofoam cups, which are much more fragile than plastic ones. The best plastic ones I have used are the Solo brand small clear ones, like you might see at a cash bar for serving wine. These are squat, not the textured clear ones that are very rigid. You should be able to squish the cup a bit without it cracking.
Good luck and please post your version when you get it done. I'd love to see it.
I should make some new Sparkleballs for this holiday season.
Oh, and colored cups look pretty great. I would only use white lights in them to emphasis the color.
Add your voice! Click below to comment. ThriftyFun is powered by your wisdom!